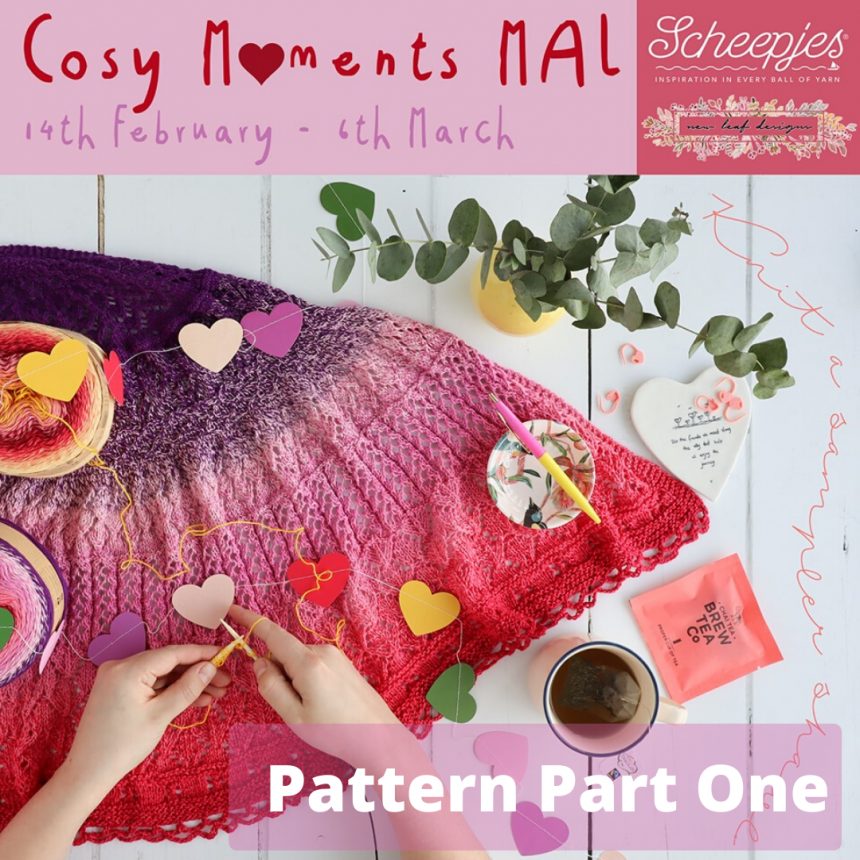
Cosy Moments Shawl – Pattern Part One
Get the full PDF pattern via my stores:
Shop the PDF version here Purchase on Ravelry
Hello everyone, and welcome to part one of the Cosy Moments Shawl pattern! Be sure to share your progress in the Scheepjes Facebook Group, any questions can be shared there as well. This part will include the cast on, increase and moss stitch section, and Lace Sections 1 & 2. On each of these sections I will have videos, please find them in this blogpost as well. This MAL is kindly sponsored by Scheepjes.
Welkom bij Deel 1 van het Cosy Moments Shawl patroon! Deel jouw voortgang in de Scheepjes Facebook groep, hier kun je ook vragen stellen. Dit eerste deel bestaat uit de opzet, meerderingen, en kantpatronen 1 & 2. Voor elk van deze delen heb ik video’s opgenomen in het Engels, deze kun je in deze blogpost vinden. Deze MAL wordt liefdevol gesponsord door Scheepjes.
What is the Cosy Moments Shawl?
The Cosy Moments Shawl is a lace sampler shawl knitting pattern, meaning you will learn several new techniques and lace stitch patterns during the making of this shawl.
De Cosy Moments Shawl is een breipatroon voor een kanten omslagdoek, waarbij je veel nieuwe technieken en steekpatronen zult leren.
Can I knit this shawl? | Kan ik deze omslagdoek breien?
The Cosy Moments Shawl is aimed at intermediate knitters. You will need to be comfortable with using a circular needle, and confident in your knit and purl stitches. All other stitches will be explained in the videos. You don’t need to have experience with lace knitting specifically. If you are a beginner knitter, please feel free to check out my beginner knitting patterns first.
De Cosy Moments Shawl is bedoeld voor redelijk gevorderde breiers. Kun je goed met een rondbreinaald overweg en heb je de rechte en averechte steken onder de knie, dan kun je dit patroon proberen. Alle andere steken worden namelijk uitgelegd in de video’s. Je hoeft nog geen ervaring te hebben met kantbreien. Als je nog een beginnende breier bent kun je ook een kijkje nemen bij mijn beginner breipatronen.
Yarn and other Materials | Garen en andere materialen
Recommended yarn: Scheepjes Whirl (60% Cotton, 40% Acrylic; 1000m/220g)
1 ball of your choice
Recommended needle size: 3mm circular needles of 80cm length
Alternative yarn: Scheepjes Whirligig (80% Virgin Wool, 20% Alpaca; 1000m/450g)
1 ball of your choice. Additional Whirligigette is optional to lengthen shawl.
Recommended needle size: 3.5mm circular needles of 100cm length
Other materials: Scissors, Darning needle, 2 stitch markers, row counter, optional: cable needle.
Get all materials for the Cosy Moments Shawl via your local Scheepjes store, or purchase them via the affiliate links below:
Aanbevolen garen: Scheepjes Whirl (60% Katoen, 40% Acryl; 1000 m/220 g)
1 bol naar keuze
Aanbevolen naalden: 3 mm rondbreinaalden van 80 cm lengte
Alternatief garen: Scheepjes Whirligig (80% wol, 20% alpaca; 1000 m/450 g)
1 bol naar keuze. Eventueel kun je het patroon verlengen met een Whirligigette.
Aanbevolen naalden: 3,5 mm rondbreinaalden van 100 cm lengte
Overige materialen: Schaar, Stopnaald, 2 steekmarkeerders, toerenteller, optioneel: kabelnaald.
Alle materialen voor de Cosy Moments Shawl kun je kopen bij jouw Scheepjes winkel, of koop ze online via de volgende affiliate links:
Wool Warehouse (UK)
Caro’s Atelier (NL)
Finished Dimensions | Afgewerkte grootte
Length from tip to tip along straight edge: 135cm.
Depth down the middle: 60cm.
Finished dimensions for the Whirligig version is yet unknown, but will be larger.
Lengte van punt naar punt langs rechte zijde: 135cm.
Diepte in het midden: 60cm.
Afmetingen van de Whirligig versie zijn nog onbekend, maar zullen groter zijn.
Used Abbreviations | Gebruikte Afkortingen
| Knitting Abbreviations | Afkortingen Breien |
| [ ] number of sts on a given row
k knit k2tog knit two stitches together through the front loops kfb knit into the front and back loop of the same st (1 st increased) inc increase m marker p purl pm place marker rep repeat RS right side sm slip marker sl1, k2tog, psso slip 1 st knitwise, knit 2 sts together, pass slipped st over (2 sts decreased) ssk slip slip knit: slip 2 sts knitwise one by one, then insert left needle back into sts and knit together st(s) – stitch(es) WS wrong side yo yarnover
|
[ ] het aantal steken in een rij
1afh.2r.sbr.overh 1 s recht afhalen, 2 stn recht samenbreien, afgehaalde s overhalen (2 stn geminderd) 2afh.1r haal twee stn één voor één recht af, steek linkernaald van links naar rechts in de stn en brei ze recht samen (1 s geminderd) 2r.sbr twee stn recht samenbreien AK achterkant av averecht GK goede kant herh herhalen/herhaling m afh stekenmarkeerder afhalen m stekenmarkeerder meerd meerderen/meerdering omsl omslag pm plaats stekenmarkeerder r recht rva recht voor achter: brei in voor- en achterkant van s om 1 s te meerderen s/stn – steek/steken volg volgende
|
Chart Legend | Legenda
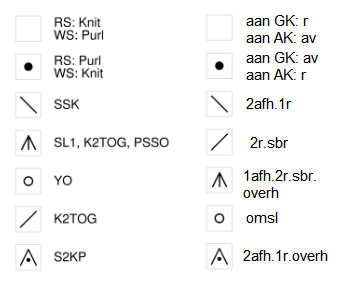
Gauge | Stekenverhouding
Scheepjes Whirl: 27 sts and 33 rows of stockinette measure 10x10cm (4×4″) with 3mm needles
Scheepjes Whirligig: 21 sts and 27 rows of stockinette measure 10x10cm (4×4″) with 3.5mm needles
Please note: For Whirligig you need to unravel the swatch yarn to re-use for your shawl.
Scheepjes Whirl: 27 stn en 33 rijen tricotsteek meten 10 x 10 cm met 3 mm naalden
Scheepjes Whirligig: 21 stn en 27 rijen tricotsteek meten 10 x 10 cm met 3,5 mm naalden
Let op: voor Whirligig moet je het garen van je proeflapje uithalen om voor je omslagdoek te gebruiken.
Pattern Notes | Patroon Opmerkingen
The Cosy Moments Shawl pattern features eight different lace patterns to create a beautiful shawl. With lace knitting, counting is the key, so make sure you always have the correct stitch count. The stitch count is shown as [12+8 sts] meaning 12 body sts and 8 edge sts, 4 sts on each side. The 4 extra sts on either side are always worked knitwise on both RS and WS throughout the entire shawl.
Het Cosy Moments Shawl patroon bestaat uit verschillende kantpatronen die samen een prachtige omslagdoek vormen. Met kant breien (ook wel ajourbreien genoemd) is het belangrijk om op elke rij het correcte aantal steken te hebben. Het stekenaantal wordt weergegeven als: [12+8 sts]. Dit betekent 12 stn voor het hoofdgedeelte van de omslagdoek en 8 randsteken, 4 aan elke zijde. De 4 stn aan elke zijde worden altijd recht gebreid, gedurende de hele omslagdoek.
Reading Lace Charts | Breischema’s lezen
The stitch patterns for this shawl will be shown in charts, and I’ve also written out the charted patterns to give you some extra guidance. In knitting charts, each square represents a stitch.
For this pattern, the chart applies to the stitches in between your stitch markers. The four stitches on the outside of the markers should ALWAYS be worked knitwise.
The first stitch on the bottom right of your chart corresponds with the first stitch after your first marker. Knitting charts are always read from bottom to top. The first row and all following RS rows on the chart are read from right to left.
Once you have completed knitting the first row, including those four stitches after the second marker, turn your work to the wrong side to knit the second row. This time, you will read the chart from left to right, the same goes for all following WS rows.
On larger charts, the WS rows are often omitted to make the chart more compact. In most cases you will just need to purl all stitches but refer to the written version to be sure.
If there’s a red box in your chart, this indicates the repeat. Often, there will also be stitches before or after this red box. The stitches to the right of the red box should ONLY be knit at the beginning of your row, and the stitches to the left of the red box should ONLY be knit at the end of your row. Please note this is reversed on WS rows.
The symbols inside the squares indicate which stitch should be knit. Please refer to the Chart Legends above. Please note that some symbols mean different stitches when used on the WS as opposed to the RS. For example, while an empty square signifies a knit stitch on the RS of your work, it signifies a purl stitch on the WS of your work, so pay attention to that.
TIP: if you’re a beginner knitter, you might want to place extra stitch markers, one between each repeat of the chart. Please note to remove these extra markers when you’re moving on to a new chart.
De stekenpatronen voor deze omslagdoek worden getoond in schema’s, maar ik heb ze ook uitgeschreven voor extra duidelijkheid. In breischema’s staat elk vakje voor één steek.
Voor dit patroon verwijst het breischema altijd slechts naar de steken TUSSEN de stekenmarkeerders. De 4 steken aan de buitenzijde van de stekenmarkeerders worden op elke rij recht gebreid.
De eerste steek rechtsonder in het schema staat voor de eerste steek ná je eerste marker. Breischema’s worden altijd van beneden naar boven gelezen. De eerste rij en alle volgende GK rijen op het schema lees je van rechts naar links.
Na de eerste rij, keer je je werk naar de AK voor de tweede rij. Deze rij en alle volgende AK rijen lees je van links naar rechts op het schema.
Bij grotere schema’s worden de AK rijen vaak weggelaten om het schema compact te houden. In de meeste gevallen hoef je de AK rijen alleen maar averecht te breien, maar lees voor de zekerheid de geschreven versie.
Een rood vak in het schema duidt de patroonherhaling aan. Soms zijn er ook steken vóór en/of ná dit rode vak. De steken rechts van het rode vak moeten ALLEEN gebreid worden aan het begin van een rij, en de steken links van het rode vak brei je ALLEEN aan het eind van de rij. Let op, bij AK rijen geldt dit andersom.
De symbolen in de vakjes staan voor het type steek, bekijk hiervoor de legenda. Let op, sommige symbolen betekenen wat anders afhankelijk van of het een GK of AK rij is.
TIP: maak het jezelf gemakkelijk en plaats stekenmarkeerders tussen elke herhaling van het schema. Verwijder deze markeerders weer als je verder gaat naar een nieuw schema.
Pattern – Part One
Garter Tab | Opzet
Use “Judy’s Magic Cast on” to CO 8 sts, 4 sts on each of the two needle tips.
Turn your work clockwise until your needletips are facing to the right, work in rows. Only work on 1 set of the 4 sts. The other set of 4 sts will be left to pick up later.
Knit 10 rows of garter stitch (knit every row). Use a row counter to keep track.
After knitting the 10th row, do not turn your work. Instead, rotate your work clockwise to pick up stitches from the ‘long side’. Pick up and knit 6 stitches on this long side.
Note: traditionally, patterns state to knit 2 garter rows for each stitch to be picked up, so you might think I’ve made a mistake by only knitting 10 rows. However, if you knit 12 rows so you can easily pick up the 6 sts, there will be a little ‘bump’ in your shawl here. With knitting just 10 rows, it’s more likely for your shawl to lay flat.
Now knit the 4 sts which were left on your needle from the cast on. [14 sts]
Gebruik “Judy’s Magic Cast on” en zet 8 stn op, 4 stn op elke naaldpunt van je rondbreinaald.
Keer na het opzetten je werk met de klok mee totdat de naaldpunten naar rechts wijzen. Brei nu in rijen, alleen op 1 set van de 4 stn. De andere set van 4 stn pakken we later weer op.
Brei 10 rijen in ribbelsteek (elke rij recht breien).
Na de 10e rij keer je je werk met de klok mee om steken op de pakken aan de lange zijde. Pak 6 stn op aan deze zijde en brei deze recht.
Let op: normaal gesproken vragen patronen om 2 rijen in ribbelsteek te breien voor elke op te pakken steek, dus 12 rijen in dit geval. Dit vergemakkelijkt het oppakken van de steken. Ik heb echter expres gekozen voor 10 rijen, zodat je minder kans hebt dat je omslagdoek gaat bobbelen.
Brei nu de 4 stn die nog over zijn van de opzet. [14 stn]
Increases and Moss Stitch Section | Meerderingen
TIP: Count your stitches after every row! Use a row counter so you don’t lose track of the rows.
Row 1 (WS) K4, pm, p6, pm, k4, turn.
Row 2 (RS)(inc) K4, sm, kfb until m, sm, k4, turn. [12+8 sts]
Row 3 K4, sm, *p1, k1* until m, sm, k4, turn.
Row 4 Rep Inc Row 2: k4, sm, kfb until m, sm, k4, turn. [24+8 sts]
Row 5 Rep Row 3
TIP: from the next row, we will be starting a little moss stitch section. If you forget which side is RS/WS, remember the moss stitch pattern starts on RS with k1, and on WS with p1.
Row 6 K4, sm, *k1, p1* until m, sm, k4, turn.
Row 7 K4, sm, *p1, k1* until m, sm, k4, turn.
Rows 8-11 Rep Rows 6-7 twice.
Row 12 Rep Inc Row 2: k4, sm, kfb until m, sm, k4, turn. [48+8 sts]
TIP: put in a lifeline after Row 12, before the first lace panel starts. Put some smooth contrasting yarn on a needle and thread it through all of the sts, Be sure to NOT thread it through the stitch markers. If you put in a lifeline, note down somewhere at which row this is. For your convenience, put in a lifeline after each lace section.
Row 13 K4, sm, p to m, sm, k4, turn.
TIP: Tel je steken na elke rij! Gebruik ook een toerenteller zodat je niet vergeet op welke rij je zit.
Rij 1 (AK) 4r, pm, 6av, pm, 4r, keer.
Rij 2 (GK)(meerd) 4r, m afh, rva tot m, m afh, 4r, keer. [12+8 stn]
Rij 3 4r, m afh, *1av, 1r* tot m, m afh, 4r, keer.
Rij 4 Herh Meerd Rij 2: 4r, m afh, rva tot m, m afh, 4r, keer. [24+8 stn]
Rij 5 Herh Rij 3
TIP: vanaf de volgende rij beginnen we een stukje in gerstekorrel steek. Als je vergeet welke kant de GK/AK is, weet dan dat het patroon op de GK begint met 1r, en op de AK met 1av.
Rij 6 4r, m afh, *1r, 1av* tot m, m afh, 4r, keer.
Rij 7 4r, m afh, *1av, 1r* tot m, m afh, 4r, keer.
Rijen 8-11 Herh Rijen 6-7 twee keer.
Rij 12 Herh Meerd Rij 2: 4r, m afh, rva tot m, m afh, 4r, keer. [48+8 stn]
TIP: plaats een levenslijn na Rij 12, voordat je met het eerste kantpatroon begint. Neem wat contrasterend glad garen (zoals Scheepjes Catona) en haal het met een stopnaald door alle stn. Haal het NIET door de stekenmarkeerders. Maak ergens een notitie wanneer je een levenslijn inbrengt. Maak het jezelf gemakkelijk en doe dit na elk kantpatroon.
Rij 13 4r, m afh, brei alle stn av tot m, m afh, 4r, keer.
Lace Section 1 (Pattern A)

This pattern is repeated over 4 sts and 4 rows. Please note there are extra sts before the first repeat and after the last repeat.
| Written version of Pattern A:
Row 1 (RS) P1, *p2, yo, ssk; rep from * until 3 sts before m, p3. Row 2 (WS) K3, *p2, k2; rep from * until 1 st before m, k1. Row 3 P1, *p2, k2tog, yo; rep from * until 3 sts before m, p3. Row 4 Rep Row 2. |
Rows 14-23 Knit 10 rows of pattern A. Please remember to knit the 4 sts on either side knitwise on all rows.
Row 24 (inc) Rep Inc Row 2: k4, sm, kfb until m, sm, k4, turn. [96+8 sts]
Row 25 K4, sm, p to m, sm, k4, turn.
De patroonherhaling bestaat uit 4 stn en 4 rijen. Let op de extra stn voor de eerste herhaling en na de laatste herhaling.
| Uitgeschreven versie van patroon A:
Rij 1 (GK) 1av, *2av, omsl, 2afh.1r; herh vanaf * tot 3 stn voor m, 3av. Rij 2 (AK) 3r, *2av, 2r; herh vanaf * tot 1 st voor m, 1r. Rij 3 1av, *2av, 2r.sbr, omsl; herh vanaf * tot 3 stn voor m, 3av. Rij 4 Herh Rij 2. |
Rijen 14-23 Brei 10 rijen van patroon A. Denk eraan de 4 stn aan elke zijde altijd recht te breien.
Rij 24 (meerd) Herh Meerd Rij 2: 4r, m afh, rva tot m, m afh, 4r, keer. [96+8 stn]
Rij 25 4r, m afh, brei alle stn av tot m, m afh, 4r, keer.
Lace Section 2 (Pattern B)

This pattern is repeated over 8 sts and 6 rows.
| Written version of Pattern B:
Row 1 (RS) *K1, yo, ssk, k3, k2tog, yo; rep from * until m. Row 2 and all WS rows P all sts until m. Row 3 *K2, yo, ssk, k1, k2tog, yo, k1; rep from * until m. Row 5 *K3, yo, sl1, k2tog, psso, yo, k2; rep from * until m. Row 6 P all sts until m. |
Rows 26-49 Knit 24 rows of pattern B. Please remember to knit the 4 sts on either side knitwise on all rows.
Row 50 K4, sm, k to m, sm, k4, turn.
Row 51 K4, sm, p to m, sm, k4, turn.
Row 52 (inc) K4, sm, *yo, k1* until m, sm, k4, turn. [192+8 sts]
Row 53-54 K4, sm, p to m, sm, k4, turn.
Row 55 K4, sm, k to m, sm, k4, turn.
De patroonherhaling bestaat uit 8 stn en 6 rijen.
| Uitgeschreven versie van patroon B:
Rij 1 (GK) *1r, omsl, 2afh.1r, 3r, 2r.sbr, omsl; herh vanaf * tot m. Rij 2 en alle AK rijen Brei alle stn av tot m. Rij 3 *2r, omsl, 2afh.1r, 1r, 2r.sbr, omsl, 1r; herh vanaf * tot m. Rij 5 *3r, omsl, 1afh.2r.sbr.overh, omsl, 2r; herh vanaf * tot m. Rij 6 Brei alle stn av tot m. |
Rijen 26-49 Brei 24 rijen van patroon B. Denk eraan de 4 stn aan elke zijde altijd recht te breien.
Rij 50 4r, m afh, brei alle stn r tot m, m afh, 4r, keer.
Rij 51 4r, m afh, brei alle stn av tot m, m afh, 4r, keer.
Rij 52 (meerd) 4r, m afh, *omsl, 1r* tot m, m afh, 4r, keer. [192+8 stn]
Rij 53-54 4r, m afh, brei alle stn av tot m, m afh, 4r, keer.
Rij 55 4r, m afh, brei alle stn r tot m, m afh, 4r, keer.
Part Two coming next week | Deel Twee komt volgende week
This is the end of Part 1, the next part will be published next week! You can also find the full pattern PDF here.
Dit is het eind van Deel 1, het volgende deel komt volgende week! Je kunt ook hier het volledige PDF patroon vinden.
February 21st – Pattern part 2
February 28th – Pattern part 3
You might also like
Breezeblocks Crochet Shawl pattern


11 Comments
Muchas felicidades …. no me canso de mirar tu video del nuevo shawl me encanta tu entusiasmo como lo presentas …. confieso que no sé tú idioma pero con solo ver tú expresión siento que disfrutaste a cada momento que avanzabas … lindo resultado pero tejer el mío y poder mostrar … saludos desde Tampico, Tamaulipas.Mexico 🥰💖💖💖
Thank you so much! Muchas gracias 🙂
I’m at Row 55 and very anxious to continue. This is my first ever MAL and I love it!! I’ve never done one before because I am not patient and I don’t like to wait for a week to get the rest of a pattern, but I loved yours so much I figured I would try to exercise my patience. Thank you for the great pattern.
Hello Linda, thank you so much! Part 2 and 3 are online now as well, happy knitting!
I’m starting Part 1 but have some questions, in Lace Section 1 (Pattern A), where are Rows 5-13? There is nothing is listed! And on Lace Section 2 (Pattern B), where are Rows 7-35? There is nothing listed! Help!
Hello Ked, thank you for your message! I’m not sure what you mean. Rows 5-13 are before Lace Section 1, and are written out in the ‘Increases and Moss Stitch section’. Every row is listed, except for the rows where you repeat the lace sections. For example Lace Section 1 is knit from row 14 to row 23. For row 14, you knit row 1 of the stitch pattern, for row 15 it’s row 2, and so on. On row 18, you start again with row 1 of the stitch pattern. You knit 10 rows of Lace section 1 this way. If it’s not about this, I really don’t know what you mean, would you explain further please?
I added an extra stitch at the beginning at pattern B for symmetry, then the lace starts and ends with a yo k1. in the increase row that followed I lost the extra stitch by starting with a k1
Perhaps in the next lace pattern I’ll add it again.
That is so clever! Thank you for sharing 🙂
This is interesting but I don’t understand how it improves symmetry. I’m just starting this shawl and want to ask if adding the extra stitch at the beginning of pattern B would be a good idea. I’m only an intermediate knitter so I haven’t learned all these tricks but I’d like to! Your answer would be very much appreciated. Thanks Gill!
Hi Ann, thank you for your comment! I’m not sure if Gill receives a notification from this so I’ll be answering on her behalf. The eyelets in lace pattern B form a horizontal zigzag line. At the righthand side, there is 1 knit stitch separating the first eyelet from the border stitches, but on the lefthand side the eyelet is directly beside the border stitches. For symmetry, it would help to add an extra knit stitch there in between the eyelet and the border sts (so at the end of row 1). You don’t have to do this, but as you say it’s quite fun to learn extra tricks like this 🙂 Happy knitting! Carmen
[…] Part One HERE, Part Two HERE, and Part Three […]