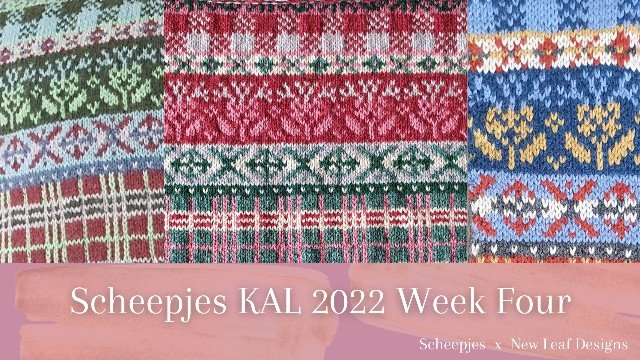
Scheepjes KAL – Week Four | Week Vier
Hello hello everyone! I hope you enjoyed the pattern from last week, because your photos looked stunning!! I absolutely love the tartan section and how it changes so drastically with each colour palette, it makes each cushion truly unique. I’m actually tempted to do a whole design with just the tartan because it’s so addictive to knit, mmm…. *daydreams* Okay! But now onto this week, because it will take some concentration. Yes, we’re back to ‘don’t knit when you’re tired’, because the patterns for this week will need your full attention. As always, if you’ve missed pattern parts or you want to check the tips and tricks for each week, please check the links for each part in the purple box below.
Hoi iedereen, en welkom bij deel 4! Ik hoop dat je ook zo hebt genoten van het patroon van vorige week, want ik genoot zeker van jullie foto’s. Zo’n mooie Schotse ruiten overal, en elke kleurstelling die ik zag was weer mijn nieuwe favoriet. Ik denk er nu over om een héél ontwerp met de Schotse ruit te doen, mmm… *droomt weg* Maar nu eerst! De patronen voor deze week hebben je opperste concentratie nodig, dus net als voorheen geldt weer: ‘niet breien als je moe bent’. Een gewaarschuwd mens telt voor twee. Zoals altijd kun je de andere delen van het patroon en de bijbehorende tips hieronder vinden in het paarse tekstvak.
Pattern Parts |
Delen van het patroon |
|---|---|
| Part 1 | Deel 1 |
| Part 2 | Deel 2 |
| Part 3 | Deel 3 |
| Part 5 | Deel 5 |
| Part 6 | Deel 6 |
| Part 7 | Deel 7 |
| Part 8 | Deel 8 |
| Part 9 | Deel 9 |
| Part 10 | Deel 10 |
Pattern Part Four | Patroon Deel Vier
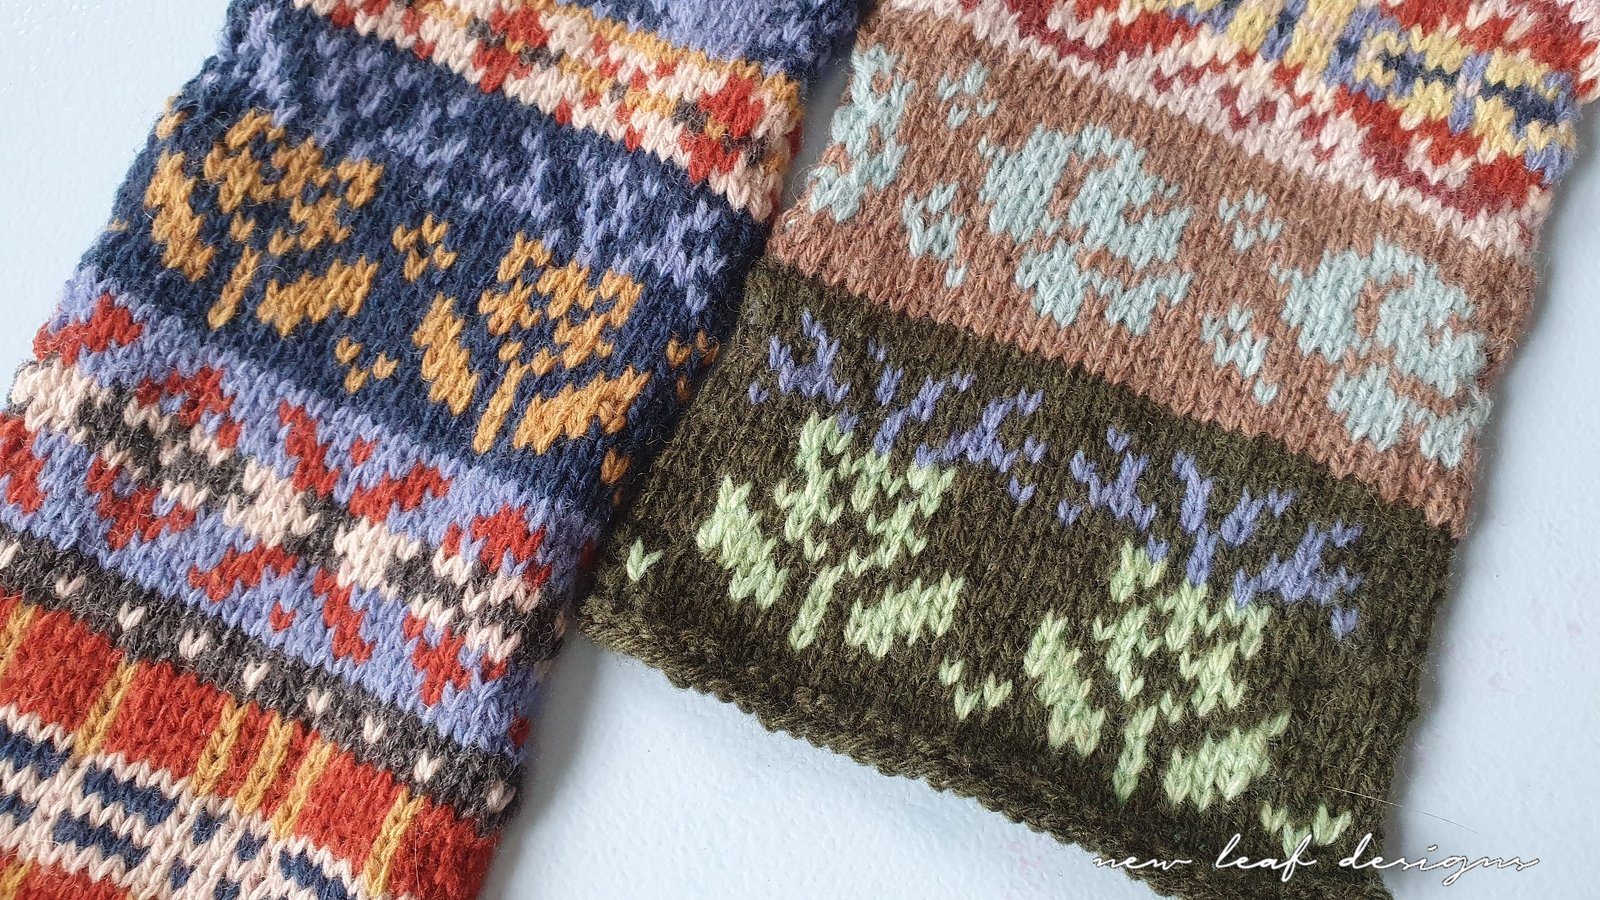
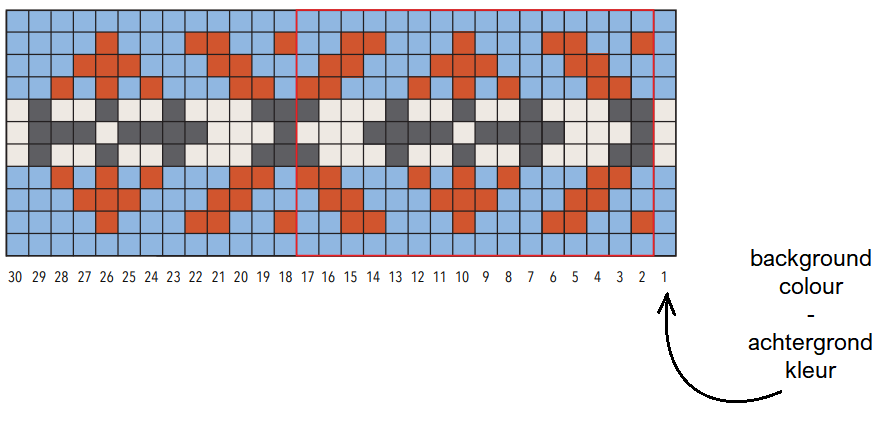
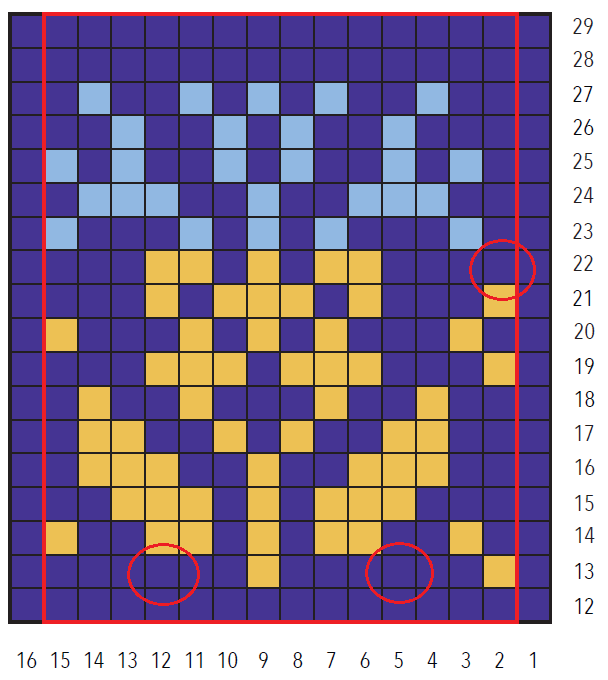
This week we will start with another ‘XO’ chart, like we had in Week two. Again, the pattern and background colours will change for the center couple of rounds, which will give more depth to your work. Then, we move on to the thistle chart which will be the most difficult one of the entire Jamie cushion. And then, we finish with another XO chart, but a very small one this time. Have fun pairing colours!
Please find Part 4 of the Scheepjes KAL pattern here on the Scheepjes website. Scroll a bit down so you see ‘Week 4’ in red, then ‘Instructions’ in black. Below that, you will find the pattern linked as a PDF. Click on the text making sure you select the right language, and the PDF will open. You can also find the pattern in the Scheepjes Facebook Group. If you would rather have a colouring sheet for the charts so you can colour it in yourself, please find it below.
Deze week beginnen we met nog een ‘XO’ schema zoals we ook hadden in Week twee. In de middelste paar toeren van het schema wissel je de patroon- en achtergrondkleur, waardoor je werk meer diepte krijgt. Daarna komt het distel schema, wat misschien wel het moeilijkste is van het hele Jamie kussen. We eindigen deze week met nog een klein XO schema. Veel plezier met het combineren van kleuren!
Je vindt Deel 4 van het Scheepjes KAL patroon hier op de Scheepjes website. Je ziet eerst ‘Week 4’ staan in het rood, en daaronder ‘Instructies’ in zwarte tekst. Daaronder is het patroon gelinkt als een PDF. Klik op de tekst, en het PDF opent zich. Je kunt het patroon ook vinden in de Scheepjes Facebook Groep. Als je liever een inkleur-versie hebt zodat je die zelf in kan kleuren, kijk dan hieronder.
Colour Your Chart | Kleur je schema in
![]()
If you want to print out your colouring chart, click here for the PDF version. I’m so curious to see your colours play in this chart! For team Free Spirit it’s going to be really fun to play with the colours for the thistle chart. Please do share your photos of the coloured in charts, I love seeing them.
Als je de inkleur versie graag wilt uitprinten, klik dan hier voor de PDF versie. Ik ben weer heel benieuwd welke kleuren jullie gebruiken! Voor team Free Spirit gaat het deze week heel leuk zijn de kleuren voor de distel te bepalen. Deel vooral ook je foto van je ingekleurde schema, dat vind ik zo leuk om te zien.
Tips for this Week | Tips voor deze Week
Easy repeats | Gemakkelijke patroonherhalingen
For the first chart, notice that Round 3 is basically ‘three three three; two three two’. I find myself murmuring this as I knit, which helps me concentrate. As the first chart has lots of symmetry (vertical, horizontal, diagonal) it will be relatively easy to remember, but if you need extra help you can always place stitchmarkers when a new repeat starts.
The thistle chart will be more difficult to remember, so it is definitely a good idea to place stitchmarkers there. However, some easy repeats can be found. Like in Round 19: “three three one; three three one”.
The third chart is a real treat to knit, with Rounds 30 and 34 being “three one; three one” and Rounds 31 and 33 being “three three three; one one one”.
Voor het eerste schema is Toer 3 gemakkelijk te onthouden als ‘drie drie drie, twee drie twee’. Dit mompel ik dan vaak tegen mezelf tijdens het breien en zo houd ik mijn concentratie erbij. Omdat het eerste schema veel symmetrie heeft (verticaal, horizontaal en diagonaal) zal het relatief makkelijk zijn deze te onthouden. Als je een extra geheugensteuntje kan gebruiken, plaats dan steekmarkeerders tussen de herhalingen in.
Het distel schema is moeilijker te onthouden, dus hier zijn steekmarkeerders sowieso een goed idee. Toch zitten er her en der wat gemakkelijke herhalingen in. Zoals in Toer 19 “drie drie een, drie drie een”.
Het laatste schema is een goede afsluiter voor de week, deze is wat simpeler. Onthoud voor Toeren 30 en 34 “drie een; drie een” en voor Toeren 31 en 33 “drie drie drie; een een een”.
Carrying yarns up | Garens mee omhoog dragen
For the first chart of this week, the XO chart, the pattern and background colours change for the center three rounds. You don’t have to cut the previous pattern and background colour yet, as you will use them again after these three rounds. You don’t need to anchor them here, but if you want to, you can wrap those yarns are the end of the round.
Voor het eerste schema wissel je de patroon- en achtergrondkleur in de middelste drie toeren. Je hoeft de vorige kleuren hierbij niet af te knippen, want over drie toeren gebruik je ze weer. Je hoeft ze niet vast te zetten, maar áls je dat wilt is het handig om ze in te pakken op de voorlaatste steek van de toer.
Colour Dominance | Kleurdominantie
This week, I want to tell you a bit about colour dominance. I’ve already seen a couple of you discussing it in the Scheepjes Facebook Groups, and the reason why I haven’t mentioned it until now is that I didn’t want to overwhelm new colourwork knitters. With all of the new techniques, how to hold your two yarns, how to wrap floats, pattern reading, confusing repeats, etcetera, I did not want to pile onto that with more information. Colour dominance means that one of your two colours will show up more dominantly than the other. The leftmost held strand will be dominant. When you’re holding one strand in each hand, the strand in your left hand will be dominant. When you hold both strands in one hand, the leftmost strand of those two is dominant. Looking at it differently, the strand which floats go under the other floats, is dominant.
Deze week wil ik jullie ook wat vertellen over kleurdominantie. Ik heb het al enkele keren voorbij zien komen in de Scheepjes Facebook Groepen, en de reden waarom ik het nog niet eerder heb vermeld is omdat ik beginnende breiers niet wilde overweldigen met informatie. Met alle nieuwe technieken, hoe je het garen vast moet houden, hoe je draadjes in moet pakken, het lezen van het patroon, moeilijke herhaalpatronen, etcetera, wilde ik daar niet nog iets aan toevoegen. Kleurdominantie betekent dat één van de twee kleuren beter te zien zal zijn in je werk. De draad die je links van de andere draad houdt zal dominant zijn. Als je één draad in elke hand houdt, is die in je linkerhand dominant. Als je beide draden in één hand houdt, is de meest linker draad dominant. Je kunt ook naar de meeloopdraden kijken, de korte draadjes aan de achterkant van je werk. De draad die onder de andere langs gaat is dominant.
Which colour do you want to be dominant? This will be the pattern colour. If you make the background colour dominant, the pattern can seem ‘sucked into’ the background, and you want it to be nice and clear. So always make sure your pattern colour is the leftmost strand in your hands. How do you know what the pattern colour is? Well, for each chart it starts and ends with a stitch in the background colour, so the other colour in that round is the pattern colour.
Welke kleur wil je dominant hebben? Het beste resultaat krijg je als de patroonkleur dominant is. Als je de achtergrond dominant maakt, kan het patroon in de achtergrond weg zakken, en je wilt juist dat het goed te zien is. Zorg dus dat je de patroonkleur links van de andere kleur houdt. Hoe weet je welke kleur de patroonkleur is? Nou, elk schema begint en eindigt met een steek in de achtergrondkleur, dus de ándere kleur in die toer is de patroonkleur.
And now, this is mostly personal preference, but some of you will find it is faster to knit with continental style knitting. And, with the background colour usually having the most stitches, it can be tempting to knit the background colour continentally. If you’re knitting both strands continentally, this is no problem as you simply need to make sure the pattern colour is the leftmost strand. But if you’re knitting with one strand in each hand, you need to knit the background colour with your right hand. I’m emphasizing this because for the Thistle chart, it is very tempting to knit that background colour continentally and zoom through the chart. But do know that the thistle will show up less if you do that.
En, dit zal afhankelijk zijn van je persoonlijke voorkeur, maar sommigen zullen het sneller vinden om continentaal (met de linkerhand) te breien. En omdat de achtergrondkleur vaak de kleur is met de meeste steken in een bepaalde toer, kan het uitnodigend zijn om de achtergrondkleur continentaal te breien. Als je beide draden continentaal vasthoudt is dit geen probleem, houd dan de patroonkleur links van de achtergrondkleur vast. Maar als je net als ik met één draad in elke hand breit, moet je de achtergrondkleur rechts vasthouden. Ik leg hier even de nadruk op want het kan echt verleidelijk zijn het distelschema te breien met de achtergrondkleur links van de andere, maar let hier echt op, want anders wordt de distel in de achtergrond ‘gezogen’ en is hij minder zichtbaar.
Wrapping Floats | Garens inpakken
Up until now you have only really needed to wrap your floats in the ‘corners’ of your pillowcase. For the thistle chart, I also recommend wrapping your floats in the pattern. In Round 13 (the second round of the Thistle chart), you will have 6 stitches of Yarn D after each other. While I personally only wrap floats from 7 stitches up, you could wrap your floats in this section. Similarly, in Round 22 you have 7 consecutive stitches of Yarn D, so I recommend wrapping your floats here too. Please also view the picture below for the recommended wrapping of floats.
Tot nu toe hoefde je slechts je draden in te pakken in de hoek, of aan de zijkanten van het kussen. Voor het distelschema raad ik ook aan om in de patroonherhaling de patroonkleur in te pakken. In Toer 13 (de 2e toer van het schema), heb je 6 steken van Kleur D achter elkaar. Persoonlijk pak ik pas garens in vanaf 7 opeenvolgende steken, maar voor deze 6 kan je dat ook al doen. In Toer 22 heb je 7 steken achter elkaar van Kleur D, dus raad ik hier ook aan om de patroonkleur in te pakken. Zie ook de foto hieronder voor de aanbevolen steken voor je garen in te pakken.
Neat edges for your colourwork
Have you seen my video for making the edges of your colourwork cushion neater? Find the English video here.
Heb je mijn video al gezien waar ik je tips geef voor nettere randen van je kleurwerk kussens? Vind de Nederlandse video hier.
Share your makes | Deel jouw creatie
I hope you have fun with this week of the Scheepjes KAL, and please do share your pictures on Facebook or Instagram with the hashtags #ScheepjesKAL2022 and #SassenachKAL. For posting on Instagram, tag me @newleafdesigns.nl in your photo so I can see. For Facebook, post them in the Scheepjes Facebook Group and tag me (@ Carmen New Leaf) as well. Also, I would very much appreciate it if you create a project page on Ravelry and add your photos and thoughts there. Thank you so much!!
Ik wens je veel plezier met deze week van de Scheepjes KAL, en deel vooral je foto’s op Facebook of Instagram met de hashtags #ScheepjesKAL2022 en #SassenachKAL. Op Instagram kun je me taggen als @newleafdesigns.nl in je foto zodat ik hem kan zien. Op Facebook plaats je in de Scheepjes Facebook Groep en tag je mij (@ Carmen New Leaf). Ik zou het ook enorm op prijs stellen als je een projectpagina aanmaakt op Ravelry en daar je foto’s toevoegt. Alvast bedankt!!
You might also like


4 Comments
[…] Part 4 […]
[…] Part 4 […]
[…] Part 4 […]
[…] Part 4 […]