
Sassenach KAL Bonus Pattern
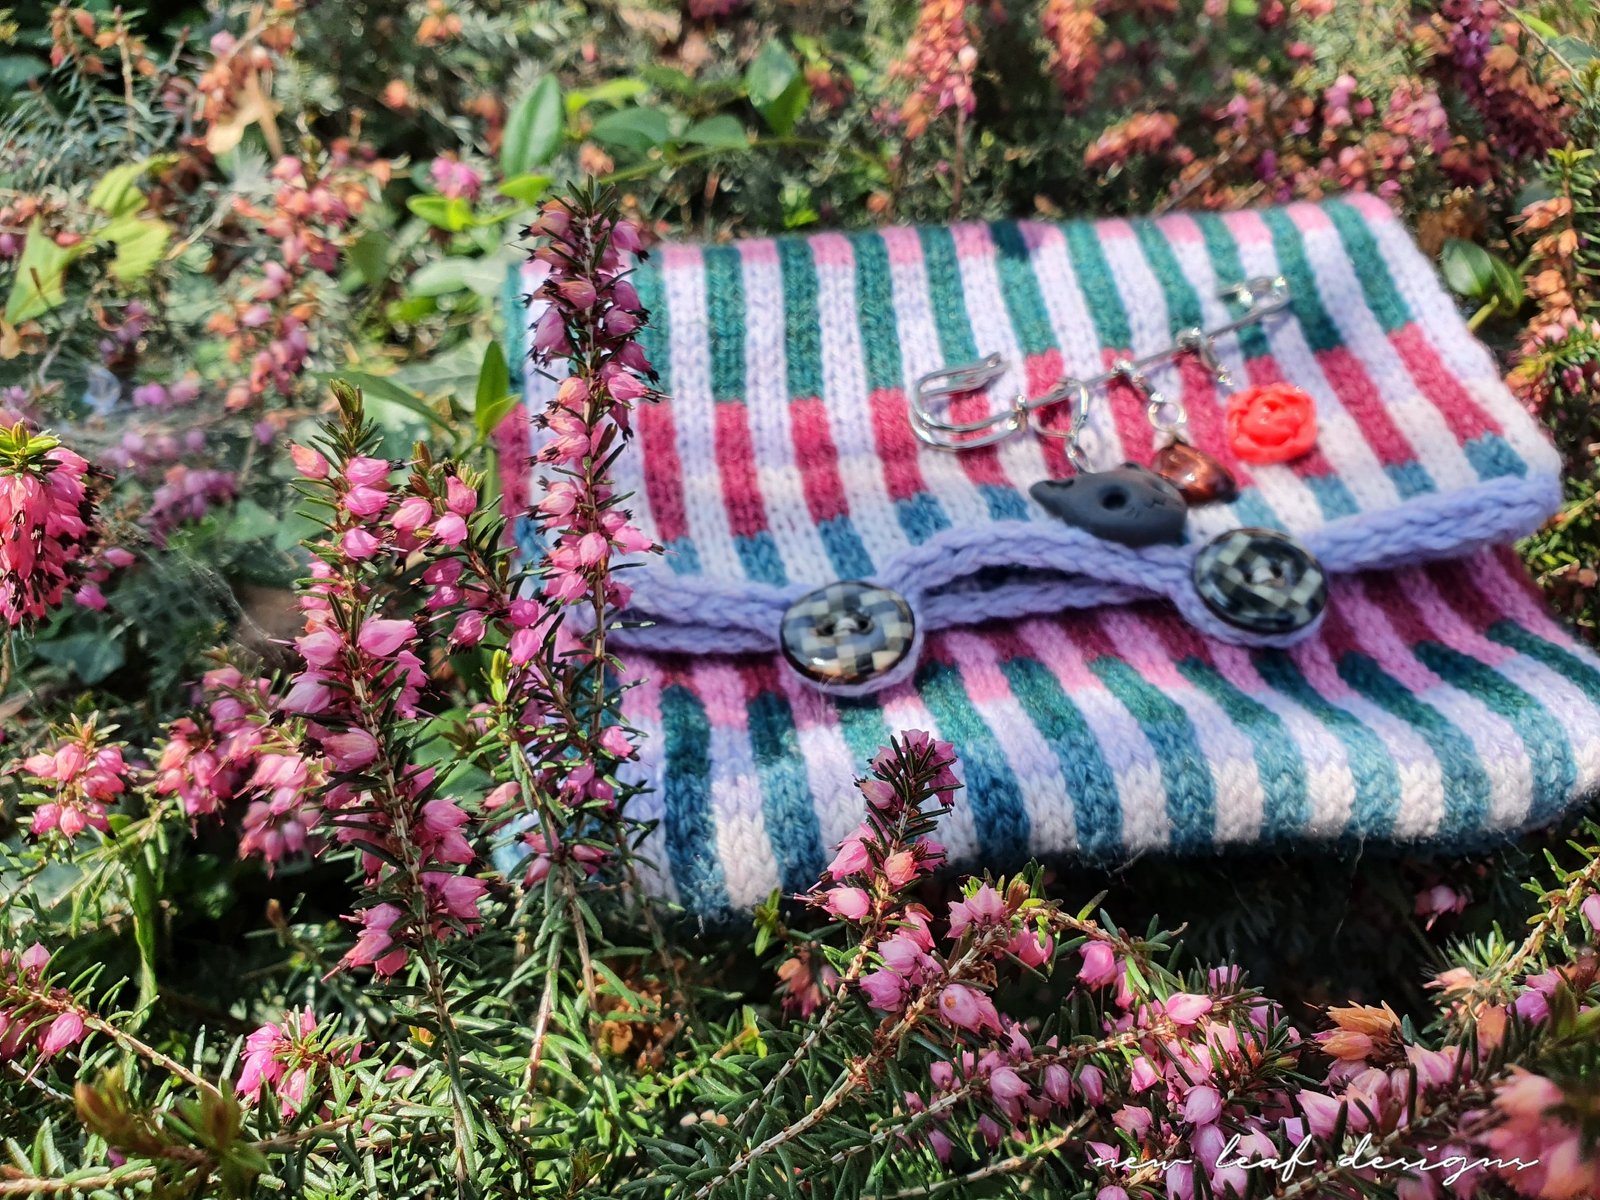
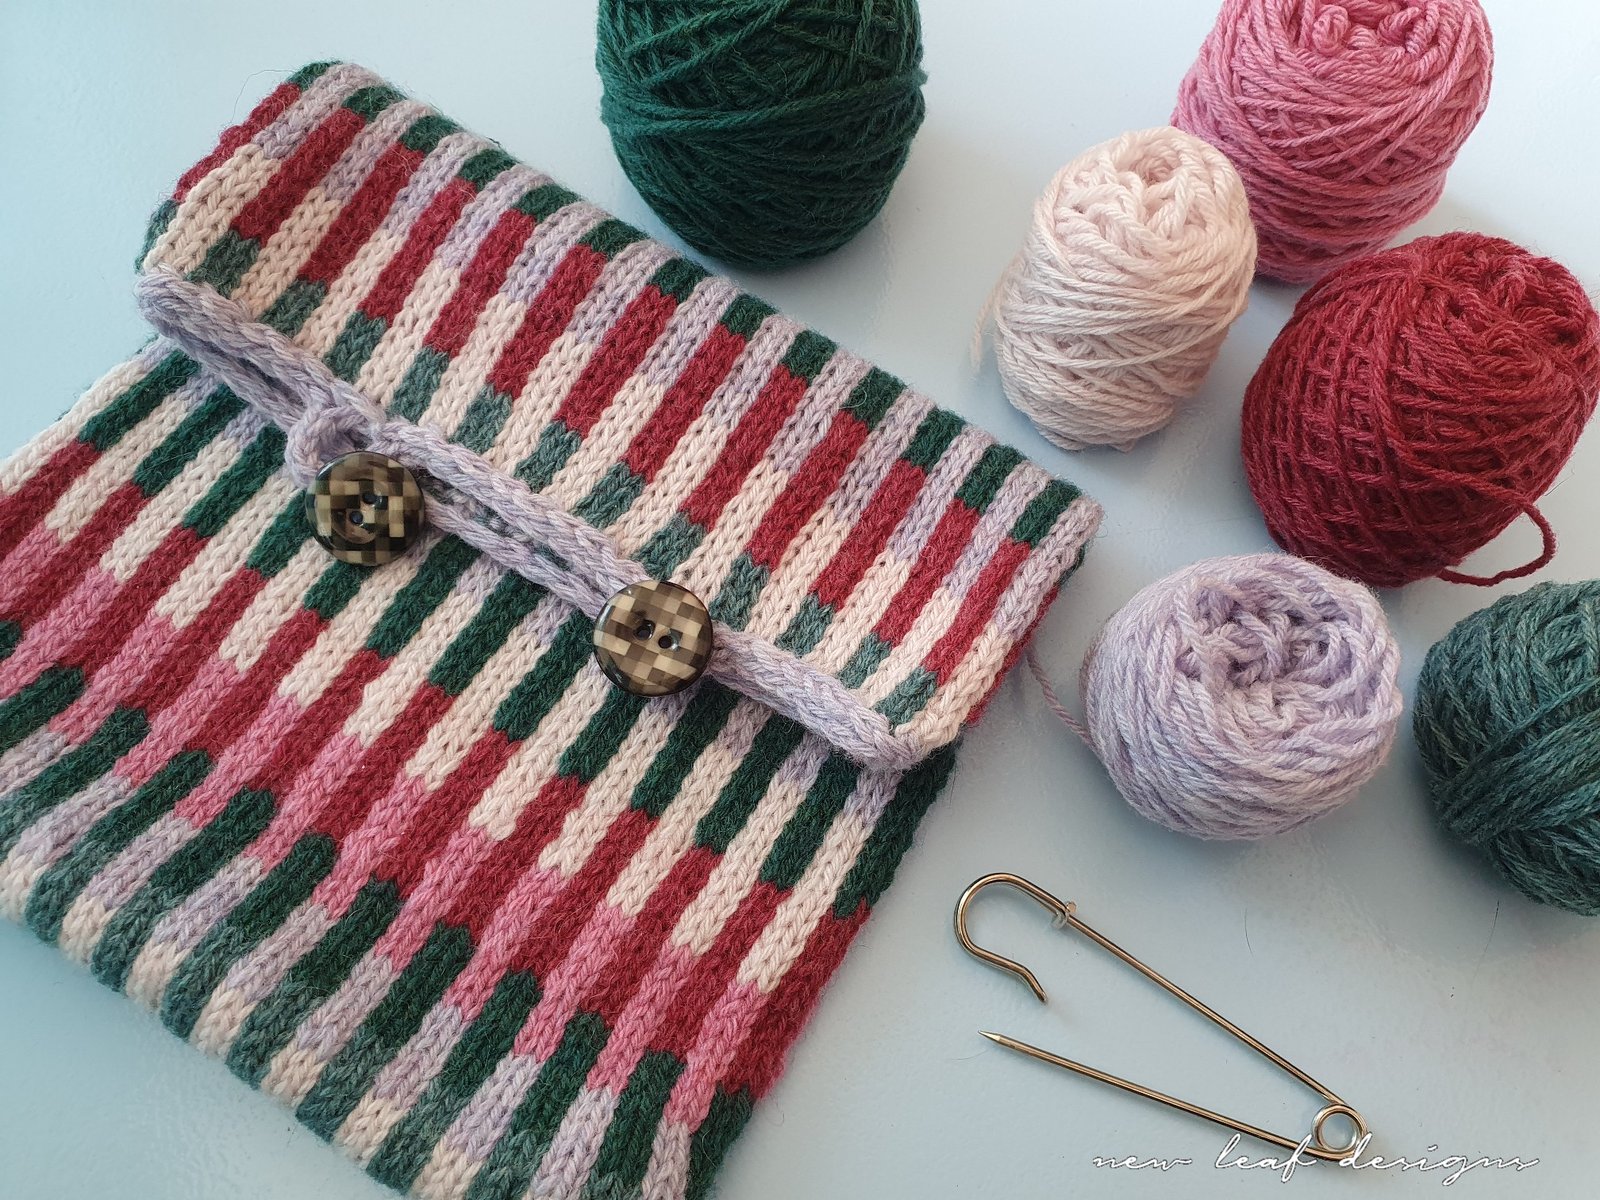
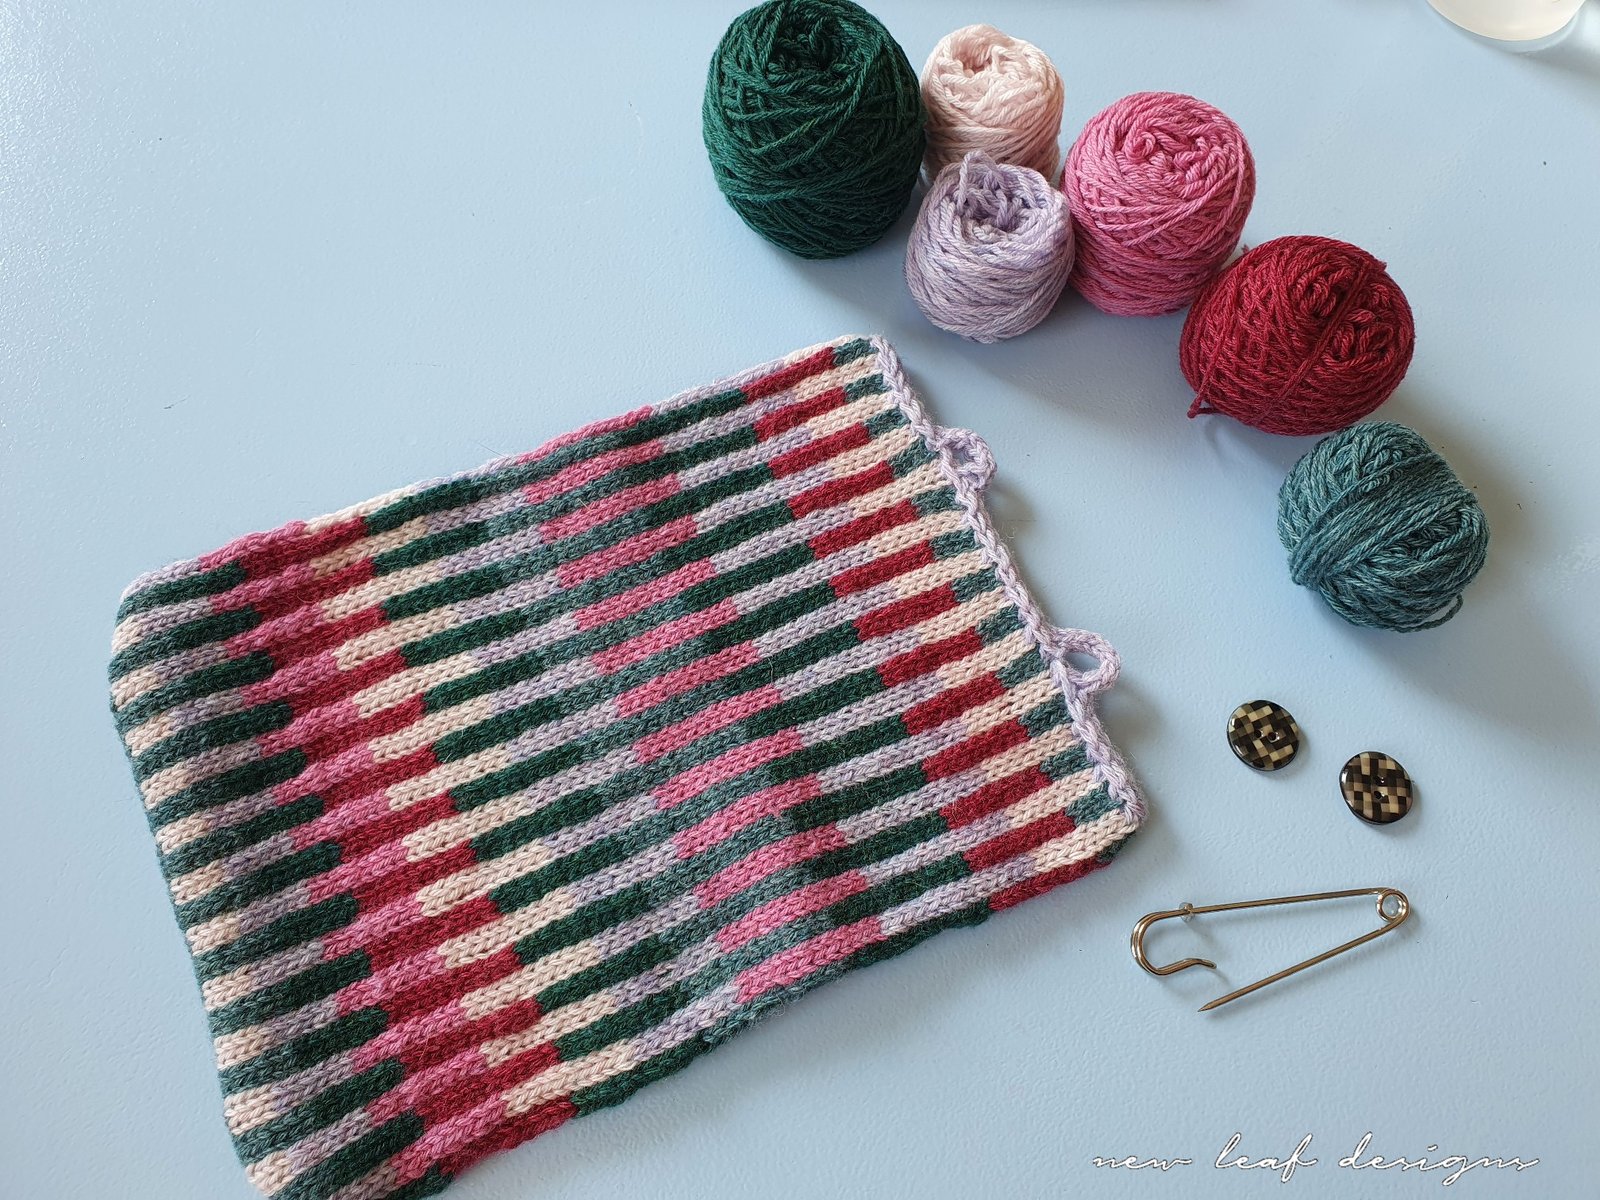
The Calluna phone pouch is the perfect pattern to use up your leftover yarns after completing the two cushions from the Sassenach Knit-a-Long. You need an even mix of dark and light colours of Scheepjes Metropolis, but other than that you are pretty much free in your colour choice. For instance, it doesn’t matter if you only have 5 grams left of the one colour and 30 grams left of another, you can just use them as you see fit.
For the phone pouch, you will need roughly 40 grams of Scheepjes Metropolis yarn in total. Since there is pretty much an even split between light and dark colours, that means 20 grams of each group. This pattern would also make for a great tablet cover when made a bit longer, in which case you will need more yarn. There are many more possibilities for this little pattern, such as making it into a hot water bottle cover, and I’m sure I will see many more varieties popping up in the Scheepjes Facebook Groups. Be sure to share what you do with it! If you want to see some other inspiration for what to do with your scraps, scroll down to the bottom of this blogpost.
Het Calluna telefoontasje is het perfecte patroon om de overige garens van de Sassenach KAL te gebruiken. Je bent heel vrij in je kleurkeuze, het belangrijkste is dat je evenveel gram lichte kleuren hebt als donkere kleuren. Het maakt bijvoorbeeld niet uit als je van de ene lichte kleur heel veel nog hebt en nog maar een restje van een andere lichte kleur, je kunt ze allemaal gebruiken.
Voor het telefoontasje heb je ongeveer 40 gram Scheepjes Metropolis nodig, dus 20 gram van de donkere kleuren en 20 gram van de lichte kleuren. Je kunt met dit patroon ook een tablethoes maken, in dat geval moet je hem langer maken dus heb je meer garen nodig. Wellicht heb je veel meer over dan 40 gram van je KAL garens, kijk in dat geval ook even bij de inspiratie-ideeën onderaan deze blogpost. Je kunt er zoveel mee! Deel vooral wat je maakt in de Scheepjes Facebook Groep, dat vind ik erg leuk om te zien.
Calluna Phone Pouch | Calluna Telefoontasje
The name ‘Calluna’ means heather. You might recall that for the Knit-a-Long, I named the three colourways Cirsium (thistle), Rosa (rose) and Erica (heather). Erica and Calluna are different types of heather, and the one we have in our front garden seems to be Calluna Vulgaris. Since I made the phone pouch with my leftovers of the Erica kit, I decided to name it Calluna!
De naam ‘Calluna’ betekent heide. Misschien herinner je je dat ik de officiële kleurstellingen voor de Knit-a-Long naar bloemensoorten heb genoemd: Cirsium (distel), Rosa (roos) en Erica (heide). Erica en Calluna zijn verschillende soorten heide, en die in onze voortuin staat blijkt Calluna Vulgaris te zijn. Omdat ik het telefoontasje maakte met mijn overige garens van de Erica kit, heb ik het Calluna genoemd!
Materials | Materialen
You will need 40 grams of Scheepjes Metropolis, of which 20 grams of light colours, and 20 grams of dark colours.
As for needle size, you can use the same needle as you used for the cushion, or perhaps a bit larger. I knit my cushions on 3mm needles, and the phone pouch on 3.25mm needles. This was more due to the fact that all my 3mm needles were occupied when I started the phone pouch. You might recall the ‘piano keys’ section from the KAL swatch, which tends to be a little tighter than the average colourwork knitting. Tight fabric works well for phone and tablet covers, but feel free to use a bigger needle to make the fabric a little looser.
You will also need the two buttons and kilt pin from the Scheepjes KAL kit.
Je hebt 40 gram Scheepjes Metropolis nodig, 20 gram van de lichte kleuren en 20 gram van de donkere kleuren. Je kunt dezelfde maat naalden gebruiken dat je voor de kussens hebt gebruikt, of wellicht nog een maatje groter. Ik breide mijn kussens op 3mm naalden, en het telefoontasje op 3,25mm. Niet perse omdat dit beter uitkomt, maar meer omdat al mijn 3mm naalden bezet waren. Weet je het ‘pianotoets’ gedeelte van het proeflapje nog, en hoe dat gedeelte strakker was dan de rest van het proeflapje? Dat effect ga je met dit werkje waarschijnlijk ook weer hebben, dus kun je prima een grotere naald gebruiken. Aan de andere kant, een strak gebreide stof werkt erg goed om je telefoon of tablet te beschermen, dus weeg het voor jezelf even af welke naald je gaat gebruiken.
Je hebt ook de twee knopen en kiltspeld nodig uit de Scheepjes KAL kit.
Gauge | Stekenverhouding
With 3.25mm needles, I got a gauge of 38 sts and 33 rounds to 10x10cm (4×4″). Gauge is not too important for this project, but you want to keep in mind what you want to use the project for. If you want to use it as a pouch or cover for your phone or tablet, this gauge (or tighter) works well. If you want to use it as a regular pouch, bag, or as a cover for something that is not quite as fragile, such as a hot water bottle, you are free to go with a looser gauge.
Met 3.25mm naalden kreeg ik een stekenverhouding van 38 stn en 33 toeren over 10x10cm. Stekenverhouding is niet super belangrijk bij dit project, omdat je waarschijnlijk meer garen over hebt. Je wilt wel even in gedachten houden wat je er uiteindelijk mee wilt maken. Wil je een hoes of tasje maken voor je telefoon of tablet, dan werkt deze stekenverhouding (of strakker) goed. Als je het tasje voor dingen wilt gebruiken die niet zo breekbaar zijn, of een hoes maakt voor bijvoorbeeld een waterkruik, dan kun je prima een lossere stekenverhouding gebruiken. Ik weet dat de naaldmaat 3,25mm niet heel gebruikelijk is, dus voel je vrij om 3mm of 3,5mm te gebruiken.
Size | Maat
The width of your project is determined by the cast on number. With the cast on number and gauge in this pattern, your project will be around 17cm wide. It will stretch a little bit further, but not much. Do measure your phone or tablet that you want to make this pouch for so you can determine whether it will fit. If you want to make a cover for a Nintendo Switch for example, you will need to cast on less stitches to make your project narrower. The pattern is highly customizable, so make it into whatever you want! Cast on a multiple of 8 sts so you can follow the pattern.
De grootte van je project is afhankelijk van hoeveel steken je opzet. Met het aantal stn van de opzet en de stekenverhouding beschreven in dit patroon krijgt je project een breedte van ongeveer 17cm. Het zal nog een beetje oprekken, maar niet veel. Meet je telefoon, tablet of ander voorwerp dat je in het tasje wilt bewaren, en kijk of het breed genoeg is. Zet zo nodig meer of minder steken op, je hebt een veelvoud van 8 stn nodig. Als je bijvoorbeeld een hoes wilt maken voor een Nintendo Switch, zul je minder steken moeten opzetten om het project smaller te maken. Ik ben heel benieuwd wat je ermee maakt!
Pattern | Patroon
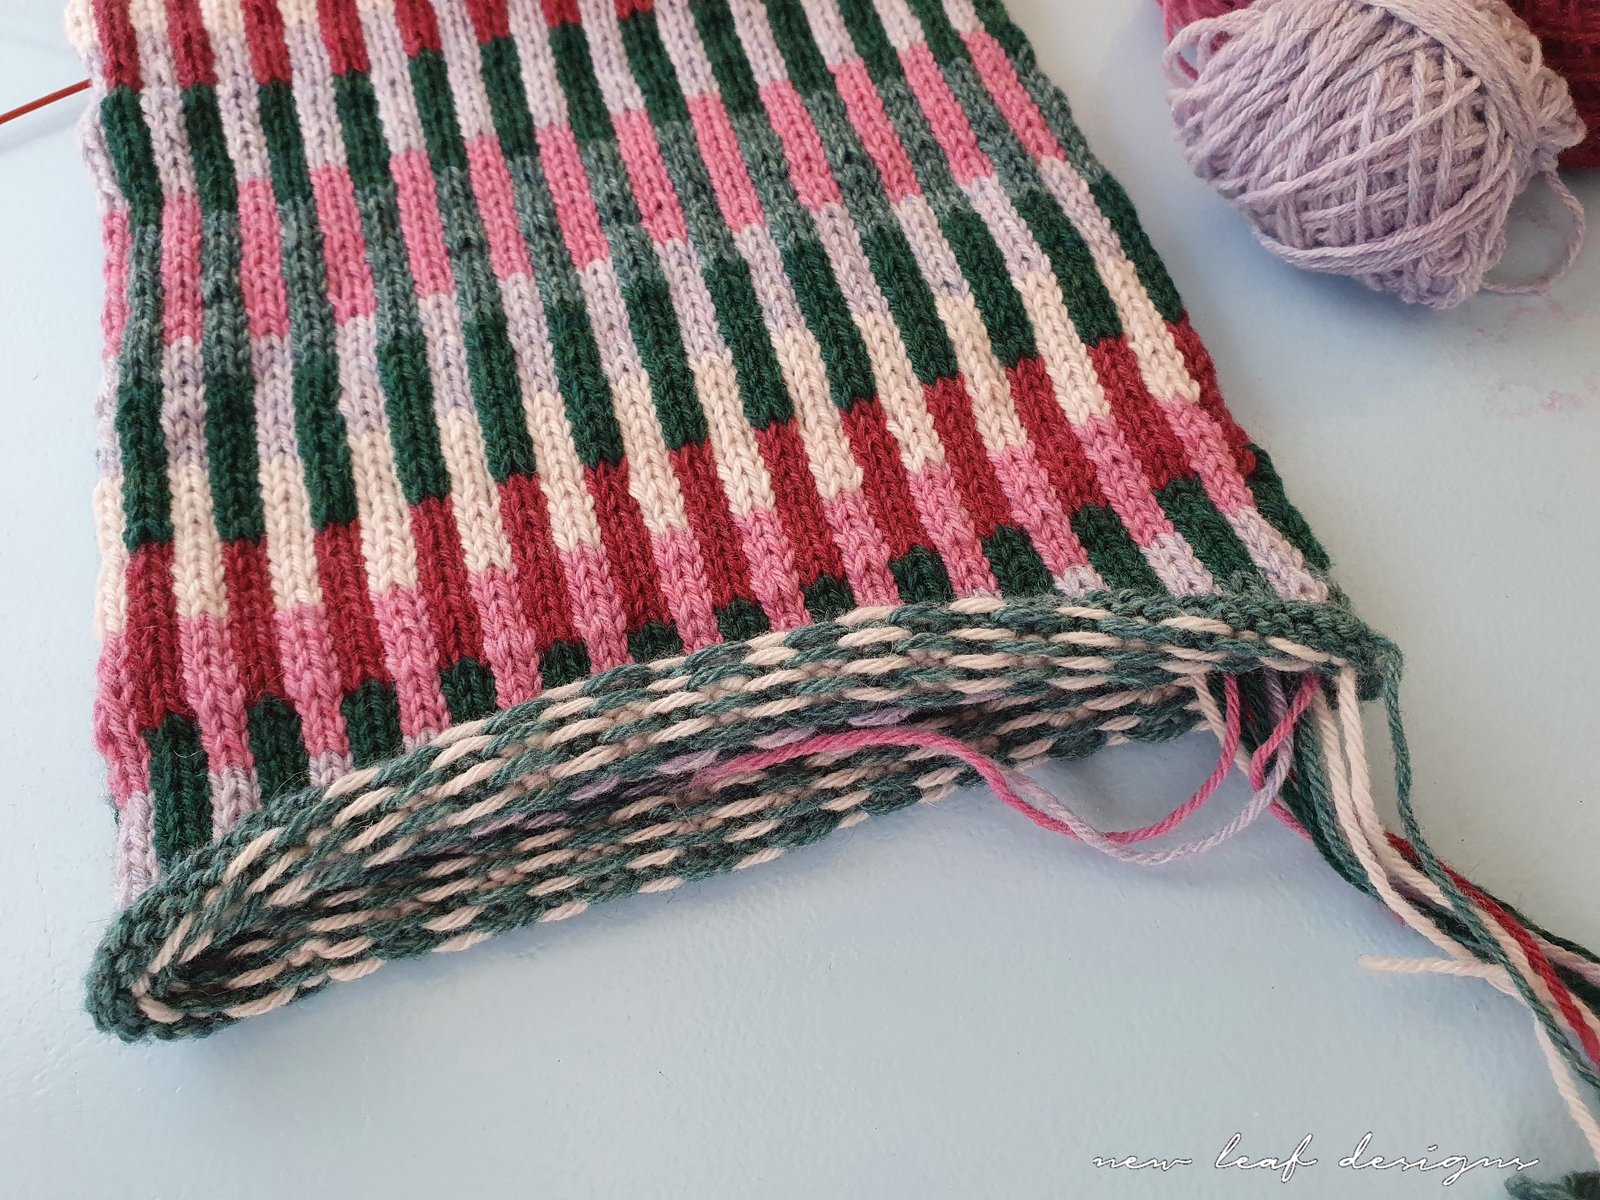
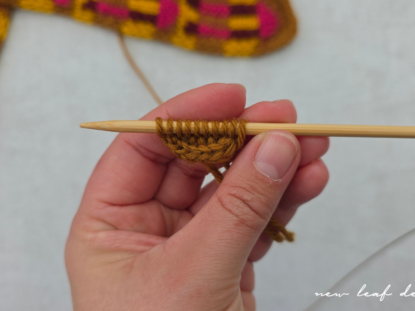
Take your circular needles and one of the darker colours, and cast on 104 stitches. If you use a long tail cast on, cast on 104 sts onto the needle. If you want to use Judy’s Magic Cast On, cast on 52 sts onto each needletip. I chose the long tail cast on for this project, so I had to seam the sides together at the end.
Neem je rondbreinaalden en een van de donkere kleuren, en zet 104 stn op. Als je de duim-en-wijsvinger methode gebruikt, zet dan 104 stn op de naald. Als je Judy’s Magic Cast On gebruikt, zet dan 52 stn op elke naaldpunt. Het verschil is dat je bij de duim-en-wijsvinger methode je werk achteraf nog samen moet naaien.
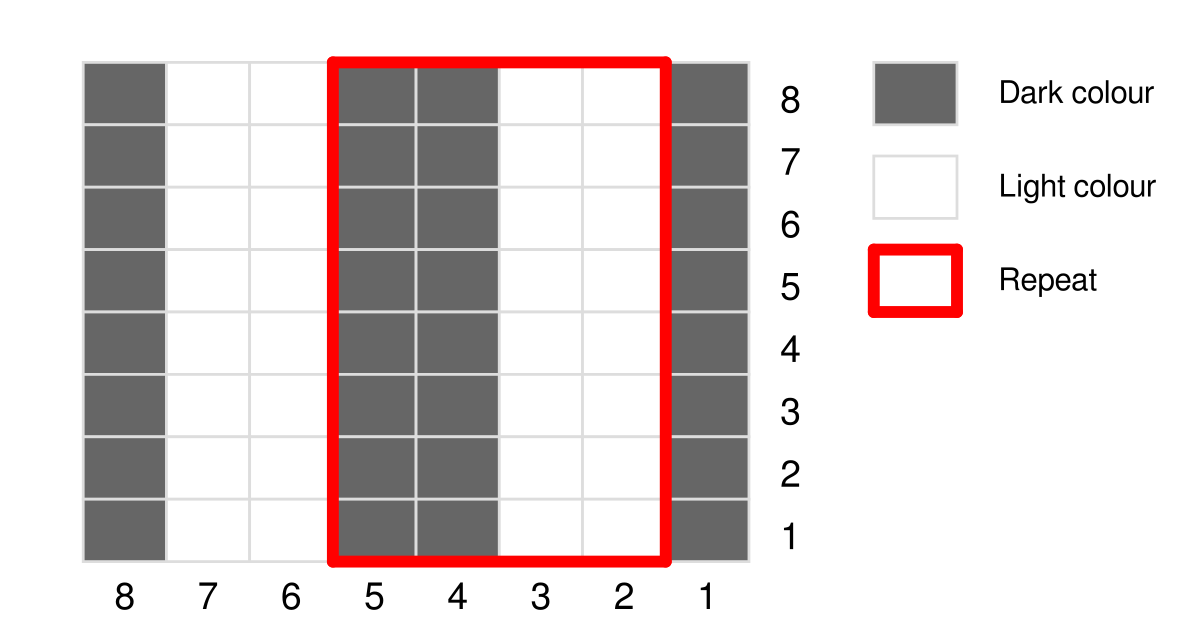
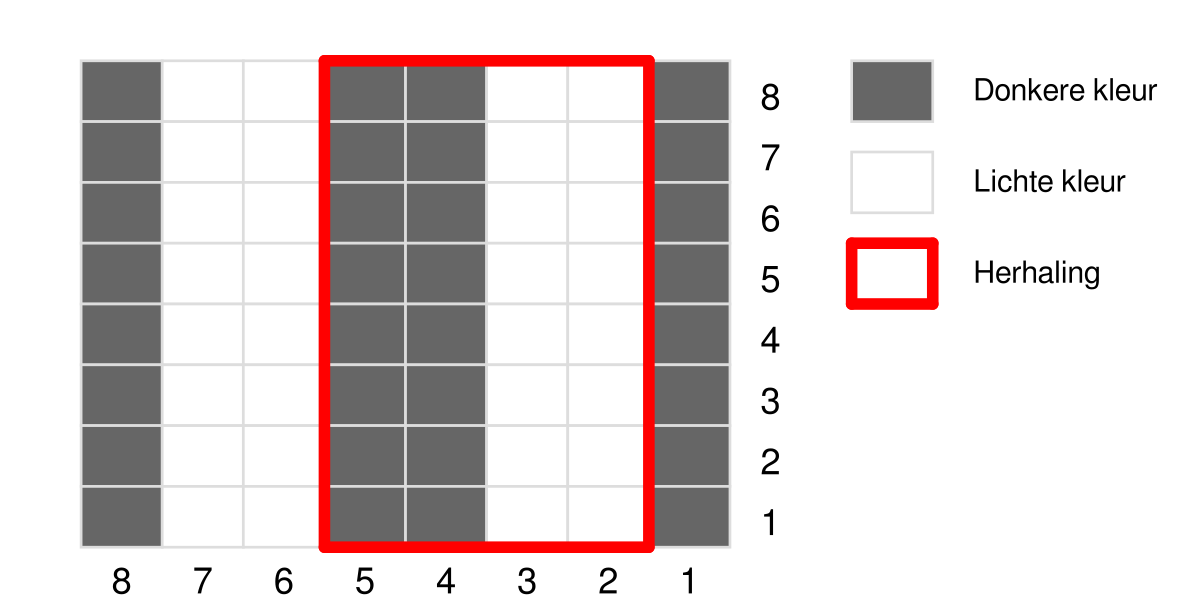
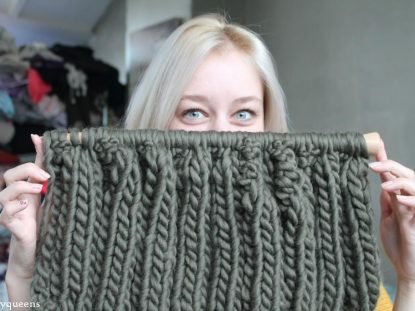
Knit two rounds of one-colour stockinette before moving on to the colourwork. It’s a very simple colourwork pattern, you knit two sts of each colour and repeat. Similar to the KAL cushion pattern, you knit one stitch in the background colour first, which is the dark colour, and then proceed to the pattern. You repeat the pattern (outlined in red) until you have 3 sts left on the first side, then you knit sts 6-8 from the chart. On the second side of your work you do the same thing, so that both sides are alike.
Brei twee toeren recht met dezelfde kleur voordat je verdergaat met het kleurwerk. Het is een simpel kleurwerkpatroon, je breit telkens 2 stn van elke kleur en herhaalt dit. Net als bij de KAL kussens breien we eerst 1 steek in de achtergrond kleur, in dit patroon de donkere kleur, en dan brei je de herhaling. Je herhaalt de rood omlijnde stn tot je nog maar 3 stn overhebt aan de voorkant, dan brei je deze volgens stn 6-8 in het schema. Aan de achterkant van je werk doe je hetzelfde, zodat beide kanten gelijk zijn.
Colours | Kleuren
For the colour switching, there are no real rules. I do think it works best if you don’t switch both light and dark colours in the same round. I knit 4 rounds of the pattern, then I switched the light colour. A couple rounds after that, I switched the dark colour. If you keep switching colours at different intervals, you get a nice flowing colour result. If, for example, you have more leftover from one particular colour than of the other colours, you can use that one for more rounds after each other before switching colours again.
Knit in the colourwork pattern until your project reaches the desired length. Do have a look at the finishing instructions to see how long you want to make the flap.
Voor de kleurwissels zijn er geen regels. Ik denk wel dat het het mooiste is als je de lichte en donkere kleur niet allebei in dezelfde toer wisselt. Als je naar mijn voorbeeld kijkt in de foto, zie je misschien dat ik na 4 toeren van de lichte kleur heb gewisseld. Een paar toeren later wisselde ik de donkere kleur. Als je de wisselingen zo laat verspringen krijg je een mooi vloeiend resultaat. Als je van een bepaalde kleur meer overhebt dan van de andere kleuren, dan kun je deze wat meer gebruiken voordat je weer wisselt.
Brei verder in het kleurwerkpatroon totdat je project de gewenste lengte heeft. Neem alvast een kijkje bij de afwerking instructies om te bepalen hoe lang je de flap wilt hebben.

Before casting off, knit 1 round with just the cast off colour. I used one of my light colours, you can use any colour you like.
Voordat je afkant, brei je 1 toer met enkel de afkantkleur. Ik gebruikte daarvoor een van de lichte kleuren, je kunt elke kleur gebruiken die je wilt.

Cast on two additional stitches with the knitted cast on (tutorial video here). You need these extra stitches to prepare for the i-cord bind off.
Zet nog twee steken op met de gebreide opzet (Engelse tutorial video). Je hebt deze extra stn nodig voor het i-cord/punnikkoord afkanten.

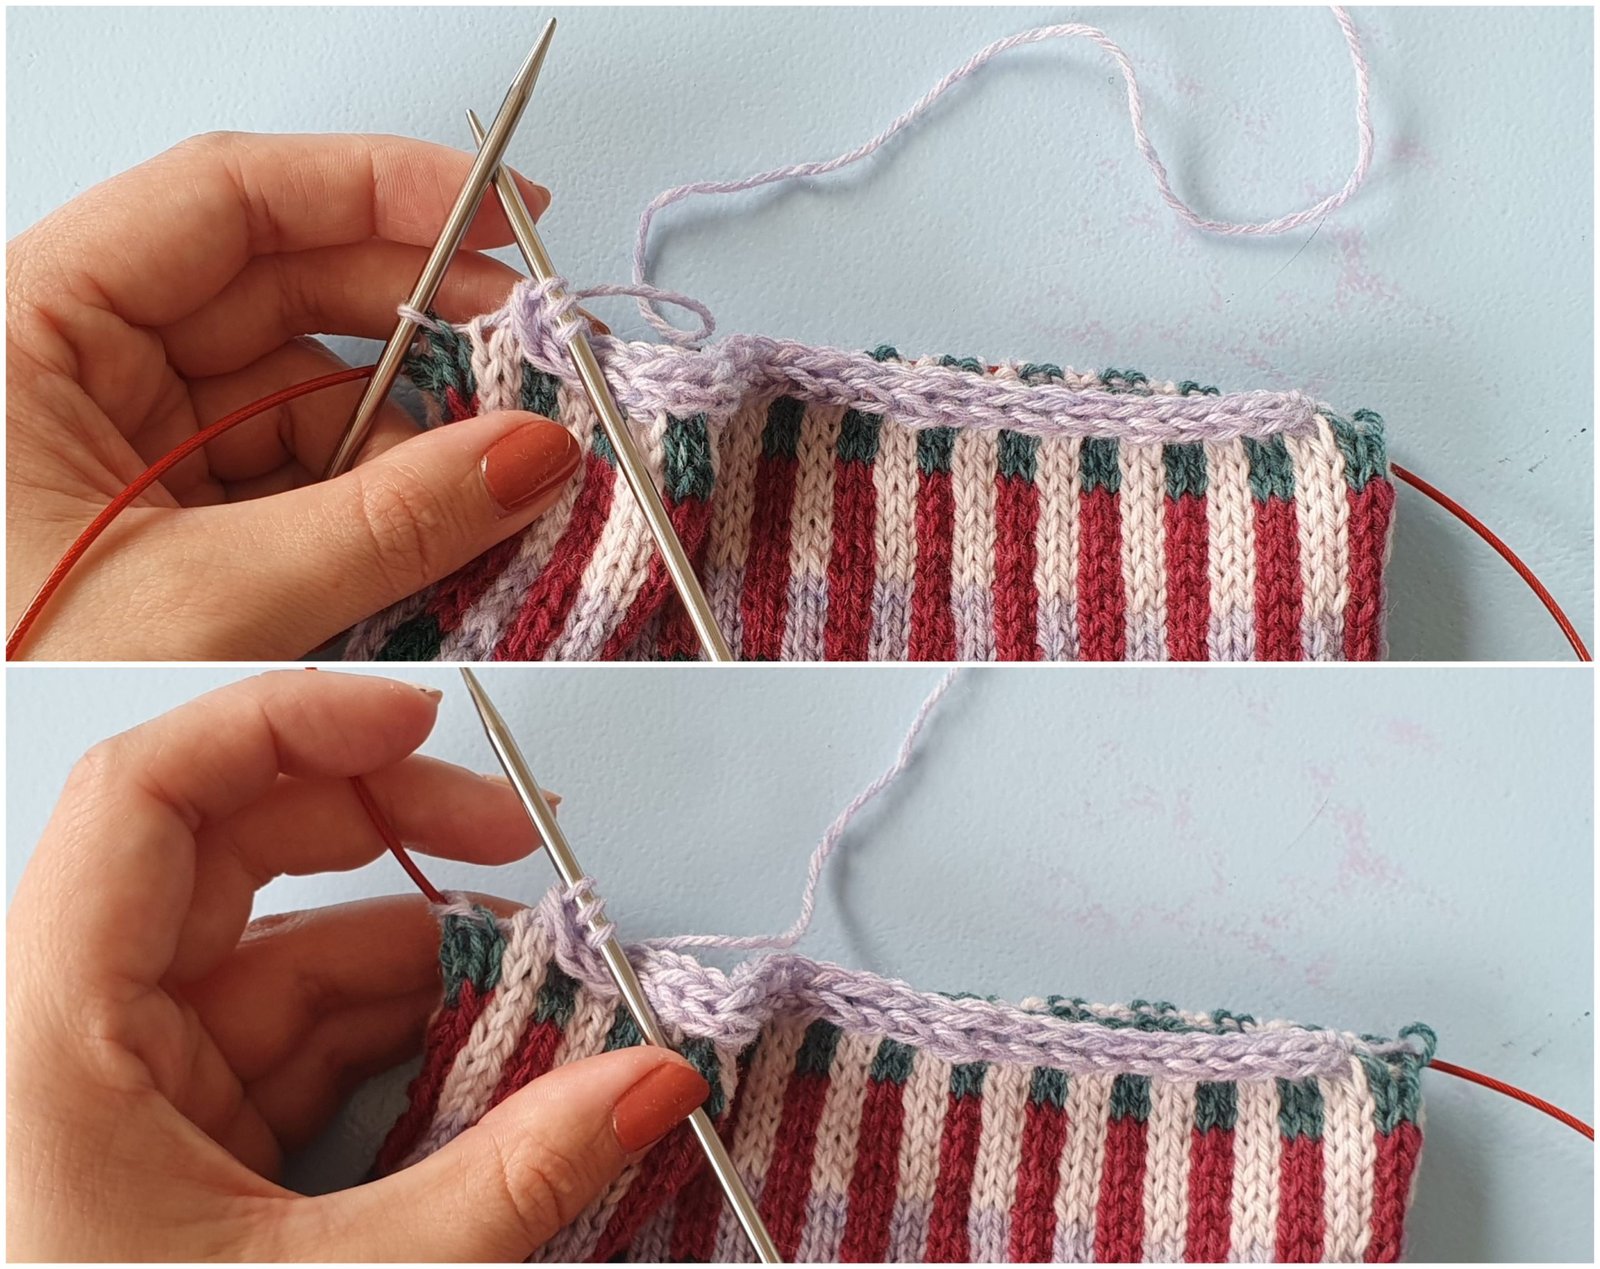
For the i-cord bind off, repeat these steps: knit 2 sts from the lefthand needle, then we knit the next 3 sts together with an ‘sssk’ (slip slip slip knit). To do this, you slip the next 3 sts one by one, knitwise. Then put the lefthand needle back into the 3 sts (see middle photo above), and knit them together. Now you have 3 sts on your righthand needle, put them all back on the lefthand needle (see right photo above), and repeat. I have a tutorial for an i-cord bind off, but please note in this video I’m only knitting 2 sts together, for this pouch you’re knitting 3 sts together.
Voor het punnikkoord afkanten herhaal je deze stappen: brei 2 stn van de linkernaald, brei de volgende 3 stn samen met ‘3afh.1r’ (3 afhalen 1 recht). Wat je doet: haal de volgende 3 stn één voor één recht af. Plaats de linkernaald weer terug in de 3 stn (zie middelste foto hierboven) en brei ze samen. Nu heb je 3 stn op de rechternaald, zet ze terug op de linkernaald (rechterfoto hierboven) en herhaal. Ik heb een Engelse tutorialvideo voor deze afkantmethode, maar let op: in de video brei ik 2 stn samen terwijl je voor dit tasje 3 stn samenbreit.
When you get to the end of the first side, there will be 1 st left on your lefthand needle. Slide that one stitch to the second side (see photo collage above).
Als je bij het eind van de voorkant komt heb je 1 s over op je linkernaald. Laat de steek naar de achterkant glijden (zie foto’s hierboven).
On the second side, place two stitchmarkers: one at 1/3 and one at 2/3. If you have 52 sts on each side, that means you place them at 17 sts from both edges. These will be the places where you create the button loops.
Aan de achterkant (tweede helft van je steken) plaats je twee steekmarkeerders: een op 1/3e, en een op 2/3e. Als je 52 stn aan elke kant hebt, plaats je ze 17stn verwijderd vanaf de zijkant. Hier maak je de knoopslussen.
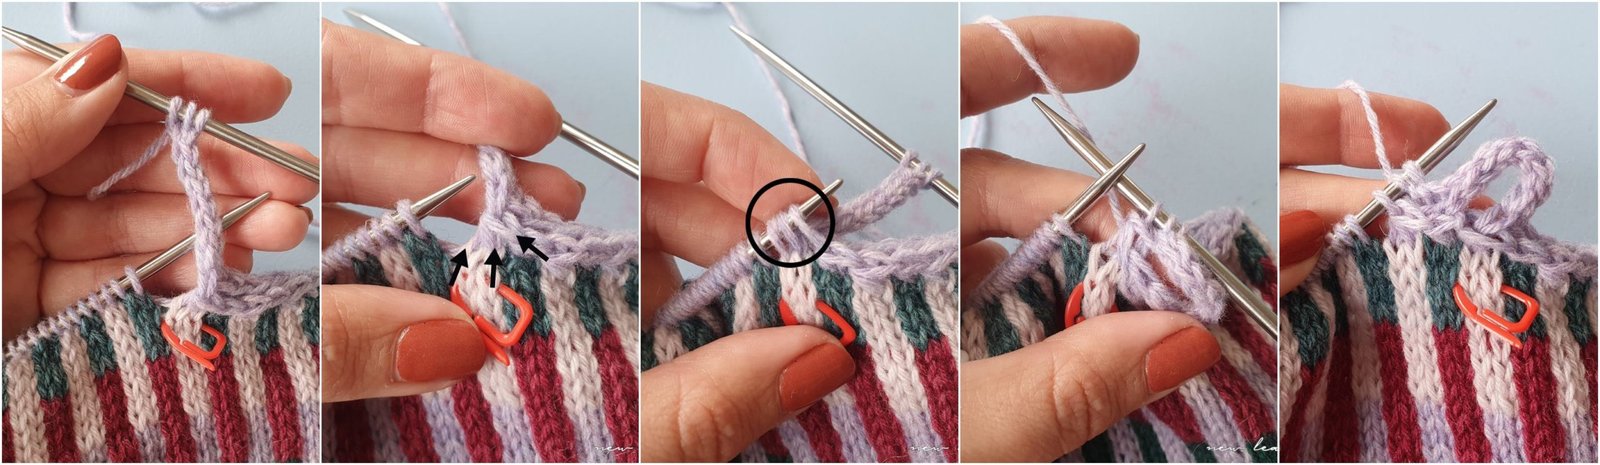
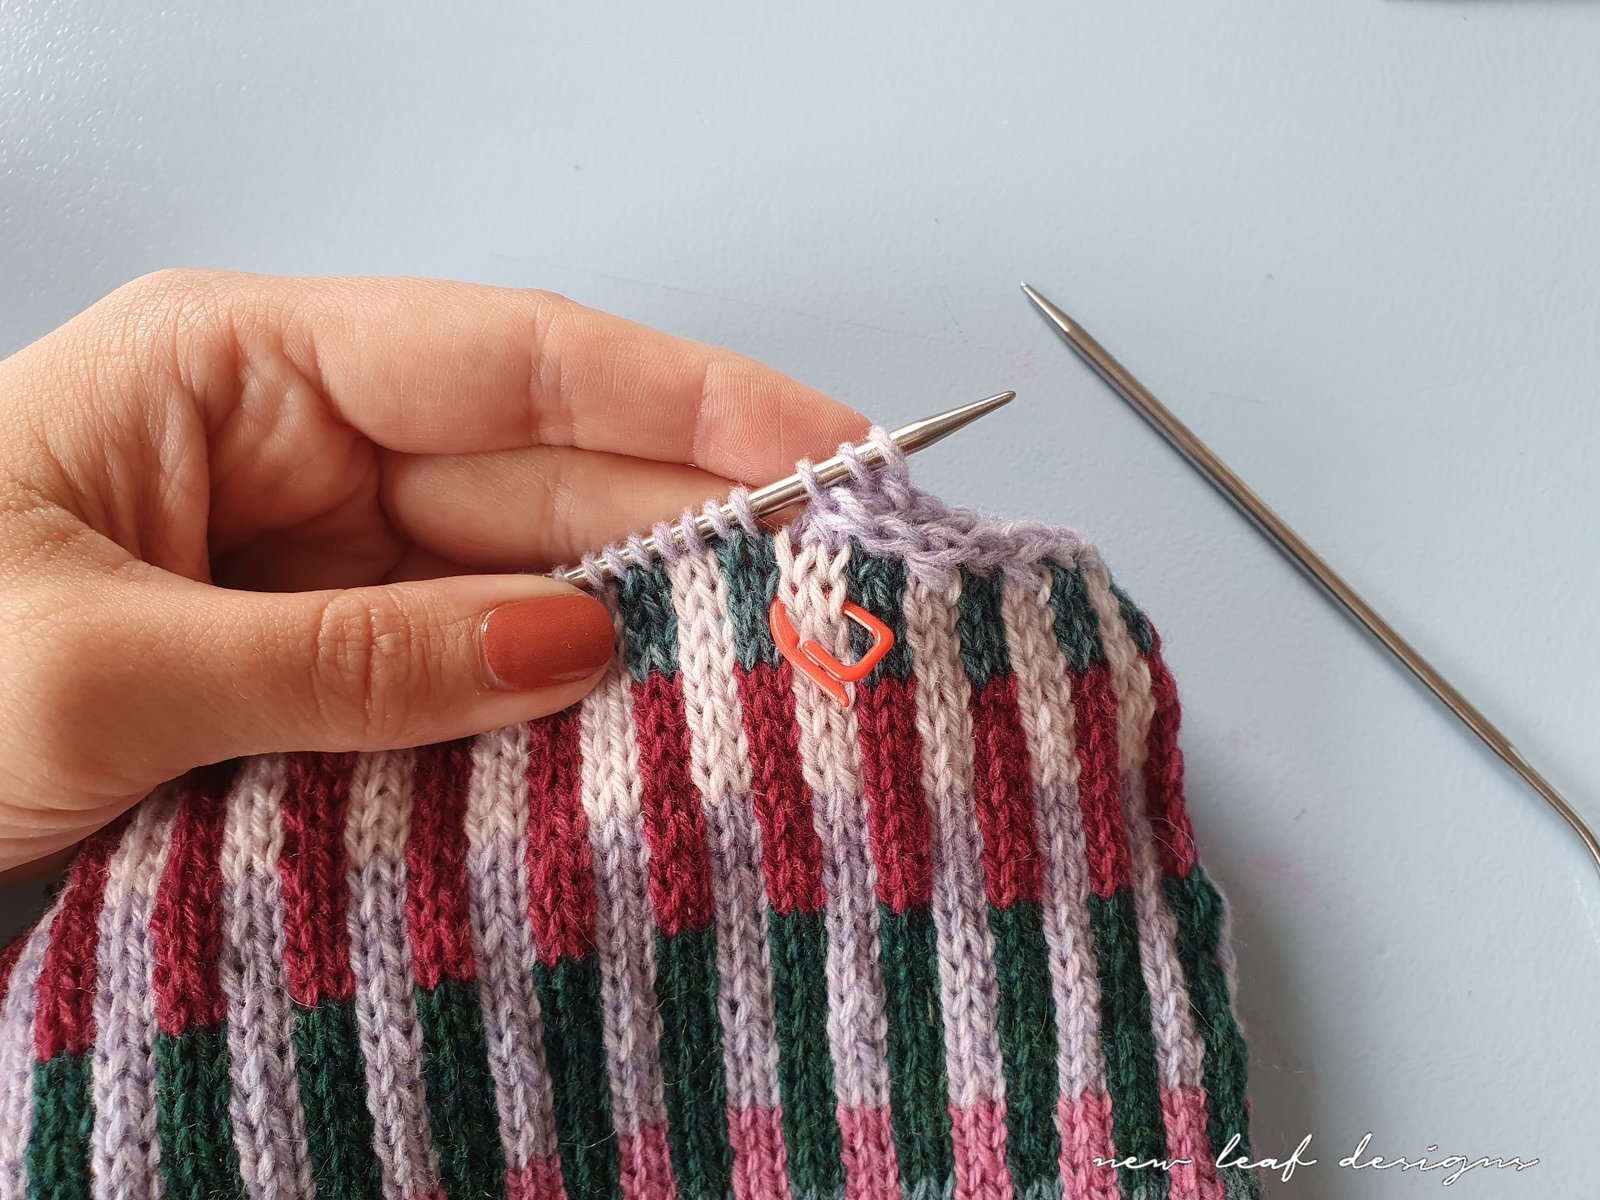
Cast off until you are at the first marked spot, then knit in i-cord for a few rounds to create a loop: knit the 3 sts, place them back on the lefthand needle, and repeat, without knitting stitches together with the cast off edge. Knit about 10 rounds of i-cord, this will give you enough length to make a button loop. The loop should allow the button to pass through, but it should not be bigger than the button. Note down the number of rounds you have knit, so you can make it exactly the same for the second loop later.
To close the button loop, insert the lefthand needle back into the 3 sts used for the previous sssk. Look at the second photo from the collage above, I’ve marked the sts with arrows. Pick them up (pic 3 above), and knit them all together (pic 4).
Continue in the cast off pattern to the other marker, and create the second button loop there in the same way.
Kant de stn af totdat je bij de eerste markeerder bent. Brei dan een aantal toeren i-cord/punnikkoord om de lus te maken: brei de 3 stn, plaats ze weer op de linkernaald, en herhaal dit, zonder stn samen te breien. Brei ongeveer 10 toeren, dit is genoeg lengte voor een knoopslus. De lus moet groot genoeg zijn zodat de knoop erdoorheen kan, maar niet groter dan de knoop. Noteer hoeveel toeren je precies breit, dan kun je dit voor de tweede lus opnieuw doen.
Om de lus te sluiten steek je de linkernaald in de 3 stn die je voor de laatste 3afh.1r hebt gebruikt. Zie hiervoor de tweede foto in de collage hierboven, ik heb ze aangeduid met pijltjes. Pak ze op (foto 3), en brei ze samen (foto 4).
Ga verder met afkanten tot de andere markeerder en doe hier hetzelfde.
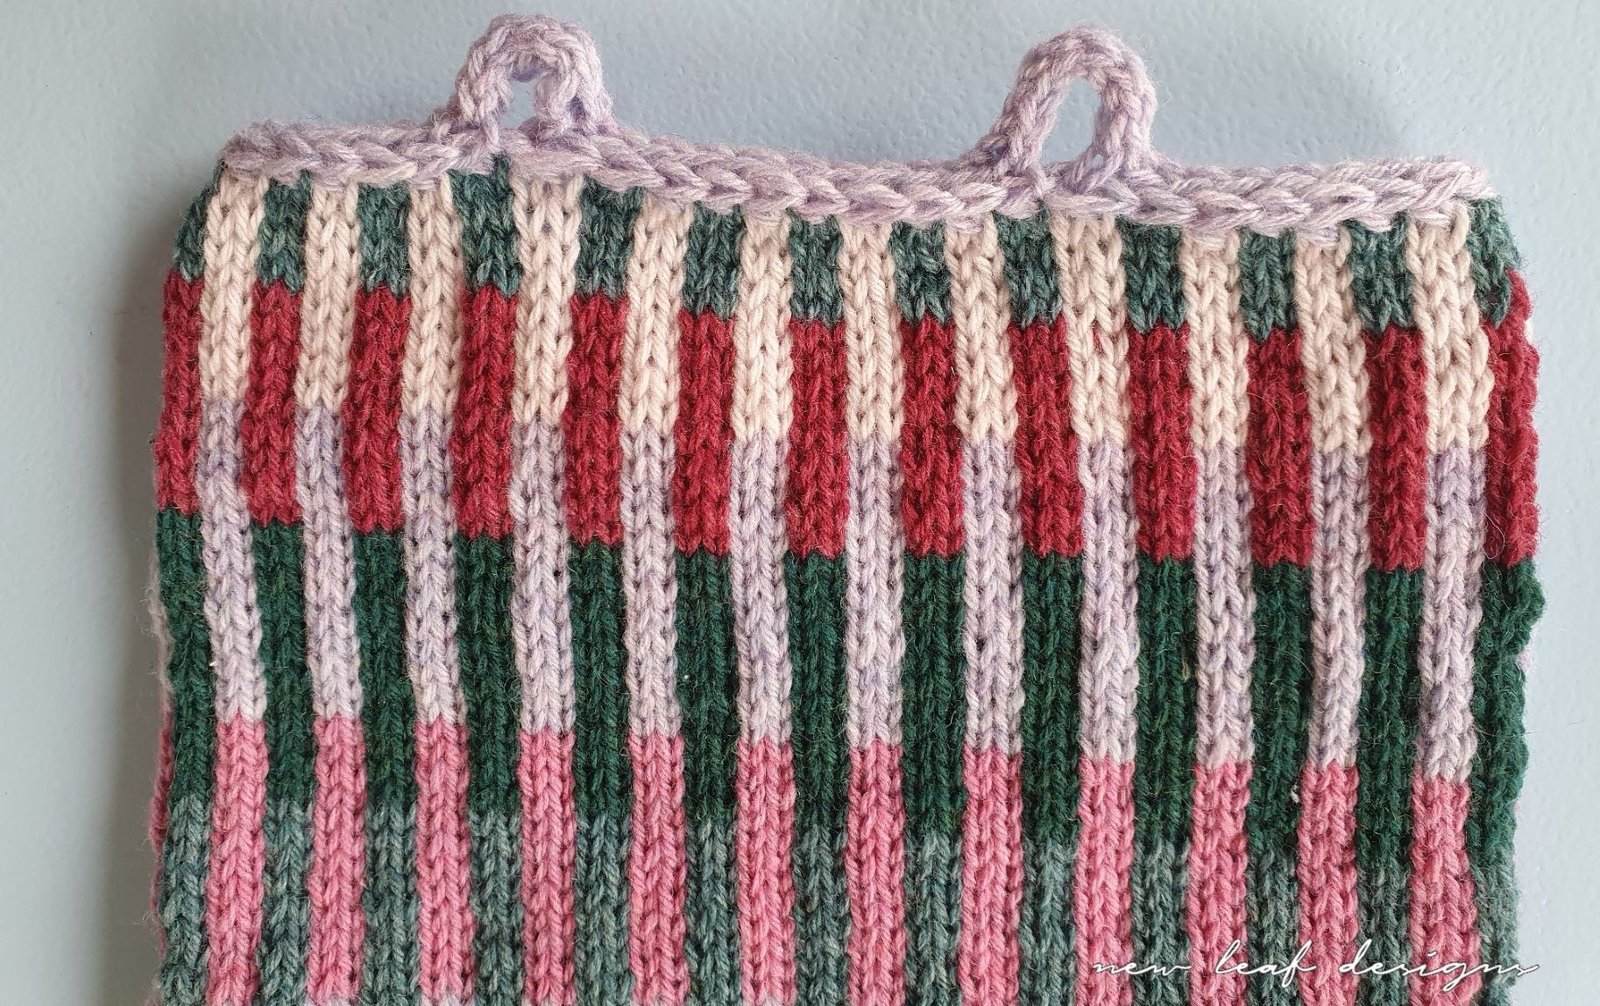
Continue knitting the i-cord cast off until there are 4 stitches left: 3 sts of the i-cord, and 1 st left on the cast off edge. k2, ssk. Sew the remaining 3 sts to the cast on edge of the i-cord.
Kant verder af tot je nog 4 stn over hebt: 3 stn van het punnikkoord, en 1 s van de rand van het tasje. Brei 2 stn recht, en dan 2afh.1r (dezelfde mindering maar dan met 2 stn ipv 3). Naai de overige 3 stn samen met de eerste 3 stn van de rand.
Finishing | Afwerking
If you used the long tail cast on, be sure to sew the bottom edges together.
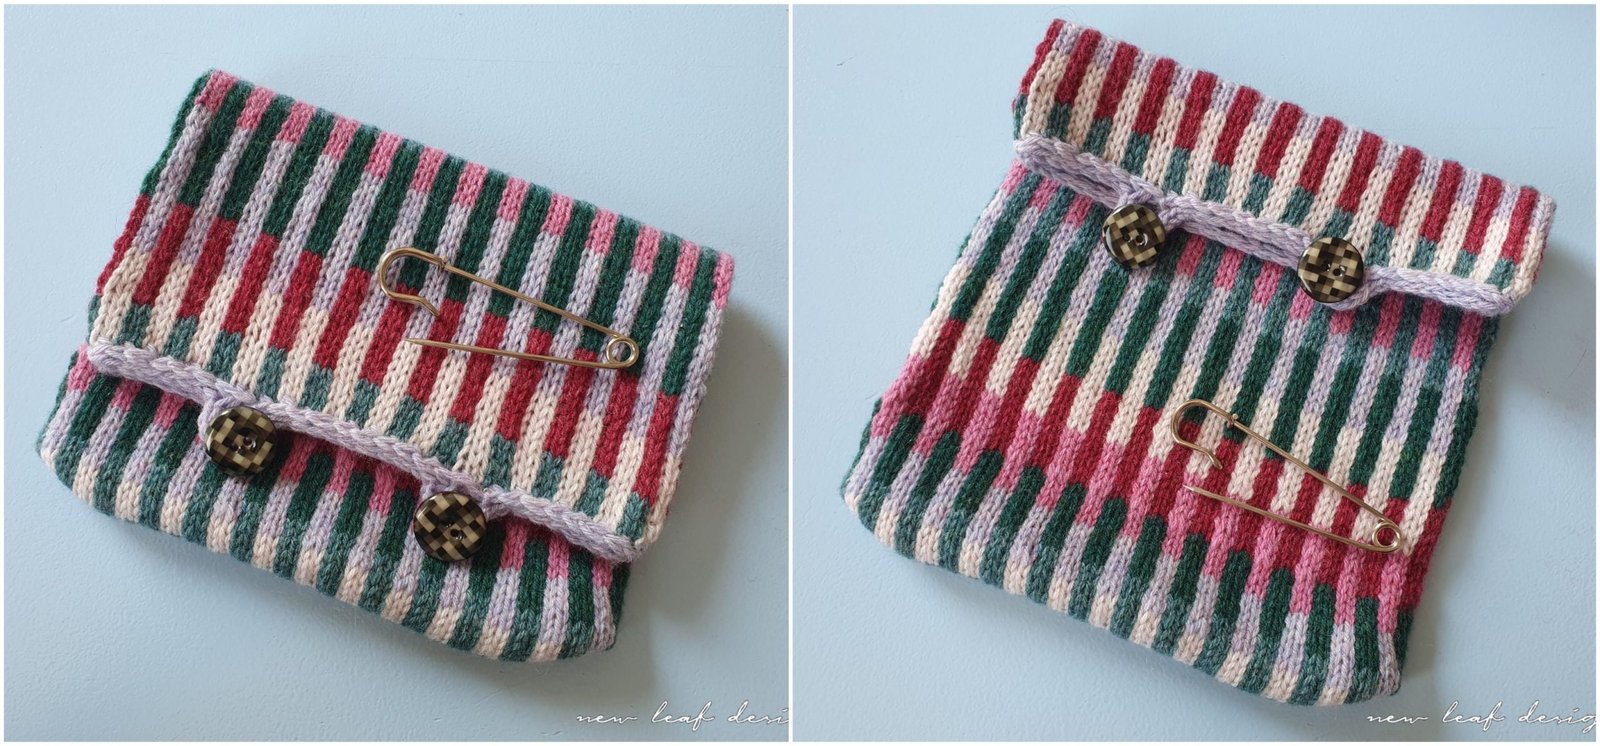
Before sewing the buttons into place, we need to determine the placement of the kilt pin. Do you want to place the buttons lower (top left photo), so that the kilt pin can be placed on the flap, or do you want to place the buttons higher up (top right photo) so that the kilt pin is attached to the pouch?
Als je de duim-en-wijsvinger methode hebt gebruikt, naai dan nog de onderkant samen.
Voordat je de knopen erop naait, bepaal je eerst waar je de kiltspeld wilt hebben. Wil je de knopen lager (foto linksboven) en de kiltspeld daarboven, of wil je de knopen hoger (foto rechtsboven) met de kiltspeld daaronder?

When you have decided on the button placement, pin a stitchmarker in each spot to mark it.
Als je hebt bepaald waar je de knopen wilt hebben, markeer deze plekken dan met speldjes.

Sew the buttons onto the marked stitches. I used some thinner cotton thread for this, but you could also use the Scheepjes Metropolis yarn.
Naai de knopen op de gemarkeerde steken. Ik gebruikte een dunne katoenen draad, maar je kunt prima het Scheepjes Metropolis garen gebruiken.
Stitch markers | Stekenmarkeerders
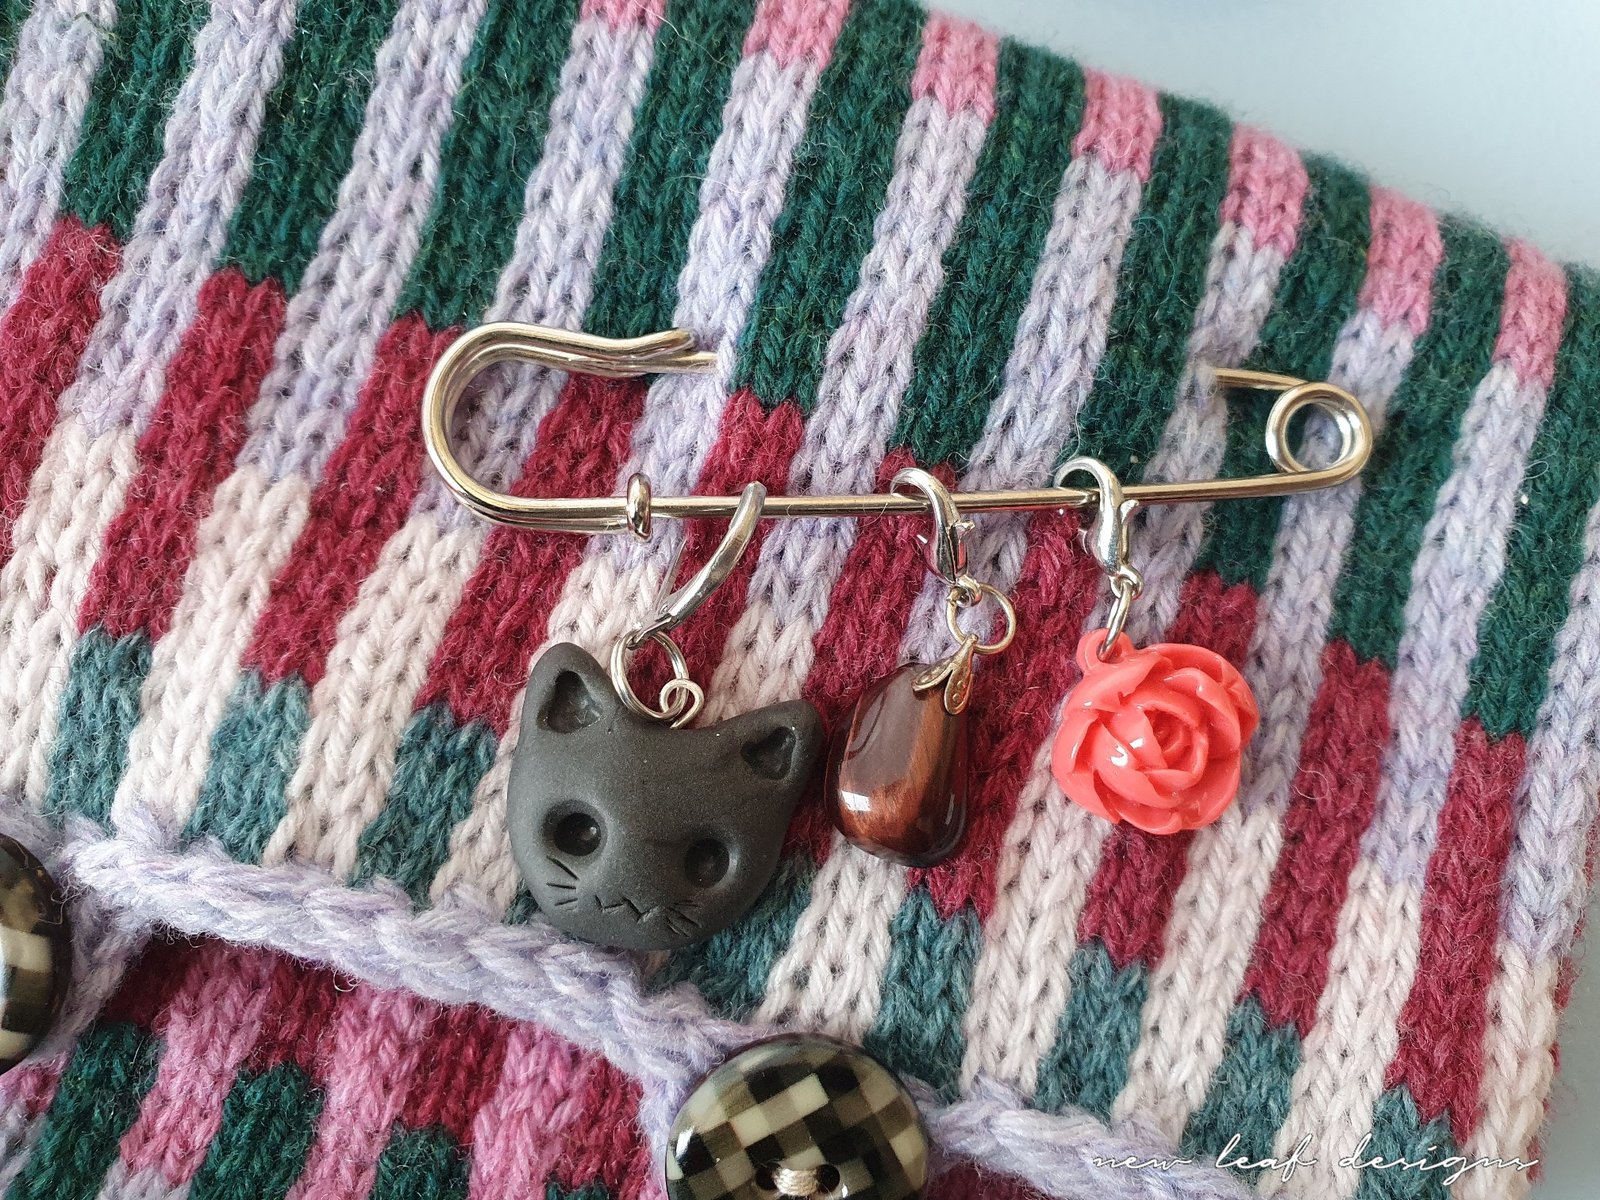
I thought it would be nice to attach some stitch markers to the kilt pin. Maybe you choose the ones you used for the Scheepjes KAL 2022 project, or perhaps some that make you think of the Outlander story, Scotland, or that in some other way can be linked to the KAL. I picked a rose stitchmarker because it links to the KAL quite nicely, with the Rose chart from Week 9 and one of the official colournames being ‘Rosa’. I also chose a gemstone charm, as a link to the gemstones used for time travel in Outlander. And as a matter of fact, the place where I got this charm is quite interesting! In the Netherlands, we also have stone formations like the stone circle in the fictional place of Craigh na Dun, called ‘Hunebedden’. A couple of years ago I visited some of the Hunebedden – with some of the other Scheepjes bloggers actually! – and I got the charm at the visitor centre. Hmm, might this be my time traveling talisman? 😉
And thirdly, the grey cat charm is obviously for my cat Momo! I was very kindly given this stitch marker by Joyce, who came to one of my KAL workshops. And she made the charm herself!
I’m very happy with my little collection of stitch markers for my Calluna pouch, I hope it inspires you to pick something to hang onto your kilt pin.
TIP: When you attach the stitch markers, also poke them through the fabric a little bit so they sit nicely in place.
Ik vond het een leuk idee om stekenmarkeerders aan de kiltspeld te bevestigen. Misschien heb je enkele markeerders die je tijdens de Scheepjes KAL hebt gebruikt, of misschien sommige die je doen denken aan het Outlander verhaal, Schotland, of die je op een andere manier aan de KAL doen denken. Ik koos een stekenmarker van een roos omdat we tijdens de KAL ook een rozenpatroon hebben gebreid, en omdat een van de garenkits ‘Rosa’ heette. Ik had ook nog een hangertje met een edelsteen eraan, als een link naar de edelstenen voor tijdreizen in Outlander. En nu ik eraan denk, heb ik deze steen op een wel heel toepasselijke plek gekocht! Een paar jaar geleden ging ik – toevallig met enkele andere Scheepjes bloggers – naar de Hunebedden. Die doen me nu natuurlijk erg denken aan de stenen bij Craigh na Dun! Bij het bezoekerscentrum kocht ik dit steentje, dat ik tot een stekenmarker heb gemaakt. Misschien is dit mijn tijdreis talisman? 😉
De stekenmarkeerder met het grijze katje eraan is natuurlijk voor mijn kat Momo! Dit bedeltje kreeg ik van Joyce die naar een van mijn KAL workshops kwam, en ze heeft hem ook nog eens zelf gemaakt! Superlief 🙂
Ik ben heel blij met mijn collectie van bedeltjes voor het Calluna tasje, en hopelijk geeft het je ideeën wat je aan de kiltspeld kunt hangen.
TIP: Als je de stekenmarkeerders bevestigt, prik ze dan ook door de stof zodat ze op die hoogte blijven hangen.

Bag strap – yes or no? | Hengsel eraan – ja of nee?
If you want to use your Calluna project as a tablet cover, you will probably not need a strap or handle for it. But it’s definitely something to consider if you’re making it into a phone pouch! I imagine it as a very handy accessory to have on a shoulder strap when you go for a walk, and just need your phone with you. I have some ideas that would work well for a bag strap, so keep on reading.
Als je het Calluna project als een tablethoes wilt gebruiken, heb je er geen hengsel aan nodig. Maar het is zeker handig als je er een telefoontasje van maakt. Dan heb je een handig tasje voor als je even gaat wandelen en alleen je telefoon nodig hebt. Hieronder vind je enkele ideeën voor het maken van een hengsel.

You want to attach the ends of the strap to the marked spots in the photo above, where you fold over the flap. Before you make the strap, just put your phone or whatever object you want to be carrying in the pouch. Phones tend to be quite heavy, so the strap needs to be securely fastened to the pouch. Don’t just sew it to a few stitches, but use a wider space to attach the straps.
For the straps to be really secure, the best thing would be to line the pouch with fabric, so that you can sew the strap to the lining fabric as well. Fabric tends to have less stretch – especially woven fabrics – so if you’re carrying heavy objects like your phone in this pouch, it’s best to line it.
Je wilt het hengsel bevestigen aan de gemarkeerde plekken in de foto hierboven. Voordat je het hengsel maakt moet je je afvragen, hoe zwaar zijn de dingen die je in het tasje wilt doen? Telefoons kunnen al best zwaar zijn, dus moet het hengsel goed vast zitten. Naai het niet aan slechts een paar steekjes, maar bevestig het aan een groter oppervlak.
Wat je het beste kunt doen als je echt wilt dat het hengsel goed vast zit, is het tasje voeren met stof. Dan kun je het hengsel door het breiwerk heen aan de stof bevestigen, en zal het goed op zijn plek blijven. Stof heeft meestal minder rek dan breiwerk, vooral geweven stoffen, dus is dit echt iets om te overwegen.
Strap ideas | Ideeën voor het hengsel
To continue in the same style of the pouch, you could make the strap with i-cord knitting too. Too make it sturdy, use your Scheepjes Metropolis yarn double stranded – two strands of one colour, or one strand of two colours.
You can also crochet the strap, which usually is sturdier than knitting. You could use the strap pattern from my Fleur-de-Lis bag, pictured below. Find the pattern part with the strap instructions here. Feel free to make it a little narrower to match the Calluna pouch better.
Om het hengsel in dezelfde stijl te maken als het tasje, kun je deze ook van punnikkoord maken. Om het wat steviger te maken kun je hiervoor Scheepjes Metropolis dubbeldraads gebruiken – twee draden van dezelfde kleur, of één draad van twee kleuren.
Je kunt het hengsel ook haken, wat meestal wat steviger is dan breien. Ken je mijn patroon voor de Fleur de Lis tas al? Hier haak je ook een mooi hengsel bij, vind het patroon hier. Voel je vrij om het wat smaller te maken om beter bij het Calluna tasje te passen.

Inspiration | Inspiratie
Do you have even more leftover yarn, or is the Calluna pouch not really your thing? Maybe you’ll like one of these ideas:
Heb je nog meer restjes over, of is het Calluna tasje niet echt jouw ding? Misschien vind je een van deze ideeën leuk:
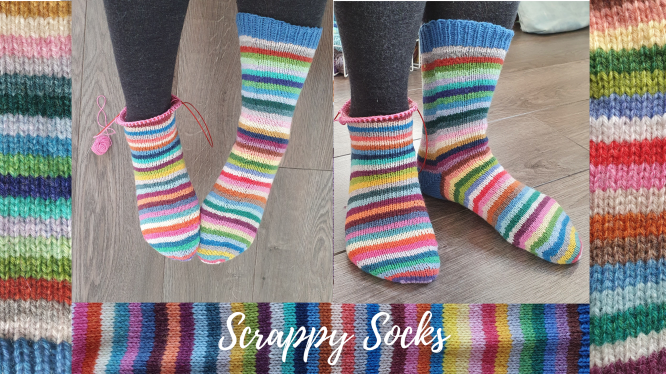
Scrappy Socks
The Scrappy Socks are a super fun project, and with my handy ‘wrapping-in-ends’ method you won’t have to weave them in! You wrap the ends in the same way you wrap floats, but you need to do it in two directions to make them stay. Watch my video here. I recommend at least 60 grams of scraps for an adult pair of socks. You knit them toe-up, so if you don’t know if you have enough yarn, knit the first sock until you still have half of your scraps left. Get the Scrappy Socks pattern via my patternshops:
De Scrappy Socks zijn heel leuk om te maken, en met mijn manier van ‘eindjes inpakken’ hoef je de eindjes ook niet meer met de naald weg te werken. Je pakt ze op dezelfde manier in als bij het kleurwerk breien, maar dan in twee richtingen. Bekijk mijn Engelse video hier. Je hebt tenminste 60 gram garen nodig voor een paar sokken in volwassen maat. Je breit ze van de teen omhoog, dus als je niet weet of je genoeg garen hebt brei je de eerste sok totdat je op de helft van je garen bent. Vind het Scrappy Socks patroon (ook in Nederlands) in mijn patroonwinkels:
Shop the PDF version here in my webshop Or purchase on Ravelry
Home Hat
The Home Hat uses at least three colours, but you can add so much more! Whether you knit the KAL with six colours or more, if you have more than 50 grams of scraps you can knit this hat. Find the free pattern right here, or purchase the printable PDF version in my shops:
De Home Hat gebruikt ten minste drie kleuren, maar je kunt er nog meer toevoegen! Of je nu de KAL kussens hebt gebreid met zes kleuren of meer, als je meer dan 50 gram over hebt kun je deze muts breien. Vind het gratis patroon hier, of koop de PDF versie in mijn webwinkels:
Shop the PDF version here in my webshop Or purchase on Ravelry
Happy at Home Mittens
Looking for more of a challenge? Then the Happy at Home Mittens are for you! They are designed to match the Home Hat, so you can make a fun set. You can find the pattern in my patternshops linked below, or you can subscribe to my Patreon page where I have the FULL step by step tutorial video for these mittens (over 2 hours long!)
Ben je in voor een uitdaging? Dan zijn de Happy at Home Mittens iets voor jou! Deze wanten heb ik ontworpen om bij de Home Hat te passen zodat je een leuke set kan maken. Vind het patroon in mijn webwinkels hieronder, of je kunt je abonneren op mijn Patreon pagina waar je de Engelse tutorialvideo vind waar ik deze wanten volledig stap voor stap met je brei. (meer dan 2 uur lang!)
Shop the PDF version here in my webshop Shop on Ravelry Patreon Page
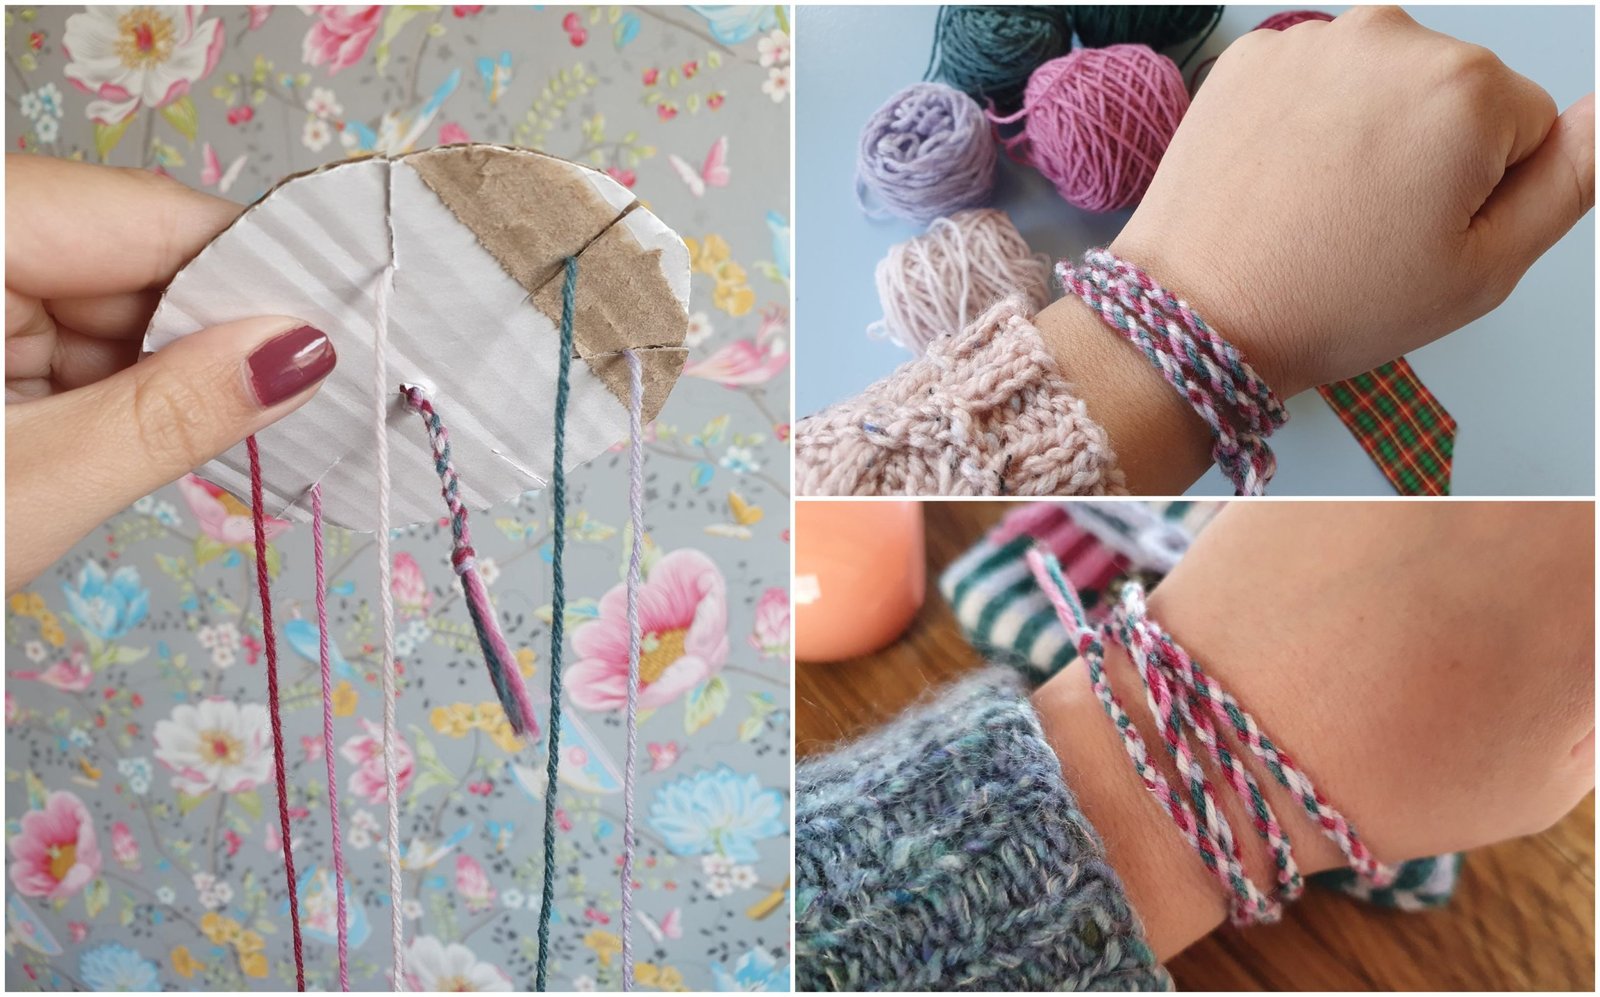
Kumihimo Bracelet
Have you heard of Kumihimo? It’s a Japanese braiding style, and it’s so fun to try! To start, you only need some cardboard, scissors, and some leftover yarns. Find my tutorial for this quick bracelet right here.
Heb je al eens gehoord van Kumihimo? Het is een Japanse vlechttechniek, en heel leuk om te proberen. Om te beginnen heb je alleen wat karton nodig, een schaar, en wat garen. Vind mijn tutorial voor dit simpele armbandje hier.


No Comment