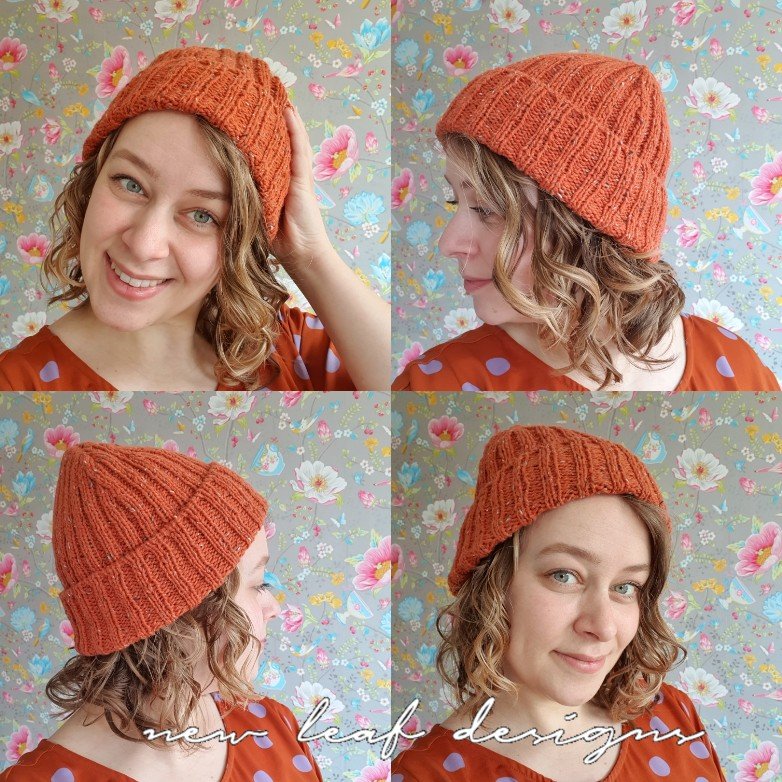
The Highland Hat – with Scheepjes Terrazzo
Knit the Highland Hat in an evening or two with Scheepjes Terrazzo, you only need one ball! The cast on is the hardest part, like with many of my patterns 😉 As always, I am here to the rescue with another video! Please note the needles necessary for this project, then pick your favourite colour, and good luck!
The free pattern is down below. If you rather have a PDF without ads, no Dutch text in between, and easy to print, then find the PDF in my shops via the buttons below.
De Highland Hat brei je in een avond of twee met Scheepjes Terrazzo, en je hebt er maar één bol voor nodig! Het moeilijkste? Tja, dat is weer de opzetmethode, zoals met veel van mijn patronen 😉 Maar zoals altijd heb ik daar ook weer een filmpje voor, al is het alleen in het Engels. Kijk goed naar de naalden die je nodig hebt, kies een leuk kleurtje, en veel succes!
Het gratis patroon vind je hieronder. Als je liever een PDF hebt zonder advertenties, zonder Engelse tekst ertussen, en die gemakkelijk te printen is, vind dan de PDF versie via de knoppen hieronder.
Shop the PDF version here in my webshop Or purchase on Ravelry
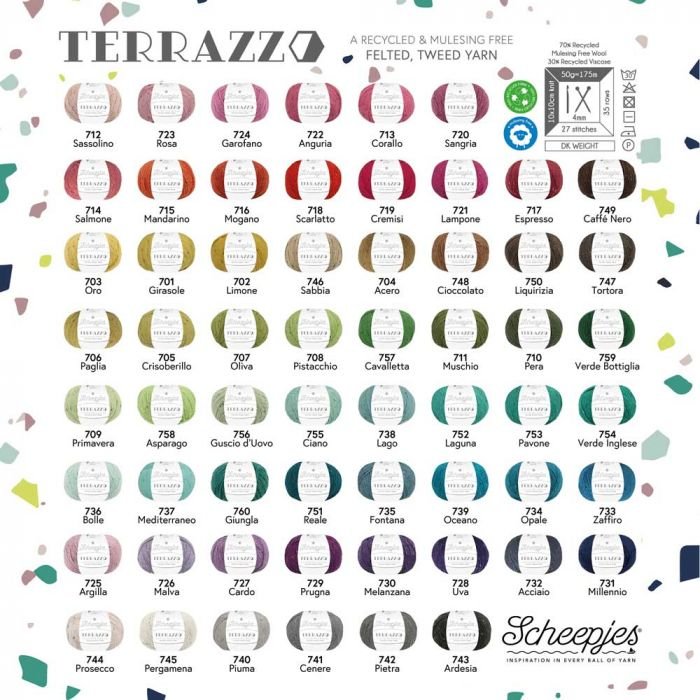
Scheepjes Terrazzo
The Highland Hat uses just one ball of Scheepjes Terrazzo, so it’s a perfect pattern to try out this fun new yarn. Get your Scheepjes Terrazzo at your local Scheepjes retailer, or shop online via one of the affiliate links below.
De Highland Hat heeft maar één bol Scheepjes Terrazzo nodig, dus het is het perfecte patroon om dit leuke nieuwe garen uit te proberen. Vind Scheepjes Terrazzo bij jouw Scheepjes winkel, of via een van de affiliate links hieronder.
Wool Warehouse – and find the Terrazzo colourpack here.
Caro’s Atelier – en vind het Terrazzo colourpack hier.

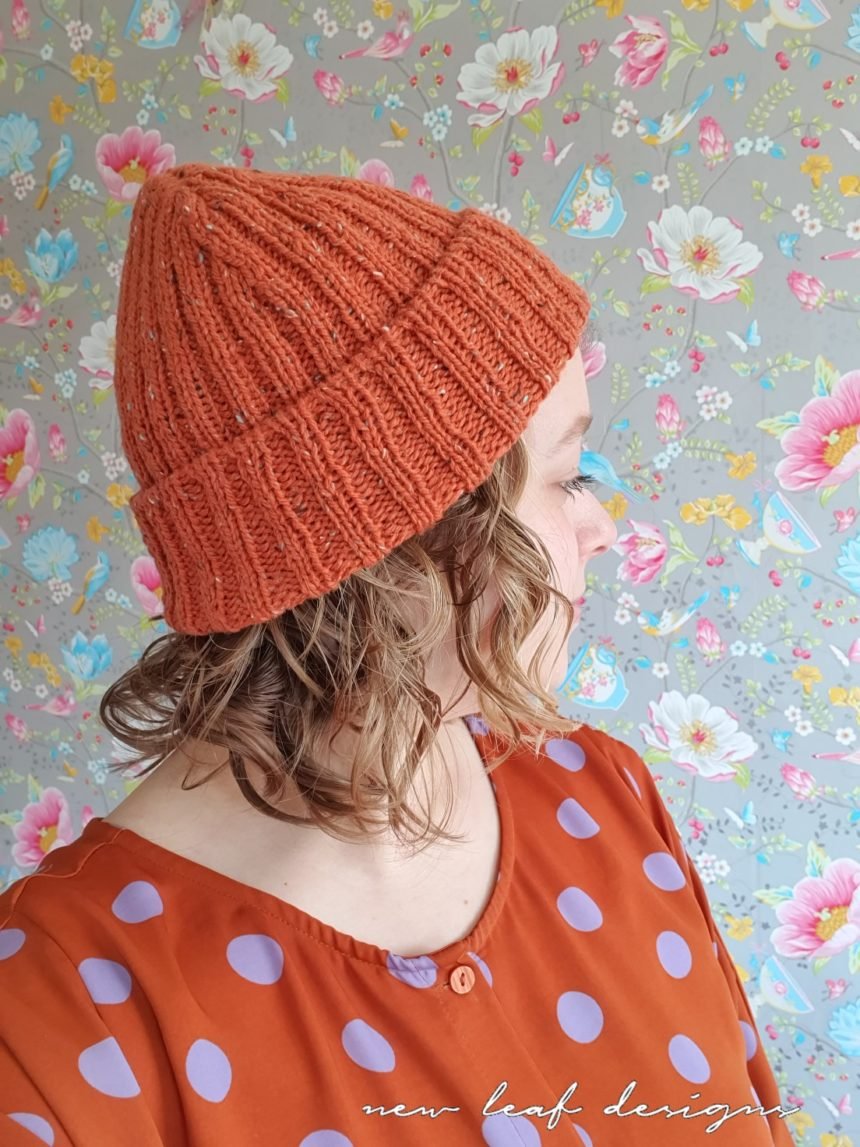
Here’s a picture of me and my tester Joyce! We met up at a workshop recently and decided to take a selfie with our Highland Hats 🙂 Joyce made hers out of Scheepjes Terrazzo Melanzana (730), and I made mine with Mogano (716).
Tijdens een workshop ontmoette ik mijn tester Joyce! We hadden allebei onze Highland Hat mee, dus bedachten we een selfie te maken 🙂 Joyce heeft de hare gemaakt van Scheepjes Terrazzo Melanzana (730), en ik maakte de mijne met Mogano (716).
Other Materials | Overige materialen
You will need circular needles of 3.5mm size, or size needed to obtain gauge. Use 40cm length needles, or 80cm length needles for magic loop knitting. For the cast on, you will need an additional circular needle of 4.5mm/5mm size. If you change the 3.5mm needles, also change the 4.5mm needles accordingly. For the cast off, you will need an additional needle (circular, straight, or double pointed) of 3.5mm size or smaller. A crochet hook of size 3.5mm or smaller will also do. Aside from these, you will also need scissors, a darning needle, 4 stitch markers and 1 beginning of the round marker.
Je hebt rondbreinaalden van 3,5mm nodig, of de maat waarmee je de stekenverhouding krijgt. Gebruik naalden van 40cm lengte, of 80cm lengte op magic loop. Voor de opzet heb je nog een andere rondbreinaald nodig van 4,5mm/5mm. Let op, als je de 3,5mm naalden aanpast naar een andere maat, pas dan ook de 4,5/5mm naalden aan. Voor de afkantmethode heb je nog een andere naald nodig (rondbreinaald, rechte naald of dubbelpuntig) van 3,5mm of kleiner. Een haaknaald van 3,5mm of kleiner kan ook. Hiernaast heb je nog een schaar, stopnaald, 4 stekenmarkers en 1 begin-van-de-toer marker nodig.
Gauge | Stekenverhouding
This gauge is measured on an unblocked and unpinned fabric. For ribbing, this means that the knit stitches will show on the surface, while the purl stitches hide between them. Do count the purl stitches in your 10cm gauge measurement as well, even if they don’t show. Gauge: 28 sts and 28 rounds of 2×2 ribbing measures 10 x 10cm (4×4″).
De stekenverhouding meet je over een niet-opgespannen en niet vastgespeld breiwerk. Voor boordsteek betekent dat, dat je de rechte steken ziet, en de averechte steken zich daartussen verstoppen. Tel de averechte steken binnen de 10cm alsnog mee, ook al zie je ze niet. De stekenverhouding is: 28 stn en 28 toeren van 2×2 boordsteek meten 10 x 10 cm.
Notes | Opmerkingen
The Highland Hat is knit from the brim to the crown. You cast on with a tubular cast on, and cast off with a three needle bind off.
De Highland Hat brei je van de rand naar de kruin. Zet op met de Tube opzetmethode, en kant af met drie naalden.
Abbreviations | Afkortingen
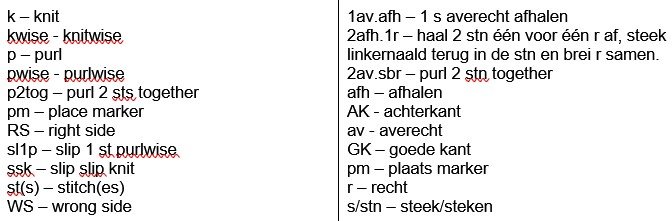
Sizes | Maten
Two adult sizes available: 104 st size for a 50-60cm head circumference, and 120 st size for a head circumference over 60cm. Please note the ribbing will make the hat stretch to fit a wide range of sizes. For further customization, cast on a multiple of 8 sts.
Twee volwassen maten beschikbaar: 104 stn voor 50-60cm hoofdomtrek, en 120 stn voor een hoofdomtrek van meer dan 60cm. De boordsteek zal er voor zorgen dat de muts voor veel maten zal passen. Voor verdere aanpassing kun je een veelvoud van 8 stn opzetten.
Pattern | Patroon
Nederlands patroon onderaan
For the cast on, watch this video.
Using the larger needle and Judy’s Magic Cast On, cast on 52(60) sts onto each needle. Still using the larger needle, knit 2 rounds of stockinette. With the cast on itself counting as 1 round, you have knit a total of 3 rounds now, or 6 rows. Now you have enough ‘tube’ fabric to zip the stitches together.
Move both needletips into the stitches and hold them in your left hand. With the smaller needle in your right hand, you are going to slip the stitches from the bigger needles to the smaller needle. The ‘front’ sts will be the knit stitches of our ribbing, and the ‘back’ sts will be the purl stitches. Please note: slip all sts pwise, even the k sts.
Start by slipping 1 k st from the front needle onto the smaller needle. Then:
*sl 2 p sts from back needle, sl 2 k sts from front needle; rep from * until you have 2 p sts left on the back needle and 1 k st on the front needle. Sl 2 p sts from back needle, and then sl 1 k st from the front needle. The working yarn is on the other end of the needle, so slide your work onto the other needletip so you can start knitting. Your work is not joined into the round yet.
Row 1: k1, *p2, k2; rep from * until last 3 sts, p2, k1. [104(120) sts]
Join your work into the round and place a marker to indicate the beginning of the round.
Round 2: k1, *p2, k2; rep from * until last 3 sts, p2, k1.
From now on, keep on knitting in 2×2 ribbing, knitting the stitches as they present themselves (knitting the knits and purling the purls), until your work measures 20cm in length.
From here, you should start knitting in magic loop because your work will become too small to knit on 40cm needles. Divide your work in half, with 52(60) sts on each half.
TIP: For a ssk only slip the first st, so you knit the first st through the front loop and the second st through the back loop, this looks neater.
Round 1: *k1, p2, k1 (pm between current and next st), ssk, work sts as they present themselves (k the k sts, p the p sts) to 6 sts before the end of the first half, k2tog, (pm in between current and next st), k1, p2, k1; rep from * for second half. [4 sts decreased: 100/116 sts]
Round 2: Work sts as they present, please note that might mean you just k1 or p1 instead of a full k2 or p2 column.
Round 3: *k1, p2, k1, ssk, work sts as they present to 2 sts before m, k2tog, k1, p2, k1; rep from * for second half. [4 sts decreased]
Round 4: Work sts as they present.
Rounds 5-14: Repeat Rounds 3 and 4 five more times.
Rounds 15-16: Repeat Round 3 two more times. 68/84 sts left at end Round 16.
Round 17: *k1, p2tog, k1, ssk, work sts as they present to 2 sts before m, k2tog, k1, p2tog, k1; rep from * for second half. [8 sts decreased: 60/76]
Round 18: *k1, p1, k1, ssk, work sts as they present to 2 sts before m, k2tog, k1, p1, k1; rep from * for second half. [4 sts decreased: 56/72]
Round 19: k1, p1, *k1, ssk, p2, k1, ssk, work sts as they present to 6 sts before m, (you should have ended with p2, with next k2tog using next 2 k sts) k2tog, k1, p1, k2tog, (now at m) k1. You now have 2 sts left until the end of the first half. We want to k these 2 sts together with the first 2 sts of the second half, rearrange your sts if necessary so that these 4 sts are on the same needle.
Knit them together like this: slip 2 sts (1p, 1k) together k2wise, so that the k st is laying on top. Slip the next k and p sts one by one as if preparing for a ssk. Insert left needle back into sts with tip coming out in front, and knit them all together. Let the 1 remaining st stay on the ‘first half’ of the sts, as if it was the st knit at the very end of the first half.
Rep from * for second half, knitting the last 2 sts of the round together with the first 2 sts of the next round in the same manner. Let the 1 remaining st of that decrease stay on the ‘second half’ of the sts, as if it was the st knit at the very end of the last round. [14 sts decreased: 42/58]
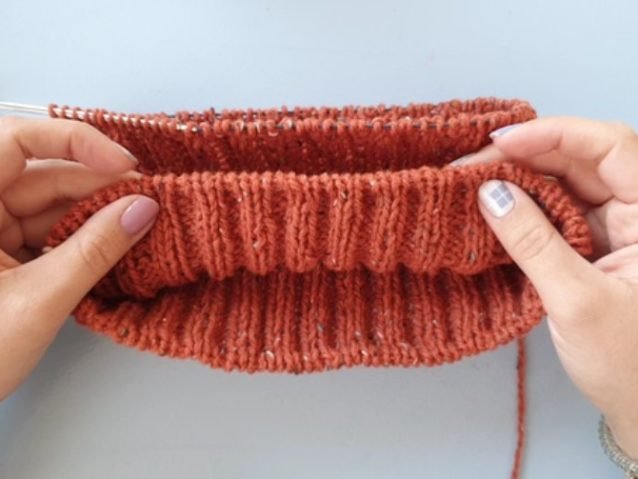
Turn your work inside out for the three needle bind off. Slide your sts onto the cable of your circular needle, otherwise the needletips might get stuck in your work. Check that you have the same number of sts on both sides.
Use a third needle to knit the stitches together, this can be of the same size or smaller. You can also use a crochet hook of the same size or smaller. Your yarn will be attached to the front needle. TIP: I got the neatest result when using a smaller needle.
With your third needle, go through the first st on the front needle, then the first st on the back needle, knit them together as if they were one st. This kind of works as a k2tog. Do the same for the second set of sts, then cast off the first st by slipping it over the second. Work your way across the rest of the sts.
Scroll down past the Dutch pattern for the finishing instructions.
PDF version – New Leaf Webshop PDF version – Ravelry
Nederlands Patroon
Bekijk deze video voor de opzet.
Met de grotere naald en Judy’s Magic Cast On, zet je 52(60) stn op voor elke naaldpunt. Brei – nog steeds met de grotere naald – 2 toeren tricotsteek. De opzet zelf telt ook als 1 toer, dus heb je nu in totaal 3 toeren, of 6 rijen. Je hebt nu genoeg stof om er een tube van te vouwen, met de goede tricotkant aan de buitenkant. Schuif de steken op de naaldpunten en houd ze in je linkerhand (als je rechtshandig breit). Met de kleinere naald in je rechterhand, haal je de stn van de grotere naald over naar de kleinere naald. De ‘voorste’ stn zullen de rechte stn zijn van de boordsteek, en de ‘achterste’ stn zijn de averechte stn. Let op: haal alle stn averecht af, zelfs de rechte stn.
Begin met het afhalen van 1 r s van de voorste naald naar de kleinere naald. Dan: *2 av stn afh van achterste naald, 2 r stn afh van voorste naald; herh vanaf * tot je nog 2 av stn op de achterste naald over hebt, en 1 r s op de voorste naald. Haal 2 av stn van de achterste naald en dan de laatste r s van de voorste naald. Je garen zit nog aan de andere kant van de naald, dus schuif je werk naar die naaldpunt zodat je de stn kan breien. Je werk is op dit moment nog plat i.p.v. in het rond.
Rij 1: 1r, *2av, 2r; herh vanaf * tot laatste 3 stn, 2av, 1r. [104(120) stn]
Ga in het rond verder en plaats een steekmarkeerder om het begin van de toer te markeren.
Toer 2: 1r, *2av, 2r; herh vanaf * tot laatste 3 stn, 2av, 1r.
Brei in 2×2 boordsteek verder, brei de stn zoals ze zich voordoen, tot je werk 20cm lang is.
Vanaf hier brei je in magic loop verder, want je werk wordt te klein voor 40cm naalden. Verdeel je stn door de helft, dus 52(60) stn aan elke kant.
TIP: Haal voor de 2afh.1r alleen de éérste s af, zodat je de eerste s door de voorste lus en de tweede s door de achterste lus breit. Dit ziet er netter uit.
Toer 1: *1r, 2av, 1r (pm tussen huidige en volgende s), 2afh.1r, brei stn zoals ze zich voordoen (brei r stn r, av stn av) tot 6 stn voor eind eerste helft, 2r.sbr, (pm tussen huidige en volgende s), 1r, 2av, 1r; herh vanaf * voor tweede helft. [4 stn geminderd: 100/116 stn]
Toer 2: Brei stn zoals ze zich voordoen. Let op, dat betekent soms dat je maar 1 s r of av breit, ipv een volledige kolom van 2 stn.
Toer 3: *1r, 2av, 1r, 2afh.1r, brei stn zoals ze zich voordoen tot 2 stn voor m, 2r.sbr, 1r, 2av, 1r; herh vanaf * voor tweede helft. [4 stn geminderd]
Toer 4: Brei stn zoals ze zich voordoen.
Toeren 5-14: Herh Toeren 3 en 4 nog vijf keer.
Toeren 15-16: Herh Toer 3 nog twee keer. 68(84) stn over aan eind Toer 16.
Toer 17: *1r, 2av.sbr, 1r, 2afh.1r, brei stn zoals ze zich voordoen tot 2 stn voor m, 2r.sbr, 1r, 2av.sbr, 1r; herh vanaf * voor tweede helft. [8 stn geminderd: 60/76]
Toer 18: *1r, 1av, 1r, 2afh.1r, brei stn zoals ze zich voordoen tot 2 stn voor m, 2r.sbr, 1r, 1av, 1r; herh vanaf * voor tweede helft. [4 stn geminderd: 56/72]
Toer 19: 1r, 1av, *1r, 2afh.1r, 2av, 1r, 2afh.1r, brei stn zoals ze zich voordoen tot 6 stn voor m, (je eindigt hier met 2av, en voor de volgende 2r.sbr gebruik je 2 r stn) 2r.sbr, 1r, 1av, 2r.sbr, (nu bij m) 1r. Je hebt 2 stn over tot het eind van de eerste helft. Deze 2 stn breien we samen met de eerste 2 stn van het begin van de tweede helft. Herschik de stn op de naalden zodat deze 4 stn op dezelfde naald staan.
Brei ze als volgt samen: Haal 2 stn (1av, 1r) samen recht af, zodat de r s bovenop ligt. Haal de volgende r en av stn één voor één af zoals je voor een 2afh.1r doet. Steek linkernaald terug in stn en brei ze allemaal recht samen. De ene s die nu overblijft hoort bij de ‘eerste helft’ van de stn, schuif hem zo nodig terug op de vorige naald.
Herh vanaf * voor tweede helft, en brei de laatste 2 stn van de toer samen met de eerste 2 stn van de volgende toer op dezelfde manier. De ene overblijvende s van die mindering hoort bij de ‘tweede helft’. [14 stn geminderd: 42/58]
Keer je werk binnenstebuiten voor de afkantmethode met drie naalden. Voor het binnenstebuiten keren is het vaak handig de stn op de kabel van de rondbreinaald te schuiven, omdat ze anders vast komen in je werk.Let op dat je hetzelfde aantal stn aan elke kant hebt.
Gebruik een derde naald om de stn samen te breien, deze kan van dezelfde maat zijn of kleiner. Je kunt ook een haaknaald gebruiken van dezelfde maat of kleiner. Je garen zal van de voorste naald komen. TIP: met een kleinere naald kreeg ik het netste resultaat.
Ga met de derde naald door de eerste s op de voorste naald, dan de eerste s op de achterste naald, en brei ze samen alsof het 1 s is. Het werkt bijna hetzelfde als een 2r.sbr. Doe hetzelfde voor de tweede set stn, en dan kant je de eerste s af door hem over de tweede te halen. Werk zo alle stn af.
Finishing | Afwerking
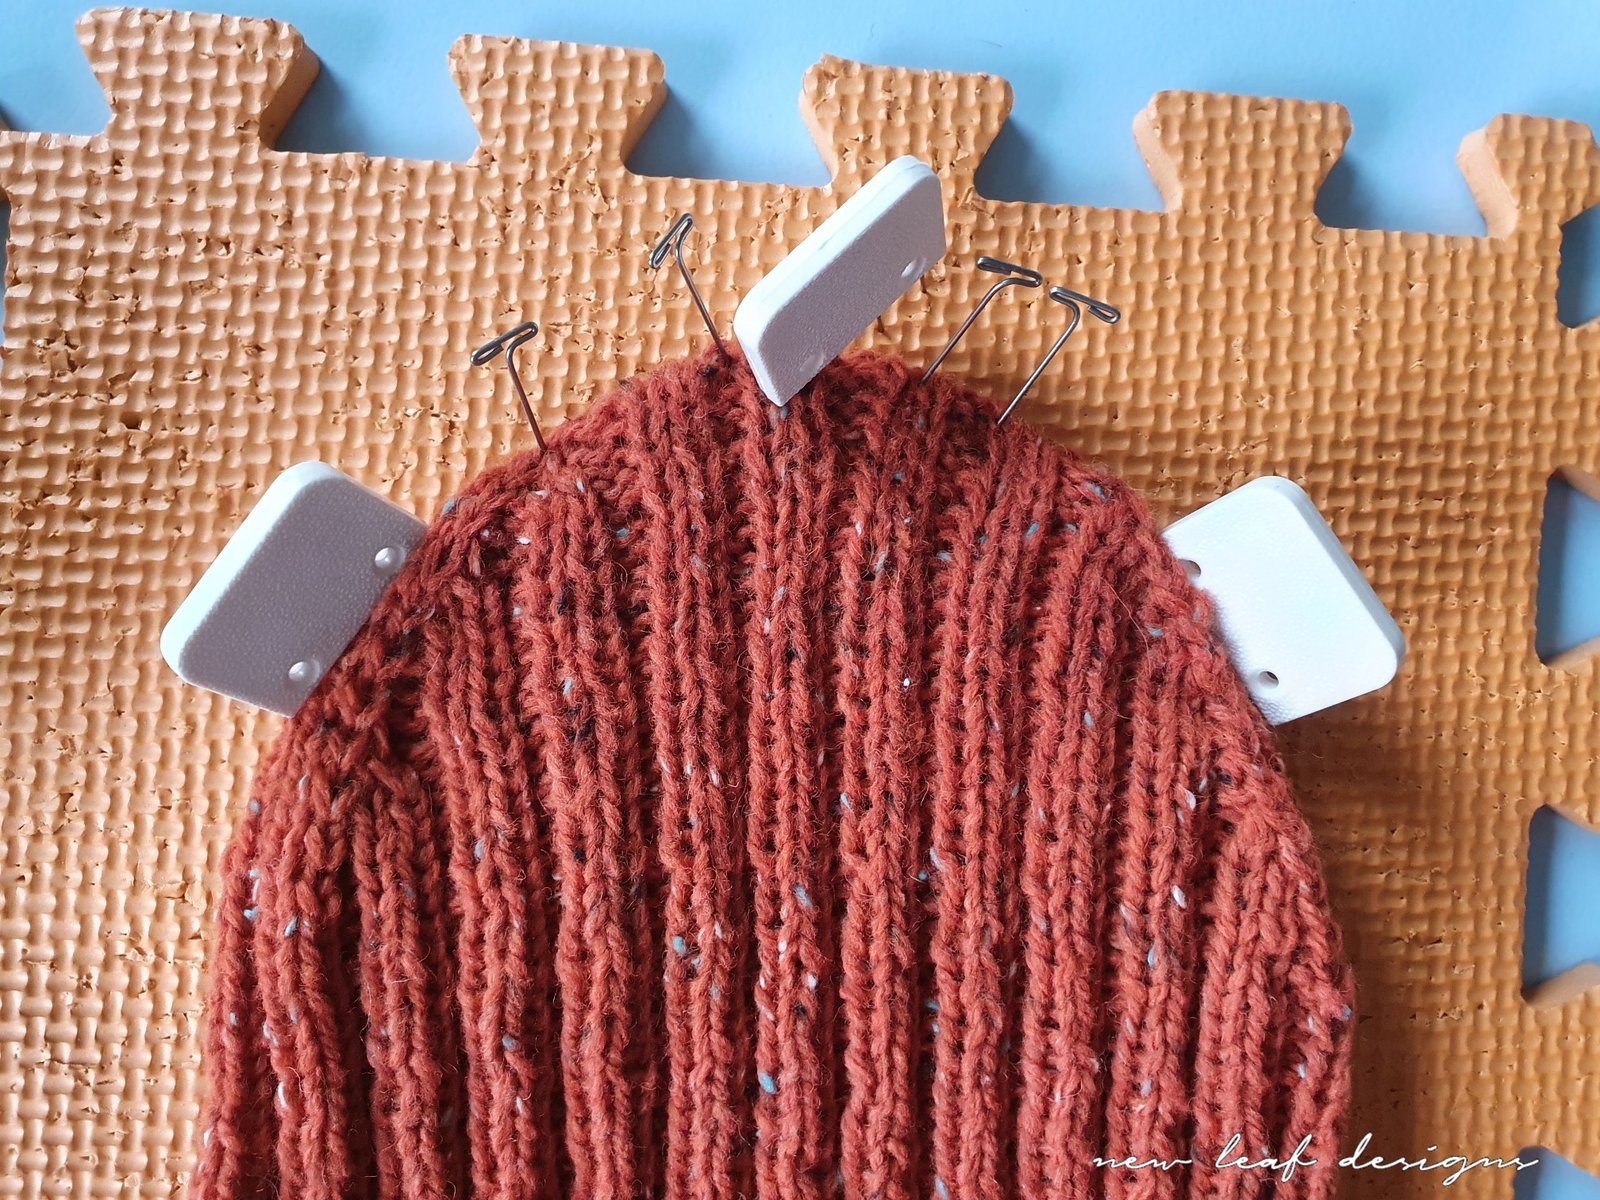
Wash your hat and lay it flat, block the crown as shown in the photo. This is to prevent the corners of the hat sticking up. If the corners still stand up, turn the hat inside out and stitch in a curved line as shown in the second picture. Weave in all ends.
Was de muts en leg hem plat, pin de kruin zoals getoond in de foto. Dit is om het vormen van ‘oortjes’ aan de muts tegen te gaan. Stel nu dat je nog steeds oortjes/hoekjes aan de muts ziet, keer dan de muts binnenstebuiten en naai een lijn zoals getoond in de tweede foto. Werk alle eindjes weg.

Wil je nieuwe patronen en videos niet missen? Schrijf je dan in voor mijn nieuwsbrief!


1 Comment
[…] Highland Hat pattern – Free! […]