Designing garments for Wheelchair users
Welcome to this resource page on designing knitting, crochet and sewing garments for wheelchair users. I’ve compiled this list in an attempt to encourage garment designers to make their garments more inclusive towards wheelchair users and disabled people. Please do note that not all wheelchair users are disabled, and not all disabled people use wheelchairs.
The list compiled below will be grouped in several themes, so that if you’re looking for tips on how to make sleeves more comfortable or better fitting, you can find them in one place.
If you have anything you want to add to this list, please contact me at: hello@newleafdesigns.nl or leave a comment below. Thank you!
For designers
If you are a knitwear, crochet or sewing designer, my hope is that you will look at this list and see how easy it is to accomodate for wheelchair users in your designs. I would love to see this reflected in patterns, similarly to accomodating for shorter/taller people in adding instructions for making a garment shorter or longer.
For makers
If you are creating a garment for a recipient who is a wheelchair user, this resource list might also be helpful for you. Even if the designer has not thought about making their design more comfortable/better fitting for wheelchair users, in this list you’ll find some tips so that you might be able to customize the garment yourself.

Acknowledgements
This list was made possible by the amazing feedback from people who are disabled and use wheelchairs, as well as people who care for wheelchair users. I want to give a special thanks to Nina, a disability mentor and activist who goes by @nina_tame on Instagram; and Emily Nicole, who is changing the world by sharing her daily life experiences with being disabled, on Instagram and Youtube. These women are doing amazing things and I highly recommend checking out their social media channels.
General tips
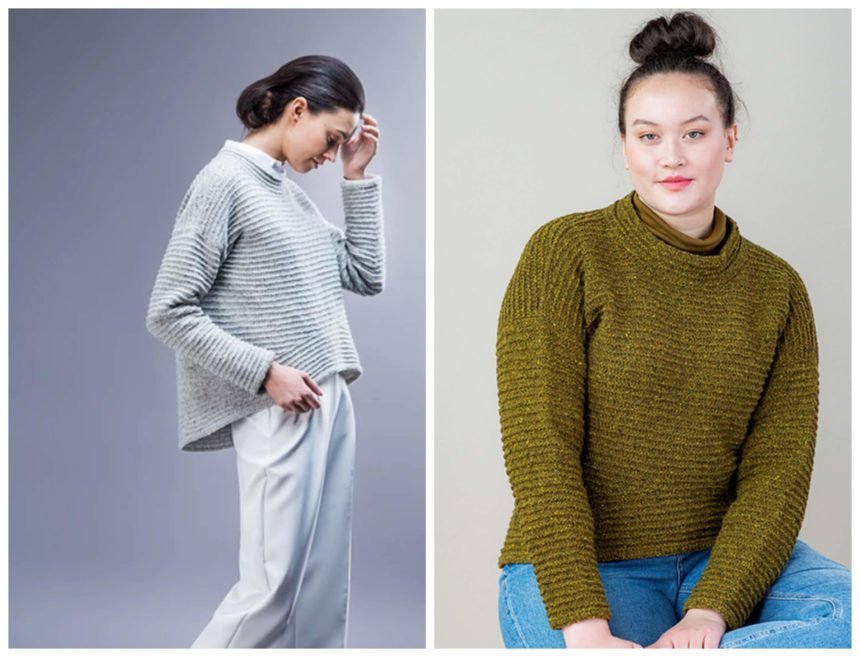
Whenever you are designing garments, make sure you also take pictures of your garment being modeled while sitting down. This is super helpful and allows people to envision what the garment would look like on them.
In general, everywhere where the body touches the wheelchair, seams should be avoided. It gets very painful to sit or lean on seams. This also goes for textured fabrics. If you’re designing a cabled sweater for example, make sure the back is either short enough so that the wearer doesn’t sit on it, or that the fabric is smooth so that it doesn’t cause discomfort when sitting on the fabric for a long time.
High waisted items such as crop tops or high waisted skirts tend to be very flattering.
Sleeves
- sleeves should allow for full range of shoulder movement so that it does not get in the way when using a wheelchair. Knitted and crocheted garments tend to be stretchy enough, so this is more applicable for sewing designs.
- sleeve length: long sleeves sometimes get in the way. As a solution, you can make the sleeves 3/4 length, or make sure they have a buttoned cuff (sewing) or long ribbed cuff (knitting/crochet) so they can be pulled back if needed.
- do not make the sleeves too baggy, bell sleeves or anything like that will get caught in the wheels. Instead, go for a tapered sleeve. Again, cuffs that can be pulled back are very helpful.
Tops / Sweaters
- cropped length sweaters or tops tend to work very well. If a garment is too long in front, it will often have too much excess fabric. Emily Nicole has a great video here on how to customize the length of a store-bought sweatshirt.
- ideally, the front of a sweater would be cropped, but the back would be a bit longer. Notice if you’re sitting, that the front of your torso is shorter than the back. For knitted or crochet garments, this would easily be remedied by adding instructions on shortrow shaping for the lower back, similarly to what we do for the back of the neck. If you are making the front and back of a garment separately, instead of shortrows you could also make the back longer and have a split at the sides. Don’t make the back too long, just so that it hits the seat. If the back is too long, you’ll be sitting on the seams which is not comfortable.
- this obviously depends on personal preference, but think about the depth of the neckline. If you’re sitting down and you have a low neckline, people can look into your shirt more easily. Garment designers may want to add instructions for raising the neckline on V-neck sweaters for example.
- Cardigans are often easier to get on than sweaters, and are more versatile because they can be worn closed in colder weather and open in warmer weather. Kind of stating the obvious here, but just keep it in mind. As a knitwear designer, I know designing cardigans is more difficult than designing sweaters, so let this be an incentive to put in the extra effort for a cardigan design.
- As for closures on cardigans, and this will vary from person to person, buttons are often not the easiest to work with. Instead, think of zippers, magnetic closures or velcro. If you’re using buttons, consider using larger buttons. People with visual impairments might also benefit from the buttons contrasting in colour with the rest of the garment.
- Some people might find it more comfortable to have a closure in the back. I found this blouse in a webshop that specializes in adaptive wheelchair clothing, which has a button closure at the back of the neck and what I think is called an ‘envelope back’. I have yet to find a sewing pattern like this, if you know of one please do let me know so I can add it here. You can get a similar effect from wrap tops.
- Think about using an elastic waistband or pull-cord for the hem of a sweater. This is especially handy if you’re going to customize a ready-made garment, but can also be applied while making the garment.
Dresses / Skirts
- Dresses and skirts often need to be longer in the front because they tend to ride up.
- Instead of a skirt, consider making a ‘skort’ (shorts with skirt layer on top) for modesty.
- For long dresses and skirts, take care that the back doesn’t drag on the floor or get caught in the wheels.
- Instead of a dress, look into if you can make a co-ord/two piece that mimics the look of a dress.
- Sewing patterns for skirts sometimes have long zippers going down the back of the skirt, this is not comfortable to sit on. See if you can move the zipper to one side (or both sides!) of the skirt.
- Elastic waistbands are an absolute win for skirts! Very comfy, plus the stretch allows for easier (un)dressing.

Trousers
- For trousers, it’s very important that they fit loosely around the waist or that they have a lot of stretch, so that they don’t cut off the bloodflow. Also, some people might use medical devices such as catheter bags, or have tubes around their waist, which may be hidden under looser clothing.
- Similarly to dresses and skirts, trouser legs ride up in the front so they need to be a bit longer, IF you are going for a full-length pair. Do make sure they don’t get caught in the wheelchair.
- Cropped trousers usually work well.
- No bulky seams or textured fabrics anywhere the body touches the wheelchair.
- Elastic waistbands!
- Long zippers at each side of the trousers to help with undressing. Trousers unzipping at the sides can also be bought at stores that have adaptive wheelchair clothing.
- Pockets should ideally be placed at the top of the thigh. Pocket placement for traditional 5-pocket jeans style are often not accessible at all for wheelchair users. Have you ever tried getting your lipbalm out of your pocket while sitting down? It’s much more accessible if they are placed at the top of the thigh.
- If adding pockets, make sure they have zipper closures so things cannot fall out, you don’t want to be picking up things from the floor all the time.
- The ‘waist area’ on trousers should be shorter in the front and longer in the back. If you’re knitting or crocheting a pair of sweatpants, you can add shortrow shaping in the back. Sewing leggings may also be easily adapted by cutting a larger piece of fabric for the back. You can also find some ready-to-buy trousers for wheelchair users online. In Dutch, this is called a ‘zit snit’ (sit cut), and in English I believe trousers adapted for wheelchair use are called ‘drop front’ trousers, so if you want to find some online you can try those search words.
Socks
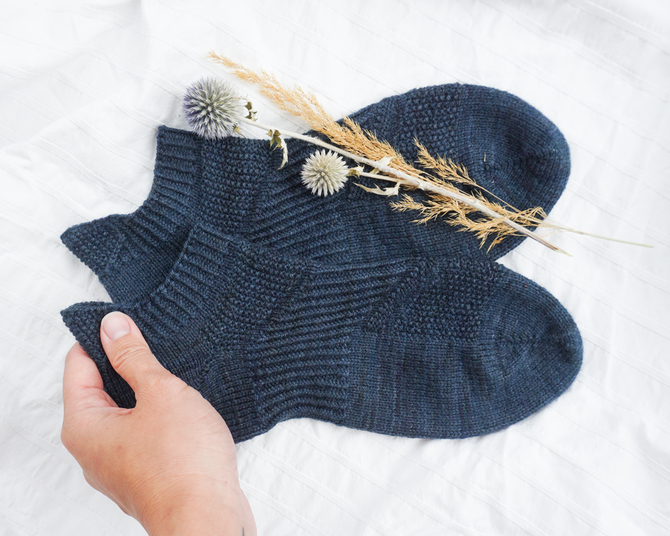
- Make sure to have lots of stretch in the leg and cuff. In particular, make sure the bind-off round is stretchy as this helps with putting the socks on.
- To help with stretchiness and to keep socks from sliding down, you might want to have a ribbed pattern over the entirety of the leg instead of just the cuff.
- Think of an easy-grip pull tab on the back of the cuff. This could be done with shortrows in the ribbing, by knitting an i-cord bind-off in the back, or by adding on a tab with crochet for example. This pattern (non-Ravelry link) by Mieka John from Salt and Stone Knits is a great example.
Shoes
- You might be surprised to see a shoe-category in this list, and I actually don’t have any tips for handmaking shoes, but I did want to share this wonderful bit of news: Nike has now created handsfree shoes called the Go FlyEase. I thought it was cool, and with inclusive clothing in mind I figured it needed to be a part of this list. The GO FlyEase shoes launched in April 2021, and are still available from several sources.
- Shoes that have velcro closures are much more accessible than shoes with laces.
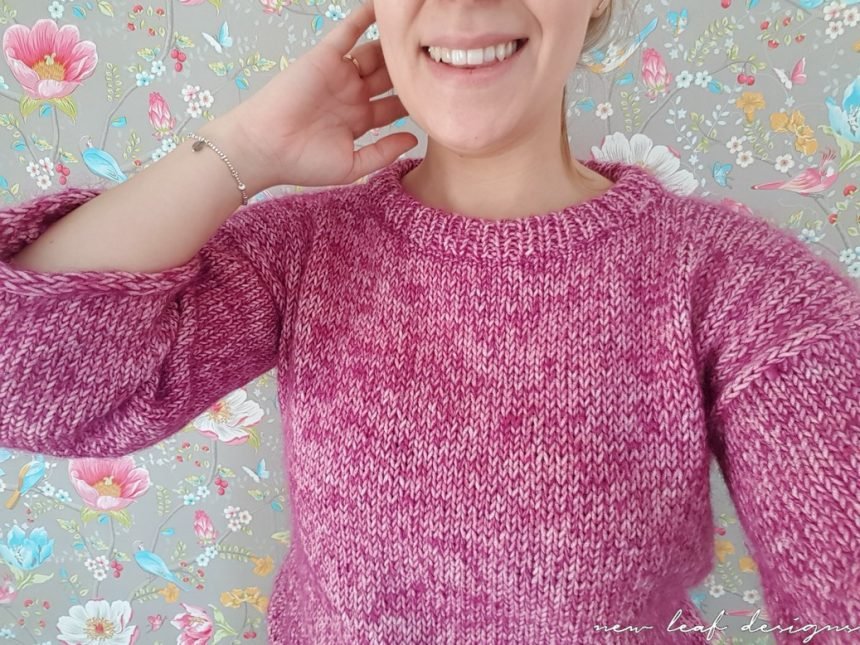
Adapted Knitting/Crochet patterns
At the moment, my patterns are not adapted yet for wheelchair wear, at least not intentionally. I hope to link adaptive patterns of mine here in the future. For now, the Pink Sweater (pictured above) probably comes closest with its dropped shoulder (lots of room), cropped length body and 3/4 length sleeves. To make the sleeves a bit more fitted you could add in more decreases and knit a long 1×1 cuff instead.
Other resources
Of course this list is not the only resource on designing for wheelchair users, nor should it be. I’ve come across some amazing resources and I will link them below. If you know of any other knitting/sewing/crochet blogs for customizing garments for wheelchair users, or other wheelchair fashion bloggers you’d like me to include, please do drop a link down below in the comments. Thank you!
Important clothing considerations for wheelchair users – from Love to Know
Inclusive Fashion – Criplife interview with designer Huiji Lin
Looking Stylish in a Wheelchair – Interview with Alicia from Spashionista
Adapting Creatively – Rose-Marie from Adapting Creatively has some great blogposts and tutorials around sewing with disability in mind
Compression socks with fun prints – by Not Your Grandma’s (check out their accessories too!)
Cur8able – Stephanie from Cur8able is a disability fashion stylist and has loads of helpful blogposts
Rebekah Taussig – Author of the book ‘Sitting Pretty’
Simply Emma – Travelblog about traveling in a wheelchair


3 Comments
Wat geweldig dat je dit hebt gedaan en doet! Je zult heel veel mensen blij maken met dit overzicht en met de tips, super Carmen!
Hi. Please help. I am buying clothes for a patient at work. She can only use cash to buy clothes so her clothes can not be ordered online. I was given $99 to spend. She’s an elderly lady, non-ambulatory, depends on a wheelchair, and she requires assistance with everything. She wears only dresses. I found 8 dresses at a thrift store. The dresses are perfect, but they all need to be altered. She doesn’t sit on her dress so the back bottom is scrunched behind her. Her dress is always smoothed out and there is no chance of the fabric causing pressure sores. The problem is finding a dress that drapes over her knees. Should I take out the back center seam? Should I open the seam all the way to the waist? Should I add a dart each side? Or should I turn the back into a very high hem? I don’t know the best way to open it up to drape over her knees while the dress isn’t tucked underneath her. Do you have a recommendation? Thank you.
Hi there Jen, thanks so much for your question! I have to admit I am not the expert here, but I did some searching. I found this open-backed skirt: https://ferruccicomfort.co.uk/products/women-s-adaptive-skirt-model-9080-back-opening-with-buttons-easy-dressing-for-wheelchair-users-mobility-impaired
Maybe an alteration like this would be suitable for the dresses? To open up the back center seam from hem to waist, and attach some kind of fastening at the hem to keep the hem corners from flapping about. This way there is no fabric underneath her legs, so hopefully that would help with draping over the knees.
I asked around in the wheelchair user community on Reddit and while this open-backed style isn’t super common, they agree it seems to be relevant for your patient.
Also, I want to thank you for being so thoughtful towards your patient and doing so much research!
Best of luck and do let me know if you have other questions,
Carmen