Cosy Moments Shawl – Pattern Part Two
Get the full PDF pattern via my stores:
Shop the PDF version here Purchase on Ravelry
Hello everyone, welcome to the Cosy Moments Shawl Pattern Part Two! In this part of the pattern I will show you how to knit the next two lace sections. These are both quite a bit more advanced than last weeks lace sections, so make sure to watch the videos for each part. Please feel free to put in lifelines whenever you feel like you need them. You’ll find the lifelines video just below this paragraph in case you need a refresher.
Welkom bij Deel Twee van het Cosy Moments Shawl patroon! In dit gedeelte laat ik je zien hoe je de volgende twee kantpatronen breit in je omslagdoek. Deze zijn beide wat moeilijker dan de vorige kantpatronen, dus maak gerust gebruik van de tutorial video’s die ik voor elk deel heb gemaakt. Voel je vrij om meer levenslijnen (reddingslijnen) te gebruiken als je deze nodig hebt. Weet je niet hoe je dit doet, of waar deze levenslijnen voor dienen? Bekijk dan de onderstaande video.
Missed Part One? | Deel Een gemist?
Find Part One for the Cosy Moments Shawl HERE. In the first part, I show you how to cast on, increase, and knit the first two lace sections. You’ll also find extra notes on reading lace charts in Part One.
Vind Deel Een van de Cosy Moments Shawl HIER. In het eerste deel laat ik je zien hoe je moet opzetten, meerderen, en hoe je de eerste twee kantpatronen breit. Hier vind je ook informatie over het lezen van breischema’s.
Yarn and other Materials | Garen en andere materialen
Recommended yarn: Scheepjes Whirl (60% Cotton, 40% Acrylic; 1000m/220g)
1 ball of your choice
Recommended needle size: 3mm circular needles of 80cm length
Alternative yarn: Scheepjes Whirligig (80% Virgin Wool, 20% Alpaca; 1000m/450g)
1 ball of your choice. Additional Whirligigette is optional to lengthen shawl.
Recommended needle size: 3.5mm circular needles of 100cm length
Other materials: Scissors, Darning needle, 2 stitch markers, row counter, optional: cable needle.
Get all materials for the Cosy Moments Shawl via your local Scheepjes store, or purchase them via the affiliate links below:
Aanbevolen garen: Scheepjes Whirl (60% Katoen, 40% Acryl; 1000 m/220 g)
1 bol naar keuze
Aanbevolen naalden: 3 mm rondbreinaalden van 80 cm lengte
Alternatief garen: Scheepjes Whirligig (80% wol, 20% alpaca; 1000 m/450 g)
1 bol naar keuze. Eventueel kun je het patroon verlengen met een Whirligigette.
Aanbevolen naalden: 3,5 mm rondbreinaalden van 100 cm lengte
Overige materialen: Schaar, Stopnaald, 2 steekmarkeerders, toerenteller, optioneel: kabelnaald.
Alle materialen voor de Cosy Moments Shawl kun je kopen bij jouw Scheepjes winkel, of koop ze online via de volgende affiliate link:
Wool Warehouse (UK) Caro’s Atelier (NL)
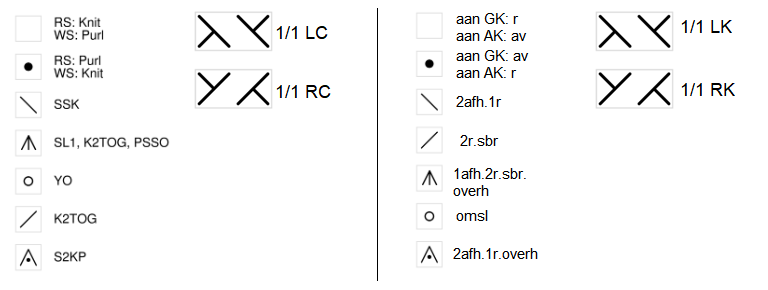
Used Abbreviations | Gebruikte Afkortingen
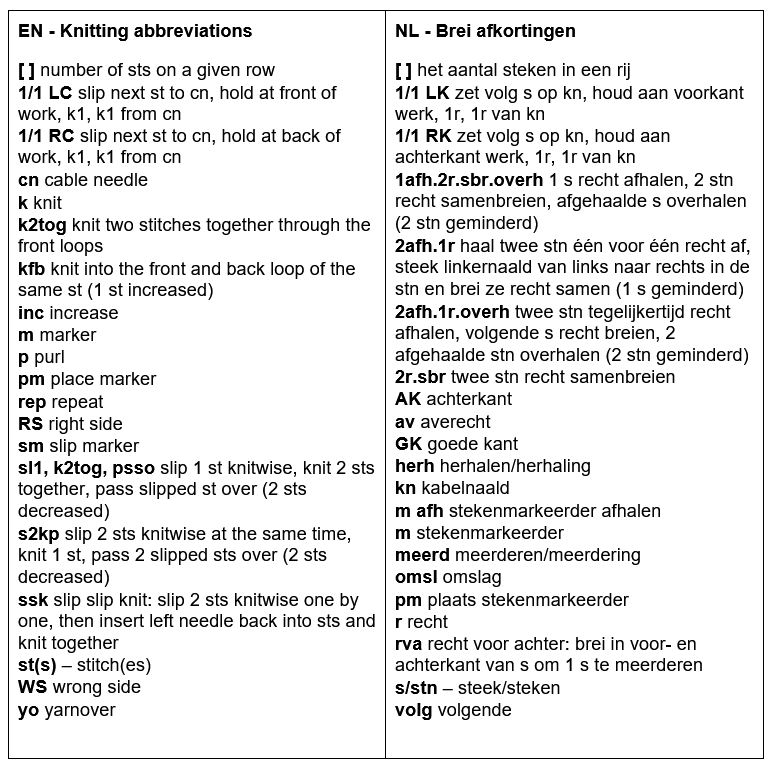
Chart Legend | Legenda
Pattern Part Two | Patroon Deel Twee
Lace Section 3 (Pattern C)
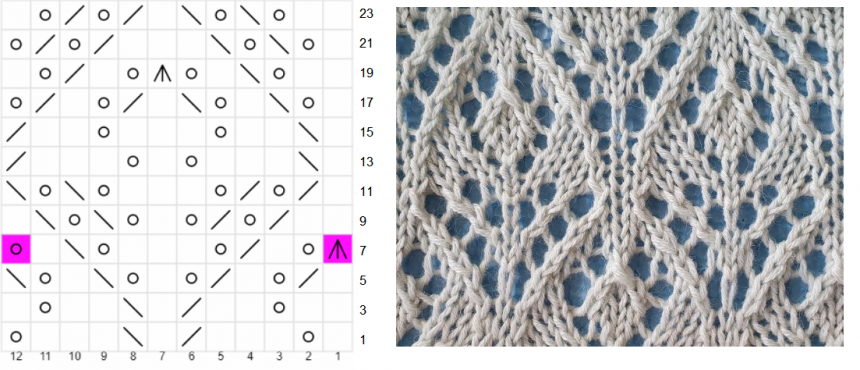
Lace Section 3 is probably the most difficult lace chart in this pattern, I’m not gonna lie. It’s a piece of work! The pattern is repeated over 12 stitches, and is 24 rows long. Feel free to place lifelines along the way, because this is a big chart! I’ve done my absolute best on the tutorial videos to walk you through each of the right side rows, so hopefully that will help. To read the instructions in the chart, please refer to the legend above. The pattern is also written out and can be found below the chart.
Kant patroon 3 is het moeilijkste kantpatroon in deze hele omslagdoek, daar zal ik geen doekjes om winden. Een hele klus! Het patroon wordt herhaald over 12 steken en is 24 rijen lang. Voel je vrij om gaandeweg extra levenslijnen (reddingslijnen) te plaatsen. Ik heb mijn best gedaan op de tutorialfilmpjes om alles zo duidelijk mogelijk weer te geven, hopelijk helpt dat erbij. Om de instructies in het schema te lezen kun je hierboven in deze blogpost de legenda bekijken. Het patroon is ook volledig uitgeschreven, dit vind je hieronder in de schuingedrukte grijze tekst.
PLEASE NOTE:
For all WS rows, purl all stitches between the markers.
Row 7 of Chart: Instead of the very first SL1, K2TOG, PSSO (marked pink), make K2TOG. You only have to do this for the very first repeat of the pattern, because a SL1, K2TOG, PSSO does not work at the edge of the shawl body.
At the END of the very last repeat of Row 7, knit one stitch instead of making the yarnover (marked pink). This is to compensate for the very first SL1, K2TOG, PSSO being turned into a K2TOG. If you would do the yarnover, you will have 1 st extra.
| Written version Pattern C:
Row 1 (RS) *K1, yo, k3, k2tog, k1, ssk, k3, yo; rep until m. Row 2 and all WS rows P all sts until m. Row 3 *K2, yo, k2, k2tog, k1, ssk, k2, yo, k1; rep from * until m. Row 5 *(k1, k2tog, yo) 2x, (k1, yo, ssk) 2x; rep from * until m. Row 7 k2tog, yo, k1, k2tog, yo, k3, yo, ssk, k1, yo, *sl1, k2tog, psso, yo, k1, k2tog, yo, k3, yo, ssk, k1, yo; rep from * a further 13 times, you should only have 13 sts left before m. Then: sl1, k2tog, psso, yo, k1, k2tog, yo, k3, yo, ssk, k2. Row 9 *K2, (k2tog, yo) 2x, k1, (yo, ssk) 2x, k1; rep from * until m. Row 11 *K1, (k2tog, yo) 2x, k3, (yo, ssk) 2x; rep from * until m. Row 13 *K1, ssk, k3, yo, k1, yo, k3, k2tog; rep from * until m. Row 15 *K1, ssk, k2, yo, k3, yo, k2, k2tog; rep from * until m. Row 17 *(K1, yo, ssk) 2x, (k1, k2tog, yo) 2x; rep from * until m. Row 19 *K2, yo, ssk, k1, yo, sl1, k2tog, psso, yo, k1, k2tog, yo, k1; rep from * until m. Row 21 *K1, (yo, ssk) 2x, k3, (k2tog, yo) 2x; rep from * until m. Row 23 *K2, (yo, ssk) 2x, k1, (k2tog, yo) 2x, k1; rep from * until m. Row 24 P all sts until m. |
Rows 56-79 Knit 24 rows of pattern C. Please remember to knit the 4 sts on either side knitwise on all rows.
Rows 80-81 k4, sm, k to m, sm, k4, turn.
Nederlandse versie:
LET OP: Voor alle AK rijen brei je alle stn tussen de markers averecht.
Rij 7 van het schema: In plaats van de eerste 1afh.2r.sbr.overh (roze vakje) brei je 2r.sbr. Je hoeft dit alleen te doen voor de allereerste herhaling. De oorspronkelijke steek komt aan een rand namelijk niet goed tot zijn recht.
Op het EIND van de allerlaatste herhaling van Rij 7 brei je een steek in plaats van de omslag te maken (roze vakje). Dit om te compenseren voor de 2r.sbr aan het begin van de rij, anders heb je een steek teveel.
| Uitgeschreven versie Patroon C:
Rij 1 (GK) *1r, omsl, 3r, 2r.sbr, 1r, 2afh.1r, 3r, omsl; herh tot m. Rij 2 en alle AK rijen Brei alle stn av tot m. Rij 3 *2r, omsl, 2r, 2r.sbr, 1r, 2afh.1r, 2r, omsl, 1r; herh vanaf * tot m. Rij 5 *(1r, 2r.sbr, omsl) 2x, (1r, omsl, 2afh.1r) 2x; herh vanaf * tot m. Rij 7 2r.sbr, omsl, 1r, 2r.sbr, omsl, 3r, omsl, 2afh.1r, 1r, omsl, *1afh.2r.sbr.overh, omsl, 1r, 2r.sbr, omsl, 3r, omsl, 2afh.1r, 1r, omsl; herh vanaf * nog 13 keer, je hebt nu nog 13 stn voor de m. Dan: 1afh.2r.sbr.overh, omsl, 1r, 2r.sbr, omsl, 3r, omsl, 2afh.1r, 2r. Rij 9 *2r, (2r.sbr, omsl) 2x, 1r, (omsl, 2afh.1r) 2x, 1r; herh vanaf * tot m. Rij 11 *1r, (2r.sbr, omsl) 2x, 3r, (omsl, 2afh.1r) 2x; herh vanaf * tot m. Rij 13 *1r, 2afh.1r, 3r, omsl, 1r, omsl, 3r, 2r.sbr; herh vanaf * tot m. Rij 15 *1r, 2afh.1r, 2r, omsl, 3r, omsl, 2r, 2r.sbr; herh vanaf * tot m. Rij 17 *(1r, omsl, 2afh.1r) 2x, (1r, 2r.sbr, omsl) 2x; herh vanaf * tot m. Rij 19 *2r, omsl, 2afh.1r, 1r, omsl, 1afh.2r.sbr.overh, omsl, 1r, 2r.sbr, omsl, 1r; herh vanaf * tot m. Rij 21 *1r, (omsl, 2afh.1r) 2x, 3r, (2r.sbr, omsl) 2x; herh vanaf * tot m. Rij 23 *2r, (omsl, 2afh.1r) 2x, 1r, (2r.sbr, omsl) 2x, 1r; herh vanaf * tot m. Rij 24 Brei alle stn av tot m. |
Rijen 56-79 Brei 24 rijen van patroon C. Denk eraan de 4 stn aan elke zijde altijd recht te breien.
Rijen 80-81 4r, m afh, brei alle stn r tot m, m afh, 4r, keer.
Lace Section 4 (Pattern D)
This section is actually not lace, but cables. It works really nicely in combination with lace though! This chart consists of twisted stitches, tiny cables of 1 x 1 stitch. You can use a cable needle for this but it’s not a necessity. In the videos I’m showing you how to do it with and without a cable needle. To read the instructions in the chart, please refer to the legend above.
Dit gedeelte is eigenlijk geen kantbreien maar kabelbreien. Ik vind het er prachtig uitzien in combinatie met kant, en hoop dat jij er ook zo over denkt! Dit schema bestaat uit kleine kabelsteekjes, van 1×1 steek. Je kunt hiervoor een kabelnaald gebruiken maar dit is niet nodig, in de video’s laat ik je zien hoe je het mét en zonder kabelnaald breit. Maak gebruik van de legenda om onderstaand breischema te lezen.
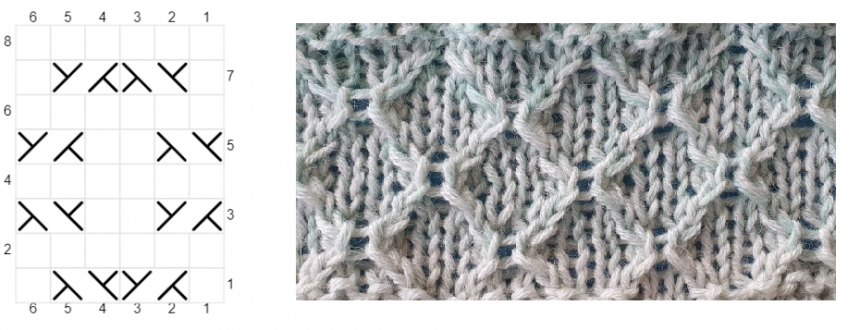
This pattern is repeated over 6 sts and 8 rows.
| Written version of Pattern D:
Row 1 (RS) *K1, 1/1 RC, 1/1 LC, k1; rep from * until m. Row 2 and all WS rows P all sts until m. Row 3 *1/1 RC, k2, 1/1 LC; rep from * until m. Row 5 *1/1 LC, k2, 1/1 RC; rep from * until m. Row 7 *K1, 1/1 LC, 1/1 RC, k1; rep from * until m. Row 8 P all sts until m. |
Rows 82-96 Knit 15 rows of pattern D: knit Rows 1-8 of the pattern once, then Rows 1-7 (!!) once more. Please remember to knit the 4 sts on either side knitwise on all rows.
Row 97 (WS) K4, sm, k to m, sm, k4 turn.
Row 98 (inc) K4, sm, kfb until m, sm, k4, turn. [384+8 sts]
Row 99 K4, sm, p to m, sm, k4, turn.
Row 100 K4, sm, k to m, sm, k4, turn.
Row 101 K4, sm, p to m, sm, k4, turn.
Nederlandse versie:
Dit patroon herhaalt zich over 6 steken en 8 rijen.
| Uitgeschreven versie van patroon D:
Rij 1 (GK) *1r, 1/1 RK, 1/1 LK, 1r; herh vanaf * tot m. Rij 2 en alle AK rijen Brei alle stn av tot m. Rij 3 *1/1 RK, 2r, 1/1 LK; herh vanaf * tot m. Rij 5 *1/1 LK, 2r, 1/1 RK; herh vanaf * tot m. Rij 7 *1r, 1/1 LK, 1/1 RK, 1r; herh vanaf * tot m. Rij 8 Brei alle stn av tot m. |
Rijen 82-96 Brei 15 rijen van patroon D: Brei Rijen 1-8 van het patroon een keer, en dan Rijen 1-7 (!!) van het patroon nogmaals. Denk eraan de 4 stn aan elke zijde altijd recht te breien.
Rij 97 4r, m afh, brei alle stn r tot m, m afh, 4r, keer.
Rij 98 (meerd) 4r, m afh, rva tot m, m afh, 4r, keer. [384+8 stn]
Rij 99 4r, m afh, brei alle stn av tot m, m afh, 4r, keer.
Rij 100 4r, m afh, brei alle stn r tot m, m afh, 4r, keer.
Rij 101 4r, m afh, brei alle stn av tot m, m afh, 4r, keer.
Part Three coming next week | Deel Drie komt volgende week
This is the end of Part 2, the next part will be published next week! You can also find the full pattern PDF here.
Dit is het eind van Deel 2, het volgende deel komt volgende week! Je kunt ook hier het volledige PDF patroon vinden.
February 14th – Pattern part 1
February 28th – Pattern part 3
I will link to these blogposts here as soon as they are published.
Zodra deze delen uitkomen zal ik hier een linkje plaatsen.
You might also like:
The Friendly Fox – Free Crochet Pattern




10 Comments
Is there a way to print this? I dont have the pdf but would love to use your tip of printing it out and using bright Washi tape.
Hello Jacki, the pdf in my shop is an easy printable. It was a lot of work for me to create so that’s why it is a paid version. I suppose you could copy and paste the website-pattern in Word and print it from there, that might work!
Hi
I really would like to do this shawl but am not able to at present.
Will the pattern and videos stay on your page for the future.
Tanya
Hello Tanya, yes the patterns will stay available on my blog, as well as the videos 🙂
Like with Part 1, where are Rows 25-55 in Lace Section 3 (Pattern C)? There are no instructions for these Rows! And where are Rows 9-81 in Lace Section 4 (Pattern D)? There are no instructions for these either! Help!
Erg leuk om te breien. Ben nu bij patroon C rij 24.
Wat is het volgende patroon voor rij 25 t/m 55?
Is mij onduidelijk?
Zie dat de vraag al eens gesteld is, maar lees geen antwoord..
Hoi Nicol, bedankt voor je reactie! De vraag was inderdaad al eens gesteld maar omdat dezelfde persoon ook precies dezelfde vraag heeft geplaatst bij andere blogberichten heb ik maar bij één daarvan geantwoord.
Het patroon C begint op rij 56 en brei je tot en met rij 79, dat zijn 24 rijen in totaal, daarna ga je verder bij rij 80. Je breit dus maar één patroonherhaling van patroon C. Ik begrijp dat het wat verwarrend kan zijn, maar hopelijk is het zo duidelijk! Groetjes Carmen
[…] Find Part One HERE, and Part Two HERE. […]
[…] Part 2 […]
[…] Part One HERE, Part Two HERE, and Part Three […]