
City Stripe Socks Knitting Pattern
The City Stripe Socks are here, and I can’t wait to tell you all about them. I had the pleasure of working with the newest yarn by Scheepjes: Downtown! A beautiful selfstriping yarn, so buttery soft you’re gonna have to try it out yourselves. This yarn can be used for many projects: scarves, hats, mittens, legwarmers, and of course a selfstriping yarn with nylon content is a sock knitter’s dream.
I’m a sock knitter at heart, so I wanted my first project with this yarn to be a lovely pair of stripy socks! Selfstriping yarns look great in socks, especially with afterthought heels, so that’s what I have in store for you with the City Stripe Socks. If you’ve never knit an afterthought heel before: no worries. As always, I’ve got you covered with a video tutorial and a photo tutorial as well.
You can find the free pattern for the City Stripe socks below. If you would rather have the pattern as a downloadable PDF, take a look in my Ravelry shop and my New Leaf Webshop.
Dit zijn de City Stripe Socks! Ik kan niet wachten om je er alles over te vertellen. Scheepjes heeft net een nieuw garen uitgebracht, Scheepjes Downtown, en ik had het grote genoegen om alvast met dit mooie garen te mogen werken. Een prachtig zelfstrepend garen, en zó zacht… dat zul je echt even zelf moeten gaan proberen. Dit garen kun je gebruiken voor heel veel projecten: sjaals, mutsen, handschoenen, beenwarmers, en natuurlijk is een zelfstrepend garen met nylon erin de droom van elke sokkenbreier.
Nu ben ik natuurlijk ook groot fan van sokken breien, dus wilde ik dat mijn eerste project hiermee een mooi paar gestreepte sokken zou worden. En dat zijn de City Stripe Socks geworden! Zelfstrepend garen zoals Scheepjes Downtown werkt fantastisch voor sokken, al helemaal als je een ‘Afterthought heel’ breit. Als je nog nooit een Afterthought heel hebt gebreid ben je hier aan het goede adres. Ik heb weer een video tutorial en een foto tutorial voor je.
Het gratis patroon vind je hieronder. Als je liever een PDF hebt die je kunt printen, kijk dan in mijn Ravelry winkel en eigen webshop.

Yarn | Garen
Scheepjes Downtown has 75% merino and 25% nylon, making it a very sturdy yarn that’s great for garments and accessories. The merino is SO soft I can’t even explain, definitely pop a ball or two in your shopping basket when you see this yarn! The meterage is 200m/50 grams making it a fingering weight yarn, also called sock weight.
Head on over to the Scheepjes website to locate shops in your area, or shop via the affiliate links below. Shopping via affiliate links means the shopkeeper rewards me with a small percentage of your purchase and it doesn’t cost you anything extra.
Shop at Wool Warehouse Shop at Caro’s Atelier
For one pair of adult socks, you’ll need two balls of Scheepjes Downtown yarn. The colour used for the sample is 400 After Dark. You’ll also need a pair of 2.25mm needles.
Scheepjes Downtown is een blend van 75% extra fijne Merino en 25% nylon, waardoor het zowel superzacht is en ook sterk genoeg voor sokken, truien en accessoires. Dit garen is zo zacht, dus neem zeker een bolletje of twee mee als je het ziet! Eén bolletje is 50 gram en er zit 200 meter op, waardoor het een sokkengewicht garen is, ook wel ‘fingering weight’ genoemd.
Zoek hier naar Scheepjes winkels bij jou in de buurt. Zodra het online te verkrijgen is zal ik hier ook wat affiliate links plaatsen, als je via die links koopt beloont de winkelhouder mij met een percentage van je aankoop. Je hoeft hiervoor niets extra’s te betalen.
Shop at Wool Warehouse Shop at Caro’s Atelier
Voor één paar sokken van volwassen maat heb je twee bollen Scheepjes Downtown nodig. Voor de sokken van de foto heb ik de kleur 400 After Dark gebruikt. Je hebt ook naalden nodig van maat 2,25 mm.
Pattern notes | Patroon notities
These socks are knit from the toe up. You cast on with Judy’s Magic Cast On at the toe, increase a couple rounds, and then knit the foot. For the heel we are doing an Afterthought heel. You have the option of going true afterthought and doing this after the ‘sock tube’ from toe to cuff is complete, or you can do a ‘Forethought’ heel where you put in a little bit of waste yarn at the heel placement. If this is your first time, I recommend doing a Forethought heel because it is less daunting. With a true afterthought heel, you cut into your knitting to open up a gap for the heel, and this might be a little scary for new sock knitters. When you’re ready, watch my handy tutorial video for all the steps.
Deze sokken brei je vanaf de teen omhoog. Bij de teen zetten we op met de Judy’s Magic Cast On methode, meerderen we een paar toeren, en daarna brei je de voet. Voor de hak doen we een Afterthought heel, in het Nederlands vertaald de ‘hiel achteraf’. Je breit deze pas ná het breien van de sok van teen tot boord. Hier heb je twee opties voor: je kunt een ‘echte’ Afterthought heel doen en in je breiwerk knippen (geen paniek!), óf je kunt op de plek waar je de hak zet alvast een draadje restgaren inbreien. Bij het breien van de hak haal je dat restdraadje eruit en hoef je dus niet te knippen in je breiwerk. Deze laatste manier noemen ze ook wel de ‘Forethought’ hiel. Ik heb een tutorial voor beide, dus je kunt kiezen welke je doet.
Sizes | Maten
| To fit shoe size: | US shoe sizes | UK shoe sizes | Amount of sts circumference | Length Toe + Foot* |
| EU 35-36 | 5-6 | 2.5-3.5 | 56 | 18 cm (7.1in) |
| EU 37-38 | 6.5-7.5 | 4-5 | 60 | 19 cm (7.5in) |
| EU 39-41 | 8-9.5 | 6-7 | 60 | 20 cm (7.9in) |
| EU 42-43 | 10-11 | 7.5-8 | 64 | 21 cm (8.3in) |
| EU 44-45 | 12-12.5 | 9-10 | 64 | 22 cm (8.7in) |
| EU 46-47 | 13-14 | 10.5-12 | 68 | 23 cm (9.1in) |
*The Length Toe + Foot measurement is the entire foot length minus 5cm/2in (roughly).
Instructions for different sizes will be given in the pattern as EU35-36(37-38; 39-41; 42-43; 44-45; 46-47)
In de maattabel hierboven zie je helemaal links de schoenmaat, in de vierde kolom het totaal aantal steken, en helemaal rechts de afmeting van opzet tot begin van de hak. Deze informatie wordt ook nog in het patroon genoemd. Instructies voor verschillende maten worden in het patroon weergegeven als EU35-36(37-38; 39-41; 42-43; 44-45; 46-47).
Pattern | Patroon
Toe
FOR CIRCULAR NEEDLE:
Take your yarn and cast on 10 sts on each needle using ‘Judy’s Magic Cast On’. Find the instruction video here.
With circular needles, Needle 1 refers to one needletip with half of your sts, and Needle 2 refers to the other needletip with half of your sts.
FOR DOUBLE POINTED NEEDLES:
Take your yarn and cast on 5 sts on each of the first two needles using ‘Judy’s Magic Cast On’. Then, if you have a total of 5 DPNs, take the next two needles and cast on the same amount of sts on those needles. If you have a total of 4 DPNs, you will take 1 extra needle, and continue to cast on so that you have 10 sts on one needle, and 5 sts on each of the two other needles. Instruction video here.
With DPNs, Needle 1 refers to the first half of your sts, whether they are divided between two needles or together on one needle. Needle 2 refers to the second half of your sts, whether they are divided between two needles or together on one needle.
FOR BOTH KINDS OF NEEDLES:
For the next round only, all sts on Needle 1 except for the first one will be twisted, knit into the back strand of the sts to straighten them.
Toe Round 1 K to end. [20 sts]
Toe Round 2 (inc) *Kfb, k until 2 sts remain on Needle 1, kfb, k1, rep from * for Needle 2.
Rep Round 2 another three times, until you have 36 sts.
Rep Round 1 and 2 until there are 56(60;60;64;64;68) sts in total on all your needles.
Teen
VOOR RONDBREINAALDEN:
Neem je garen en zet 10 stn op voor elke naald met ‘Judy’s Magic Cast On’. Instructievideo hier.
Bij rondbreinaalden verwijst Naald 1 naar de ene naaldpunt met de helft van je stn, en Naald 2 naar de andere naaldpunt met de andere helft stn.
VOOR DUBBELPUNTIGE NAALDEN:
Neem je garen en zet 5 stn op voor elk van de eerste 2 naalden, met ‘Judy’s Magic Cast On’. Daarna, als je in totaal 5 DPNs hebt, neem je de volgende 2 naalden en zet je daar hetzelfde aantal stn op. Als je totaal 4 DPNs hebt neem je 1 extra naald, en ga je verder met opzetten zodat je 10 stn hebt op één naald, en 5 stn op elk van twee andere naalden. Instructievideo hier.
Bij DPNs verwijst Naald 1 naar de eerste helft van je stn, of deze nu op 1 naald staan of dat ze over 2 naalden zijn verdeeld. Naald 2 verwijst naar de tweede helft van je stn, of deze nu op 1 naald staan of dat ze over 2 naalden verdeeld zijn.
VOOR BEIDE SOORTEN NAALDEN:
Bij de volgende toer zijn alle stn op Naald 1 behalve de eerste s verdraaid. Brei daarom in de achterste lus van deze stn om ze weer recht te krijgen. Dit laat ik ook zien in de tutorial video die hierboven gelinkt is.
Teen Toer 1 Brei alle stn r. [20 stn]
Teen Toer 2 (meerd) *Rva, brei r tot laatste 2 stn van Naald 1, rva, 1r, herh vanaf * voor Naald 2.
Herh Toer 2 nog drie keer, zodat je in totaal 36 stn hebt.
Herh dan Toeren 1-2 tot je 56(60;60;64;64;68) stn hebt.

Foot
Keep knitting stockinette in the round until your sock measures 18(19, 20, 21, 22, 23)cm/ 7.1(7.5; 7.9; 8.3; 8.7; 9.1)inches from cast on.
PRO TIP: For a neat look, you want to place your heel in between two stripes of your selfstriping yarn.
At this point, you need to decide whether you want to go for a “true” Afterthought heel and cut your heel in afterwards, or if you want to knit a “Forethought” heel where you don’t have to cut into your knitting. For the Afterthought heel, place a stitch marker on Needle 2 of the next round.
Voet
Brei in tricotsteek tot je sok 18(19, 20, 21, 22, 23)cm meet vanaf de opzet.
PRO TIP: Voor een net resultaat plaats je de hak tussen twee strepen van je zelfstrepende garen.
Nu moet je een keuze maken tussen een ‘echte’ Afterthought hiel, of een ‘Forethought’ hiel. Bij de eerste knip je in je breiwerk, en bij de tweede plaats je restgaren dat je later verwijdert. Als je de Afterthought hiel doet, plaats dan een stekenmarkeerder op Naald 2 van de volgende toer.
Forethought heel
Knit across Needle 1, turn. Take some scrap yarn and a spare needle in the same size. If you’re using DPNs, you can simply take your spare DPN. Knit Needle 2 with the scrap yarn and spare needle. Then, knit across Needle 2 again with your working yarn and needles. If necessary, trim the ends of the scrap yarn so that you have about 10cm left on each side.
For the rest of the heel instructions, please see “Afterthought heel” below.
Forethought hiel
Brei alle stn van Naald 1 r, keer. Neem wat restgaren en een andere naald in dezelfde maat. Als je DPNs gebruikt neem je simpelweg de volgende DPN. Brei Naald 2 met het restgaren en de nieuwe naald. Dan brei je nogmaals over Naald 2 met je gewone garen en naalden. Zo nodig kun je de eindjes van het restgaren aan beide kanten bijknippen tot je aan weerszijden ongeveer 10cm over hebt.
Voor de rest van de hiel instructies zie het kopje ‘Afterthought hiel’ hieronder.
Leg
Keep knitting until your socks are of desired length. Keep in mind that the ribbing will add some more length.
Been
Brei door in tricotsteek totdat je sokken van gewenste lengte zijn. Denk eraan dat het boord ook nog lengte zal toevoegen.
Cuff
Round 1: *k2, p2; rep from * until end of round.
Repeat Round 1 until you have a cuff that is long enough. A standard cuff is between 15-20 rounds long.
Boord
Toer 1: *2r, 2av; herh vanaf * tot einde van de toer.
Herh Toer 1 tot je boord lang genoeg is. Een standaard boord is tussen de 15-20 toeren lang.
Casting off
Find the instruction video here.
For casting off 2×2 ribbing, I have a special technique which ensures you have a stretchy edge to your ribbing. It goes like this:
K2 tbl, insert left needle into 2 sts on right needle and knit them together, *p1, insert left needle into 2 sts on right needle, p2tog, p1, insert left needle into 2 sts on right needle, p2tog, k1 tbl, insert left needle into 2 sts on right needle, k2tog, k1 tbl, insert left needle into 2 sts on right needle, k2tog; rep from * until you have cast off all of the sts. Cut the yarn and pull last st until thread end comes out.
Afkanten
Vind de instructie video hier.
Voor het afkanten van 2×2 boordsteek heb ik een speciale techniek waardoor hij heel rekbaar blijft:
2r AL, steek linker naald in 2 stn op rechter naald en brei ze samen, *1av, steek linker naald in 2 stn op rechter naald, 2av.sbr, 1av, steek linker naald in 2 stn op rechter naald, 2av.sbr, 1r AL, steek linker naald in 2 stn op rechter naald, 2r.sbr, 1r AL, steek linker naald in 2 stn op rechter naald, 2r.sbr; herh vanaf * tot je alle stn hebt afgekant. Knip het garen af en trek de laatste steek groter totdat het draadeinde eruit komt.

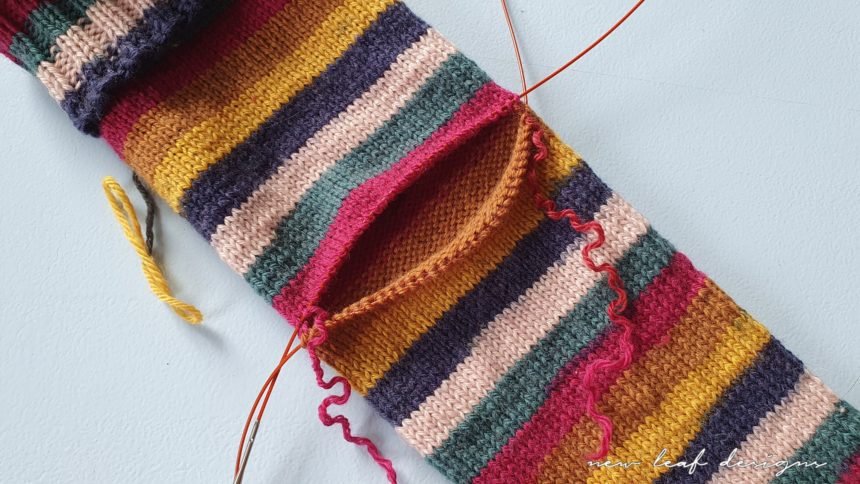
Afterthought heel Tutorial video here Photo tutorial here
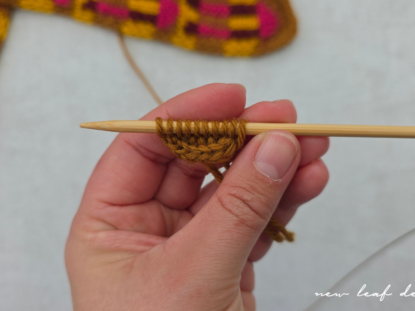
The heel is knit over exactly half of your total stitch count: 28(30;30;32;32;34) sts. Take your needles and use one needletip to pick up the stitches in the row ABOVE the stitch marker or scrap yarn. Start at one edge, then work your way to the other edge. Be sure to count your stitches and check if it’s half of your stitch count.
Do the same for the row BELOW the stitch marker or scrap yarn. This row is easier than the first one, because you can look at the stitches you picked up for the first row, move down two rows, and start picking up stitches there.
For the Forethought heel, undo your scrap yarn so that you have live stitches on your needles. If necessary, you can cut some of the scrap yarn away for easier undoing.
For the Afterthought heel, cut ONE stitch in the middle of the row in between your needles. Do NOT cut at the side of your sock, otherwise you won’t have enough length to weave in the ends. Unravel the yarn at both sides of where you cut it, until you reach the edge. Tuck the ends into the sock and weave them in later to close up gaps.
PRO TIP: Don’t unravel the yarn all the way to the edges, this helps with closing up the gap at the corners.
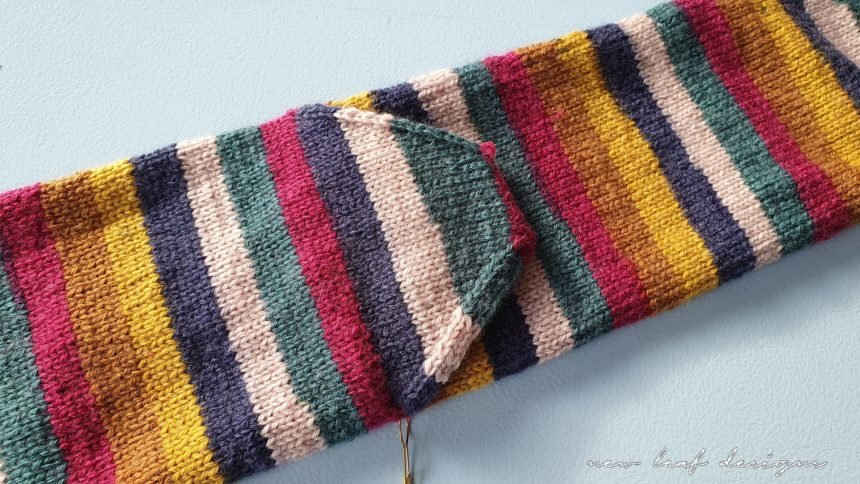
Round 1 Join your yarn and knit across Needle 1. Pick up 2 sts at the side, watch the video linked above for extra guidance. You want to move the first picked up st to Needle 1, and the second st to Needle 2. Knit across Needle 2, and pick up 2 sts at the other side as well. The first one of this set goes to Needle 2, and the 2nd to Needle 1. [60(64;64;68;68;72) sts]
Rounds 2-3 K all sts.
Round 4 (dec) K1, ssk, k to 3 sts left on Needle 1, k2tog, k1, turn to Needle 2, k1, ssk, k to 3 sts left on Needle 2, k2tog, k1. [4 sts decreased]
Round 5 K all sts.
Repeat Rounds 4-5 until there are just 20 sts left, 10 sts per Needle.
Sew all sts together using the Kitchener stitch.
Afterthought hiel Tutorial video hier Foto tutorial hier
De hak brei je over de helft van je totale stekenaantal: 28(30;30;32;32;34) stn. Pak alle stn op in de rij BOVEN de stekenmarkeerder of restgaren. Begin aan de ene zijkant, en pak de stn op tot aan de andere zijkant. Tel dan de opgepakte stn en check of het de helft van je stn aantal is.
Doe hetzelfde voor de rij ONDER de stekenmarkeerder of restgaren. Deze rij is wat makkelijker omdat je de eerder opgepakte stn kan bekijken, vanuit daar 2 toeren naar beneden telt en daar begint met steken oppakken.
Voor de Forethought hiel haal je dan het restgaren eruit, zonodig kun je steeds wat van het restgaren wegknippen voor het gemak.
Voor de Afterthought hiel knip je EEN steek door in het midden van de rij tussen je naalden. Knip NIET aan de zijkant, anders heb je niet genoeg lengte om het eindje weg te werken. Haal het garen uit aan weerszijden van waar je geknipt had, tot aan de zijkant. Stop de eindjes in de sok en werk deze later weg.
PRO TIP: Haal het garen niet helemaal uit tot aan de zijkant om gaatjes te voorkomen.
Toer 1 Hecht je garen aan en brei Naald 1 r. Pak aan de zijkant 2 stn op, bekijk de video voor extra hulp hierbij. De eerste st die je oppakt blijft op Naald 1, en de tweede st gaat naar Naald 2. Brei dan Naald 2 r en pak aan de andere kant ook 2 stn op. De eerste hiervan blijft op Naald 2, en de tweede gaat naar Naald 1. [60(64;64;68;68;72) stn]
Toeren 2-3 Brei alle stn r.
Toer 4 (mind) 1r, 2afh.1r, brei Naald 1 r tot er nog 3 stn over zijn, 2r.sbr, 1r, keer naar Naald 2, 1r, 2afh.1r, brei Naald 2 tot er nog 3 stn over zijn, 2r.sbr, 1r. [4 stn geminderd]
Toer 5 Brei alle stn r.
Herh Toeren 4-5 tot er nog 20 stn over zijn, 10 stn per Naald.
Naai alle stn samen met de Kitchener steek.
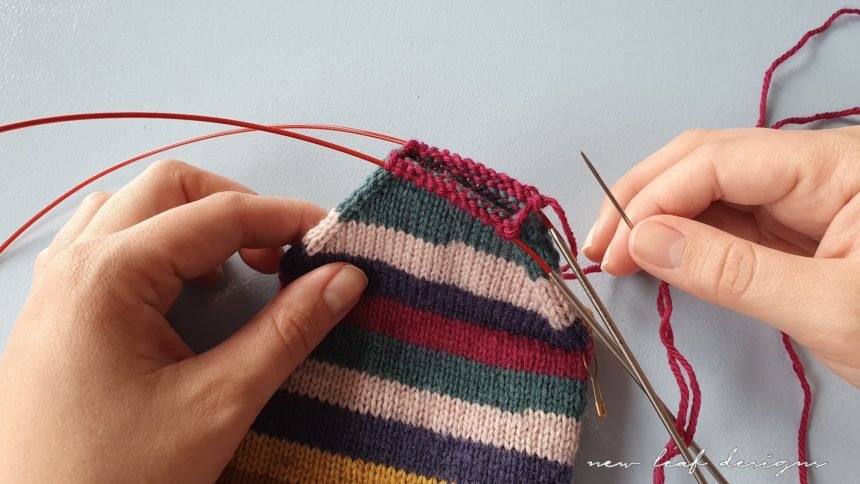
Kitchener stitch
Cut yarn leaving long tail, and thread onto tapestry needle. Hold work up with both needle tips facing to the right. You have two sets of sts, 10 sts on each needle. With tapestry, go through first st of bottom needle knitwise and take off knitting needle, go through second st purlwise and leave on. Go through first st of top needle purlwise and take off, go through second st knitwise and leave on.
For remaining sts, remember the following sequence. For bottom needle: k off, p on. Then for top needle: p off, k on. Rep until last 2 sts on each needle. Then, for bottom needle: k off, p off. For top needle: p off, k off.
Tug gently on each Kitchener st from right to left to neaten.
Kitchener steek
Knip het garen af en laat een lang draadeinde over. Rijg het draadeinde door een stopnaald. Houd het werk met beide naaldpunten naar rechts. Je hebt twee sets van stn, 10 stn op elke naald. Ga met de stopnaald door de 1e st op de onderste breinaald alsof je recht breit, dus van links naar rechts, en neem de st van de breinaald. Ga averecht – van rechts naar links – door de 2e st op dezelfde breinaald en laat deze erop zitten. Ga dan met de stopnaald averecht door de 1e st op de bovenste breinaald en haal deze af, ga dan recht door de 2e st en laat deze erop.
Onthou voor de overige stn deze volgorde. Voor onderste naald: r af, av op. Voor de bovenste naald: av af, r op. Herh tot de laatste 2 stn op elke naald. Dan voor onderste naald: r af, av af. Voor bovenste naald: av af, r af.
Trek dan voorzichtig aan elke kitchener steek van rechts naar links voor een net resultaat.
Finishing
Weave in all ends, find the tutorial video here. Wash your socks and lay them flat to dry. Block them if you want (insert a cardboard cut-out if you don’t have sock blockers) for a super smooth finish.
Werk alle eindjes weg, vind de tutorial hier. Was je sokken en leg ze plat te drogen. Je kunt ze opspannen op sokkenblockers (knip karton in een sok-vorm als je geen blockers hebt) voor een mooie afwerking.

Share your socks with the world by making a project page on Ravelry or by tagging them in Instagram pictures with #CityStripeSocks and #NewLeafDesigns.
This pattern is designed by me – Carmen Jorissen. The yarn was lovingly provided by Scheepjes, a Dutch yarn company. Copyright of this pattern is protected by Scheepjes, please do not hand out any printed copies of this pattern, thank you very much!
If you have any questions regarding the pattern you can ask them in my Facebook group, and of course this is also a great place to share your pictures!
Deel je sokken met de wereld door een projectpagina op Ravelry te maken en ze op Instagram te taggen met #CityStripeSocks en #NewLeafDesigns
Dit patroon is ontworpen door mij – Carmen Jorissen. Deel a.u.b. geen geprinte kopietjes uit van mijn patronen en deel de digitale versie ook niet, bedankt! Copyright wordt beschermd door Scheepjes.
Als je vragen hebt over het patroon dan kun je deze stellen in mijn Facebook groep, en natuurlijk mag je hier ook je foto’s delen!
Shop more patterns here Shop andere patronen hier
You might also like


4 Comments
Hoi Carmen,
Wat een leuk garen voor sokken.
Wat is het voordeel van afterthougt-hiel breien ?
Ik gebruik altijd een fleegle- hiel en kan aan 1 stuk door breien.
Ik brei op een rondbreiend , toe first en twee sokken tegelijk.
leuke website heb je en goede uitleg, ik ben blij met je.
Dank je wel alvast.
Do van Leeuwen
Hoi Do, bedankt voor je lieve berichtje! Dat toverde gelijk een lach op mijn gezicht toen ik het las. Het voordeel van de afterthought hiel is dat als je bijvoorbeeld even geen liniaal bij de hand hebt om te meten of je al op de goede plek bent voor de hak, dat je dit gewoon later kunt doen. Toen de bioscopen nog open waren ging ik daar vaak naartoe en nam ik een sok mee om aan te breien. Omdat ik in het donker echt niet kan zien of ik al bij de plek van de hak ben, was de afterthought hiel echt een uitkomst!
Ik ben benieuwd of je het een keertje probeert! Veel plezier alvast.
Groetjes Carmen
[…] If you’re looking for a full sock pattern written for six adult sizes, check out my City Stripes Sock pattern here. […]
[…] find the tutorial for an Afterthought heel below. Do also check out the City Stripe Socks pattern which is the pattern for the socks pictured in this […]