
GET YOUR YARN / GAREN KOPEN
For one pair of adult sized socks, you will need 2 balls of Scheepjes sock yarn. You can use either Scheepjes Invicta Extra, or the new Scheepjes Metropolis with 80 colours!! Get your yarn via Scheepjes retailers or via these webshops*:
Voor één paar sokken in een volwassen maat heb je 2 bollen Scheepjes sokkengaren nodig: Scheepjes Invicta Extra of het nieuwe Scheepjes Metropolis sokkengaren in wel 80 kleuren! Koop je garen via Scheepjes retailers of deze webshop*:
Wool Warehouse (UK)
Caro’s Atelier (NL)
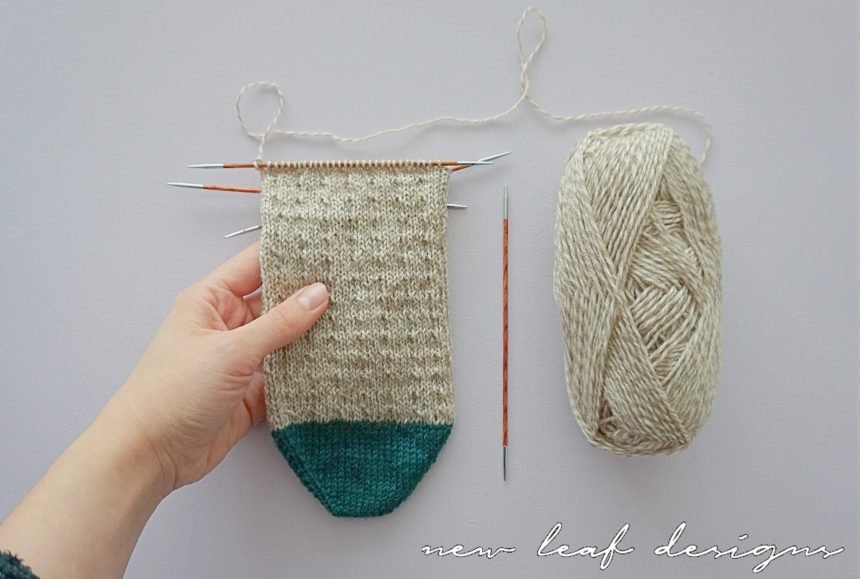
Welcome to Part 3 of the Simple Toe Up Socks Knitting Pattern
Almost there! After finishing the instructions of Part 1 and 2, you should almost have a completed sock by now. The only things left to do is to knit the cuff, also called ribbing, and to bind off stretchily. This is important when you actually wear the socks; if the cuff it stretchy enough you will have no problem pulling it up your ankle.
We zijn er bijna! Na deel 1 & 2 te hebben gevolgd is de sok bijna af. Het enige wat ons nog rest is het boord te breien, en op een speciale manier af te kanten zodat het boord goed gerekt kan worden. Dit is belangrijk voor extra comfort als je de sok aantrekt, je wilt namelijk dat het genoeg oprekt om gemakkelijk over de hak te kunnen.
Shop the PDF version here Purchase on Ravelry
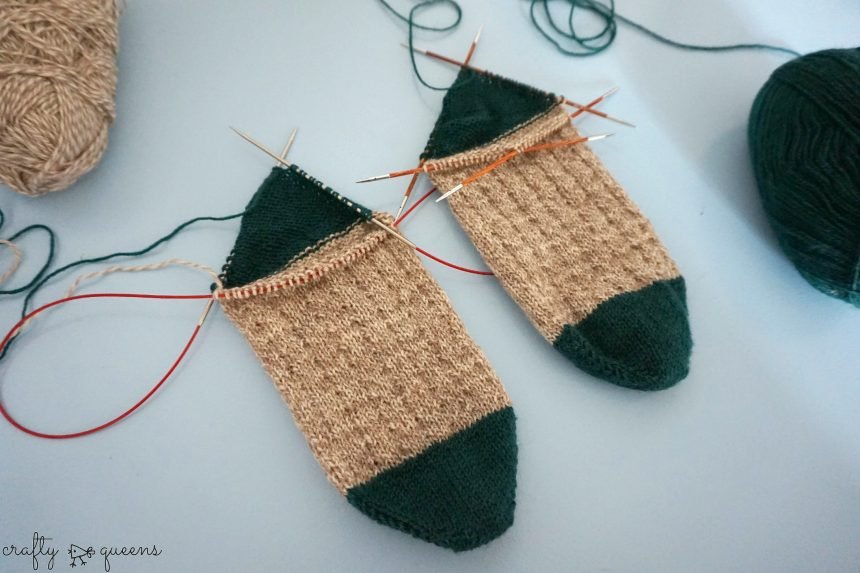
YARN / GAREN
Scheepjes Invicta Extra (75% wool, 25% nylon) – 50 gram ball
1x 1300 Dark Green / Donkergroen
1x 1443 Marled Beige / Gemeleerd Beige
NEEDLES / NAALDEN
Depends on gauge, I used 2.25 mm Knitpro Royale DPNs
Hangt van draadspanning af, ik gebruik 2,25 mm Knitpro Royale DPNs (dubbelpuntige naalden)
ABBREVIATIONS
K – Knit
P – Purl
K2TOG – Knit 2 sts together
P2TOG – Purl 2 sts together
TBL – through the back loop
ST(S) – Stitch(es)
AFKORTINGEN
R – Recht
AV – Averecht
2r.sam.br – 2 steken recht samenbreien
2av.sam.br – 2 steken averecht samenbreien
stk(n) – steek/steken
PATTERN / PATROON
Knitting the cuff is very easy, you just knit ribbing across all of the stitches until your cuff is long enough, or until you run out of yarn. The ribbing is repeated across 4 stitches, which means you should have a multiple of 4 stitches on your needles. Be sure to watch the video above for some tips and tricks!
Round 1: *k2, p2* repeat ** until end of round
Repeat round 1 until you have a cuff that is long enough. A standard cuff is in between 15-20 rounds long. Make sure to still have enough yarn for the bind off.
Het boord is een van de gemakkelijkste gedeeltes van het sokkenbreien. Je breit een geribd patroon over alle steken. Voor dit boordpatroon heb je een veelvoud van 4 steken nodig. Als je dit patroon vanaf het begin volgt en een van de aangegeven stekenaantallen gebruikt, zou je een veelvoud van 4 moeten hebben, dus kun je gelijk beginnen met het boord. Bekijk de bovenstaande video voor tips en trucs!
Toer 1: *2r, 2av*, herhaal ** tot het eind van de toer
Herhaal toer 1 totdat je boord lang genoeg is. Een standaard boord is tussen de 15 en 20 naalden lang. Let er wel op dat je nog genoeg garen hebt voor af te kanten.
BINDING OFF / AFKANTEN
For casting off ribbing, I have a special technique which ensures you have a stretchy edge to your ribbing. It goes like this:
k2 tbl, insert left needle into 2 sts on right needle and knit them together, *p1, insert left needle into 2 sts on right needle, p2tog, p1, insert left needle into 2 sts on right needle, p2tog, k1 tbl, insert left needle into 2 sts on right needle, k2tog, k1 tbl, insert left needle into 2 sts on right needle, k2tog*, repeat in this manner until you have cast off all of the sts.
Watch the video above for more tips and tricks!
Om een boord af te kanten heb ik een speciale techniek, zodat het boord fijn stretchy is. Alle rechte steken worden verdraaid gebreid, dit betekent dat je de steek door de achterste lus breit. Het gaat als volgt:
2r verdraaid, linkernaald in 2 rechter stkn steken en 2r.sam.br, *1av, linkernaald in 2 rechter stkn en 2av.sam.br, 1av, linkernaald in 2 rechter stkn en 2av.sam.br, 1r verdraaid, linkernaald in 2 rechter stkn en 2r.sam.br, 1r verdraaid, linkernaald in 2 rechter stkn en 2r.sam.br*, ga door op deze manier totdat je alle steken hebt afgekant.
Bekijk de bovenstaande video voor nog meer tips en trucs!

Many thanks to all of you who have been tagging me in your progress pictures on Instagram! I love seeing them! If you are knitting along, be sure to tag me @newleafdesigns.nl on Instagram, or use the hashtag #simpletoeupsocks.
Een aantal van jullie zijn mee aan het breien en laten foto’s zien op Instagram of Facebook, wat ik super leuk vind! Als je ook een foto plaatst zou ik het leuk vinden als je mij erin tagt met: @newleafdesigns.nl, of gebruik de hashtag #simpletoeupsocks.
The yarn for this project was very kindly sponsored by Scheepjes. This makes it more manageable for me to keep on creating fun content and patterns for you!
You might like
Simple Toe Up Socks Part 1 Here
Toe Up Socks Part 2 here
Simpele Sokken Deel 2 hier
*Affiliate links are used in this blogpost. If you choose to purchase materials via this link, you will not pay anything extra, but the shopkeeper will reward me with a small fee. It’s how I keep my website running! Thanks in advance for considering to shop via affiliate links
*In deze blogpost gebruik ik affiliate links. Als je via deze link materialen koopt, betaal je niets extra, maar dan beloont de winkelier mij met een klein percentage van je aankoop. Zo houd ik mijn website gaande! Bedankt voor het overwegen om via affiliate links te kopen.


10 Comments
Thank you so much. You’re a great instructor!
Thank you, excellent video,
Thank you for teaching me how to knit my first pair of socks!! It was completely informative and easy to follow after I got the hang of it. Great job!
Thank you so much Lindsay! I’m so glad you liked my tutorial 🙂
I couldn’t access the written pattern for these first socks, toe-up. Please, help.
Awesome tutorial! I do have a question about yardage though. You usually need 100g of yarn for a pair, would a 50g ball of the main colour be enough then? Also, if you want to knit a pair for size 45 (men’s), wouldn’t you need an extra ball of the main colour? I’d like to order Metropolis, but I’m afraid the given amounts would not be enough.
Hi Barbara, thank you for your message! Yes I would say you would need 2x 50 gram balls for the main colour if you’re knitting a size 45. Happy knitting! x Carmen
[…] this part, please view the written instructions here. It includes the pattern for the cuff and instructions on how to bind […]
Loved your tutorials! Very clear explanation of cast on and heel turn. Finally grasped the toe up method of making socks. Thank you!
Thank you for such great instructions Carmen. I keep coming back and am into my 5th year of your toe-up socks now. Such a winning pattern, and so many happy friends from it. You’re the best!