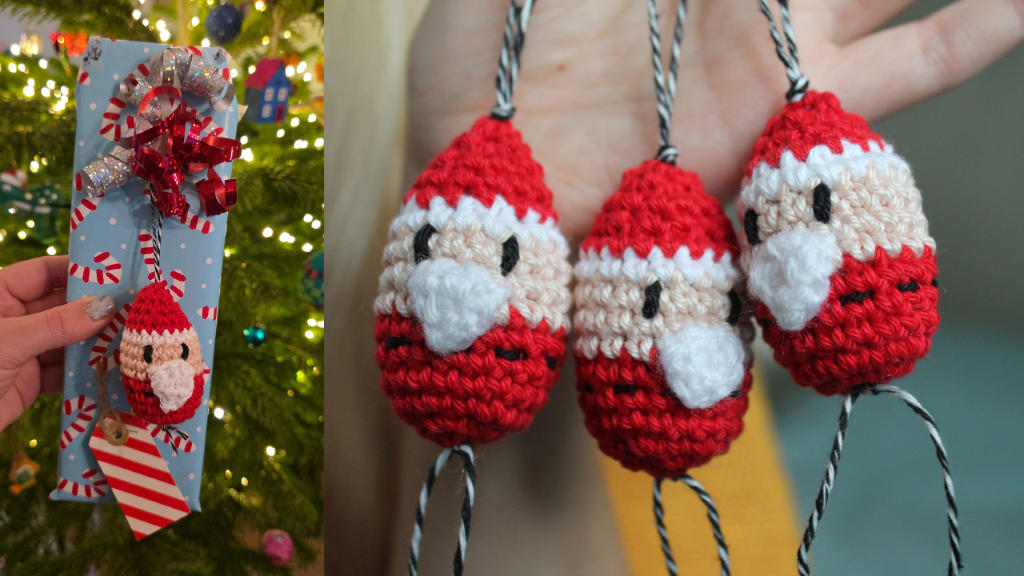
Crochet Santa Ornament
Crochet this cute little Santa, which you can use as a Christmas tree ornament or to decorate presents. Use any weight of yarn you like, as long as you have the same thickness for all the colours. The bigger the yarn, the bigger your santa will be! Please note: this pattern is written in both English and Dutch. Turn off any automatic translators to avoid confusion.
*Nederlands patroon staat onderaan!*
Materials
yarn in red, white, and a colour that can be used as skintone
black yarn for embroidered details
bakers twine
crochet hook – find the correct hook size on your yarn label
Notes on the yarn: I used 100% cotton yarns, but really any smooth yarn will do. For the little beard you can use wool or acrylic yarns for that fluffy look.
Used abbreviations
ch – chain
sc – single crochet (US terminology)
sc2tog – single crochet 2 sts together
st(s) – stitch(es)
Pattern (English US terminology)
Note: In this pattern, the rounds are worked in spirals. You don’t ch1 at the start of every round, and you don’t close it with a slip stitch. Use a stitch marker – or some leftover yarn – to mark the beginning of the round.
Make a magic ring with red yarn, ch1, then:
Round 1 6sc in magic ring
Round 2 2sc into every st
Round 3 *1sc, 2sc in next st; repeat from * to end of round.
Round 4-5-6 1sc into every st
In the last stitch of Round 6, switch to your skintone yarn by completing it with the new colour. Cut the red yarn.
Round 7-8-9 1sc into every st
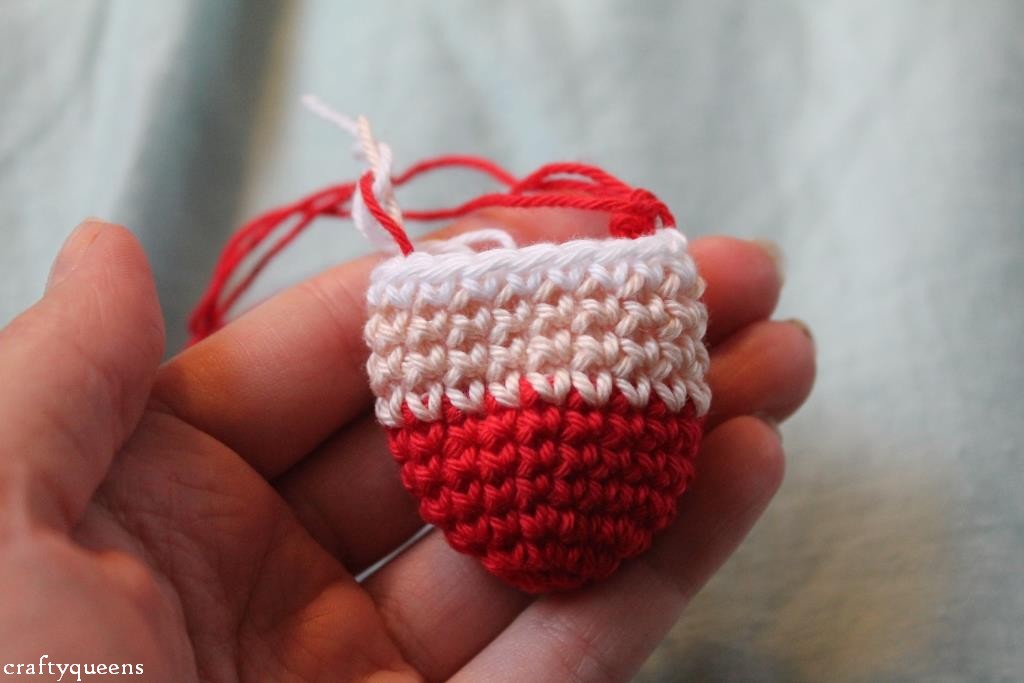
Switch to white, cut the skintone yarn.
Round 10 1sc into every st
Cut the white yarn, leave the loop of the last st large so you can easily pick it up later.

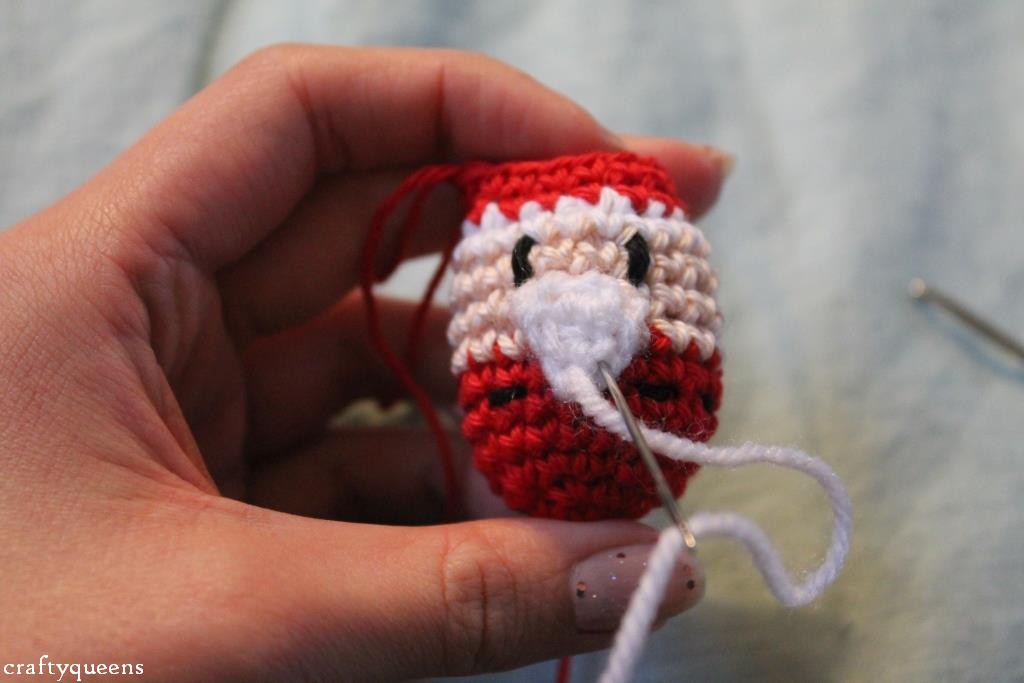
Decoration
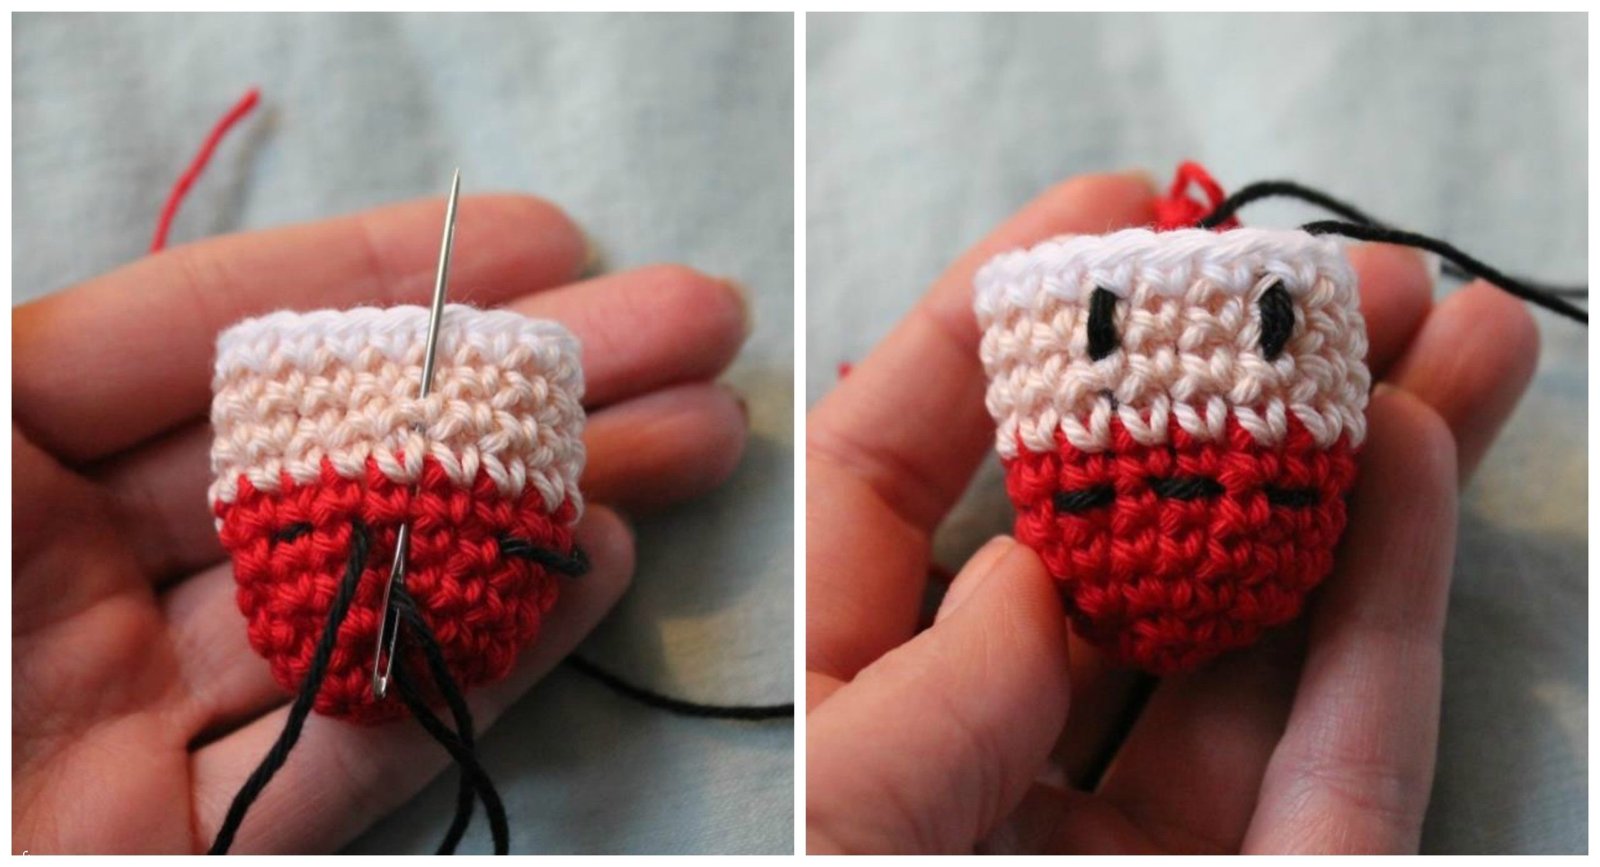
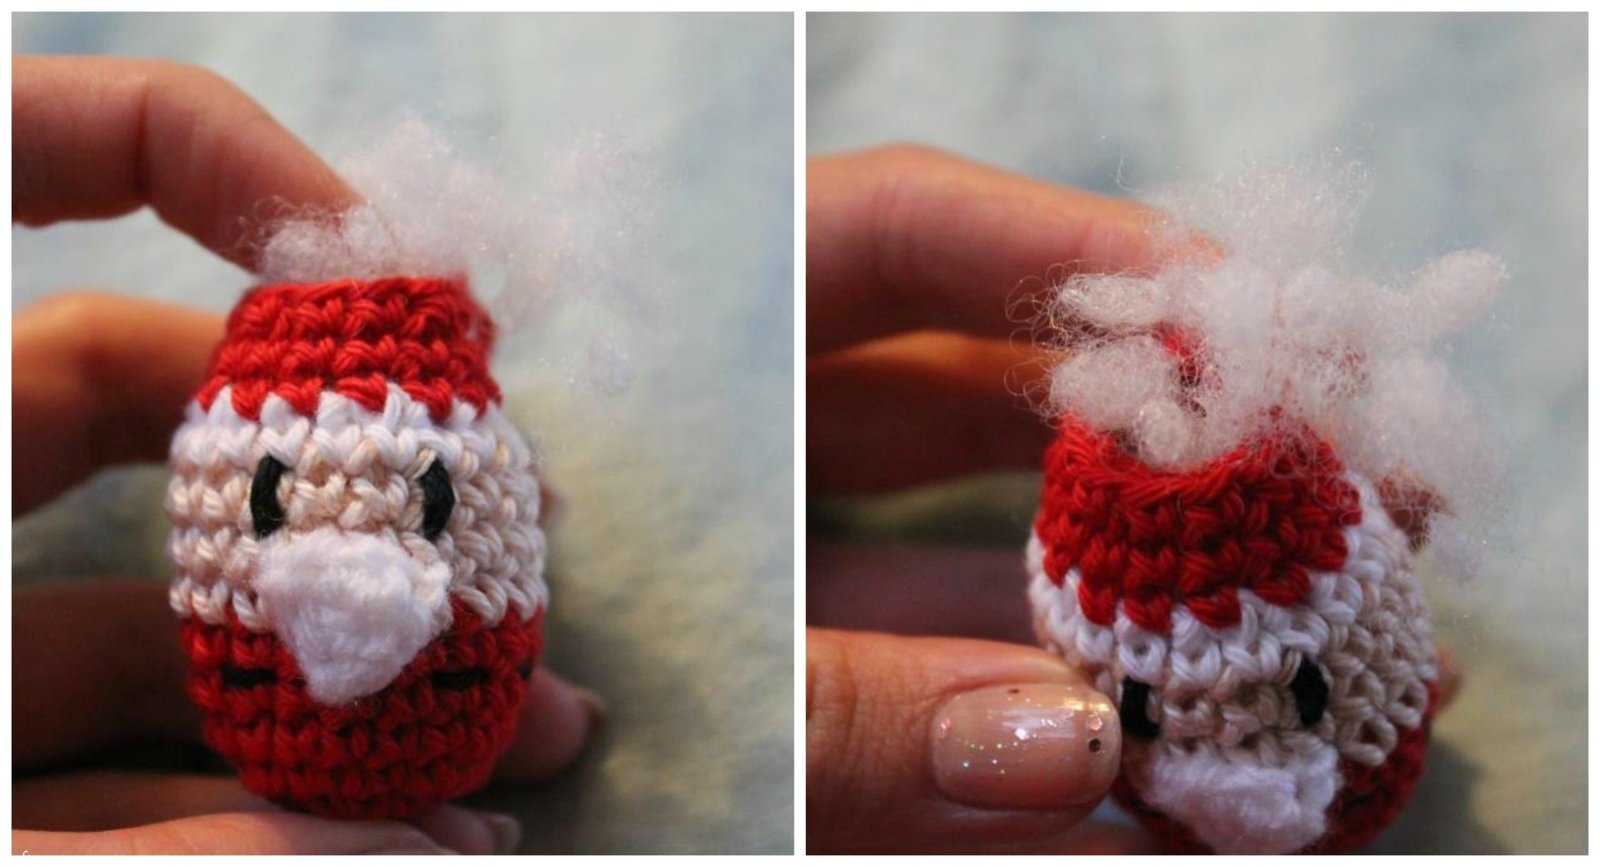
Time to decorate! Use some black yarn to sew the belt, in between Round 5 and 6. You can see my method in the photo above. With the same thread, sew the eyes. Sew vertically over a stitch in Round 9 for each eye. If the eye seems too ‘thin’, go over it again with the same yarn.

Make the beard:
1. Chain 5
2. Turn and sc4
3. Turn without chaining (ch) 1, and sc3. You will start in the second stitch for this.
4. Turn without ch, sc2
5. Turn without ch, sc1
Sew the beard onto your Santa-to-be.
Continue crocheting. Stuff the Santa when you’re at round 13.
With red:
11. sc around
12. *1sc, sc2tog*
13. sc around
14. *sc2tog*


If you want to make an ornament, you can attach the thread at this point. Go through the Santa from bottom to top, make a loop and go through it again. Make a knot at both sides. Then cut the red yarn and close your work by weaving through the remaining 6 stitches. Weave in the end.


And ta-dah, your first Santa is finished! If you like, you could attach a small bell to the bottom. That makes them look even cuter! I would love to see your crocheted Santas, you can share them with me on my Facebook page, or the Ravelry page. If you share photos on Instagram, do tag me @newleafdesigns.nl.
Happy crafting!

Nederlands patroon Kerstmannetje
Haak dit schattige kerstmannetje om in de kerstboom te hangen of om cadeautjes mee te versieren. Je kunt elke dikte garen gebruiken, let wel dat alle kleuren dezelfde dikte hebben. Gebruik dikker garen voor een groter kerstmannetje! Let op: dit patroon heb ik zowel in het Engels als in het Nederlands geschreven. Schakel automatische vertalers uit zodat het niet verwarrend wordt.
Materialen
garen in rood, wit, en in een huidskleur
beetje zwart garen
bakkerstouw
haaknaald – vind de juiste maat op het garenlabel
Opmerkingen over het garen: ik gebruikte katoenen garens, maar elk glad garen is prima. Voor het baardje kun je acryl of wol gebruiken voor een fluffy effect.
Gebruikte afkortingen
l – losse
v – vaste
2vsh – 2 vasten samen haken
st/stn – steek/steken
Nederlands Patroon
Let op: je haakt in een spiraal. Je haakt geen losse bij het begin van elke toer, en je sluit de toer niet met halve vasten. Gebruik een steekmarkeerder om het begin van de toer te markeren.
Begin met rood, maak een magische lus en haak 1l.
Toer 1 Haak 6v in ring
Toer 2 2v in elke st
Toer 3 *1v, 2v in de volgende steek; herhaal van * tot het einde van de toer.
Toer 4-5-6 1v in elke st
Wissel nu naar het huidskleur garen, door de laatste steek van Toer 6 af te maken met de nieuwe kleur. Knip het rode garen af.
Toer 7-8-9 1v in elke st
Wissel naar wit, knip het huidskleur garen af.
Toer 10 1v in elke st
Decoratie
Tijd om wat te decoreren. Met wat zwart katoen naai je een riempje tussen toer 5 en 6, op de foto kun je zien hoe ik dit doe. Met de uiteinden van deze draad maak je ook de ogen. Ik naai elk oog met 2 steekjes op elkaar.
Het baardje maak je zo:
1. Haak 5 lossen
2. Keer om en haak 4 vasten
3. Keer om zonder een keerlosse te maken, en haak 3 vasten. Hiervoor begin je dus met haken in de 2e vaste.
4. Keer om zonder een keerlosse te maken, en haak 2 vasten
5. Keer om zonder een keerlosse te maken, en haak 1 vaste
Naai het baardje vast.
Ga verder met haken, en vul het kerstmannetje op als je bij toer 13 bent.
Met rood:
11. *1v*
12. *1v, 2vsh*
13. *1v*
14. *2vsh*

Als je een hanger wilt maken, dan is dit het moment om een draad door je kerstmannetje te halen. Eerst van onder naar boven, maak een lus, en ga weer van boven naar onder door je werk heen. Maak een knoopje in de draad boven en onder het kerstmannetje. Knip dan de rode draad af en naai de overgebleven 6 steekjes dicht. Werk het draadje weg.
En tadaa, je hebt een Kerstmannetje gemaakt! Als je wilt kun je aan de onderkant nog een belletje aan de touwtjes vastknopen, dat geeft ze net iets extra’s!
Deel foto’s van je kerstmannetjes op Instagram door me te taggen: @newleafdesigns.nl, of deel foto’s in mijn Facebook groep.


11 Comments
Schattiggggg c: Xx
Love your pattern, thank you for sharing. xoRobin
You’re welcome! 🙂 xx
Oh they’re soo cute! And I thought I was done with all of the chrismassy stuff for this year! Now I have to make them! Thanks for sharing! San
Haha, thankfully these will be done in no time 😉 Just make sure you fill them with fiberfill, not with leftover yarn ends. I did that first and the ribbon would not pass through >.< Good luck! xx
dank je wel ik heb je gelinked op gratis patronen https://www.facebook.com/jennekevm?ref=hl
Bedankt voor het delen Jenneke! 🙂
heel graag gedaan xxx
Great pattern!!! I just completed my own Santa,(though…he’s pink instead of red) Here’s a link if you want to see 🙂 (It’s on Deviantart) http://fav.me/d88jhsz
Thanks for sharing!! He’s so cute 🙂
Hij is echt zo ontzettend leuk! bedankt. Ik neem voor het riempje een dubbele draad dat maakt het net wat meer een riempje en is gelijk makkelijk voor de oogjes.
Ik krijg alleen niet echt een punthoofd:-) misschien bij de tweede.