Een tijdje geleden zag ik dit geweldige tapijtje op Pinterest!
A while ago, I came across this amazing rug on Pinterest:
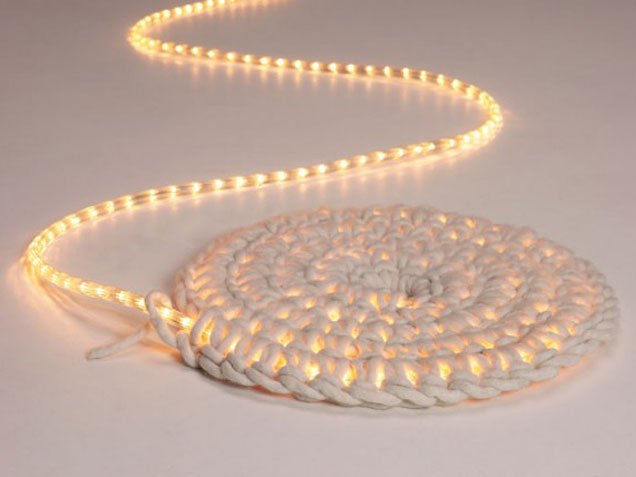
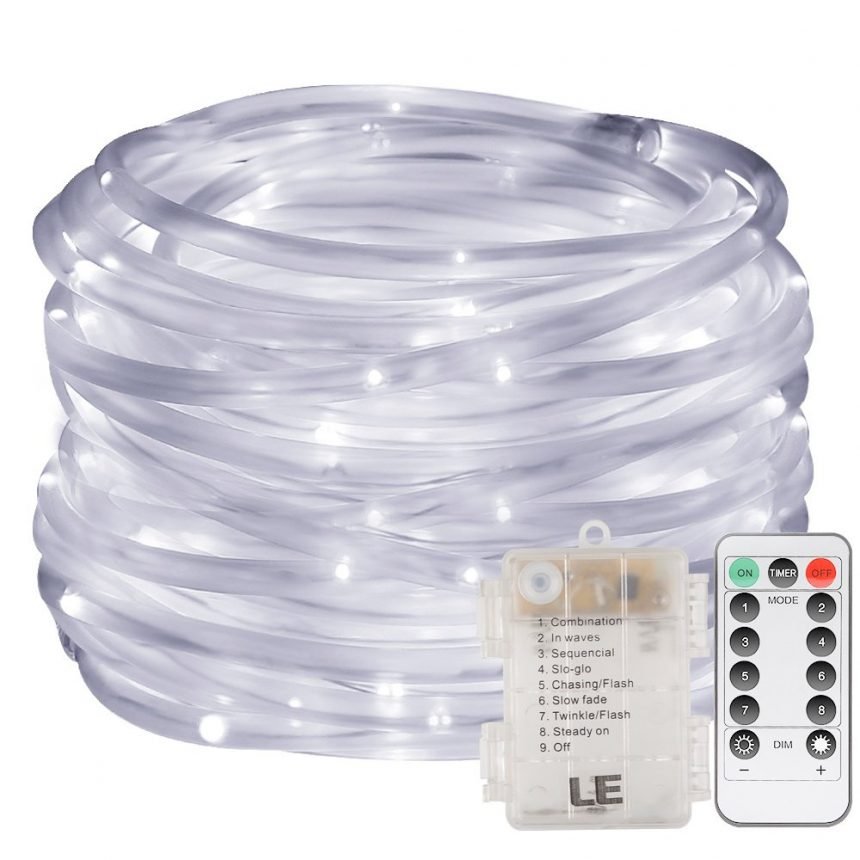
Is het niet prachtig? Ik vond het zo’n leuk idee dat ik er meteen mee wilde beginnen. Het lichtsnoer vond ik bij de Gamma of de Praxis, en wat goedkoop textielgaren bij de Action of Kruidvat gehaald. Ik kocht wel 4 klossen wit textielgaren, maar uiteindelijk heb ik nog niet eens 1 klos opgebruikt. En toen ging ik aan de slag! Of tenminste, dat wilde ik. Het was namelijk nog niet zo makkelijk! De meeste plaatjes op Pinterest linken meestal naar het originele patroon, of naar een winkel waar het verkocht wordt. Maar deze pagina was niet meer beschikbaar! Error 404 of zoiets, je kent het wel. Dus.. Ik ben dan wel geen beginneling met haken, maar het was toch even lastig! Uiteindelijk heb ik het toch uitgevogeld, en nu deel ik deze tutorial met jullie, zodat jullie niet zo hoeven te klungelen zoals ik vanmiddag zat te doen. Belangrijk: Als je een lichtsnoer gaat kopen, let dan op dat je gaat voor eentje met LED-lampjes. Deze worden voor zover ik weet niet warm, en dan is de kans op brandgevaar veel kleiner. Veiliger en energiezuiniger! UPDATE: Onderhand ben ik erachter wie de originele ontwerper is, namelijk Johanna Hyrkäs.
Isn’t it totally gorgeous? I couldn’t wait to make one myself. So I got the ropelights* and 4 skeins of t-shirt yarn* (turns out I didn’t even use up ONE skein, haha), and I started crocheting! Well.. it wasn’t that easy. I tried to look up the pattern. Most pictures on Pinterest link to the original source, which is a pattern or a store, most of the time. But the original page was gone! Error 404 or something like that. So.. Where do I start? I’m not a total crochet noob, but I had some difficulty figuring this out. Soon enough though, I got it right! I’m sharing this tutorial with all of you, to spare you some trial-and-error of your own. Important: When looking for the lights, make sure that they are LED-lights. As far as I know, these don’t heat up, so there’s less chance of fire hazard. They are safer and energy-saving! UPDATE: I’ve come across the original designer: Johanna Hyrkäs.
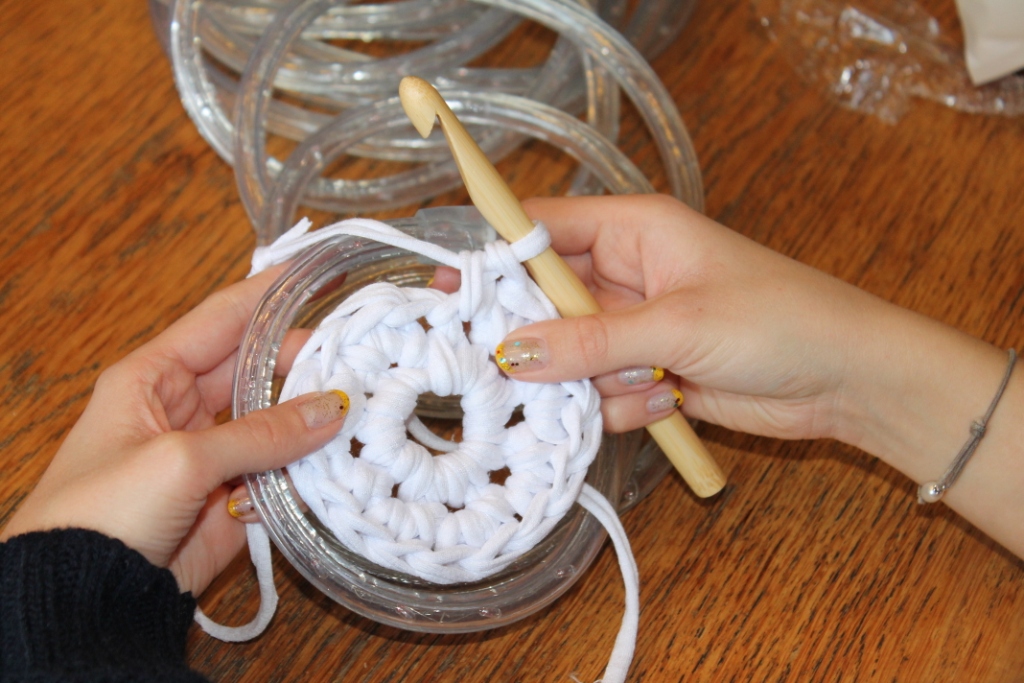
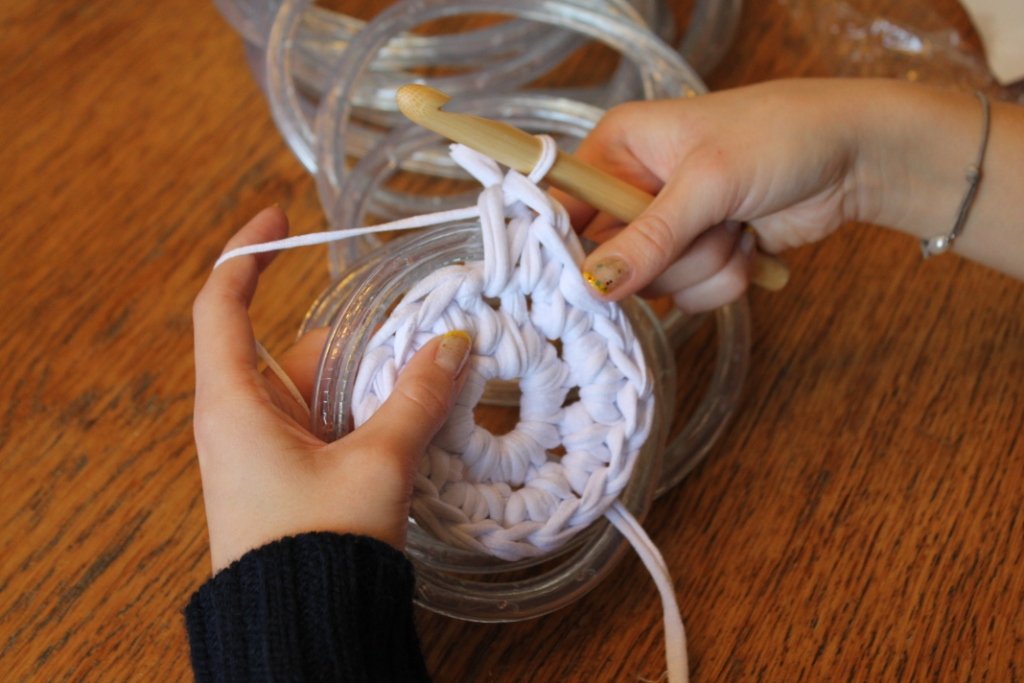
Ik begreep dat ik eerst een klein rondje moest haken zonder de lichtslang, voordat ik die erin kon verwerken. Je kunt daar namelijk niet zo’n klein rondje van maken dat je dat meteen kunt doen. Ik haakte eerst dit: 8 vasten in een ring, daarna 2 vasten in elke van die 8 vasten. Je werkt hier niet in gesloten rondes, dus je werkt gewoon aan een stuk door.
I understood that I would have to crochet in the round a few times, until it would fit the inside of the lights.. um.. cord? Anyway, because the cord is very stiff, it would not curl up small enough to work it into the crocheting from the beginning. I crocheted 8 SC in a magic circle, and then 2 SC in every SC, before I could start working with the cord. 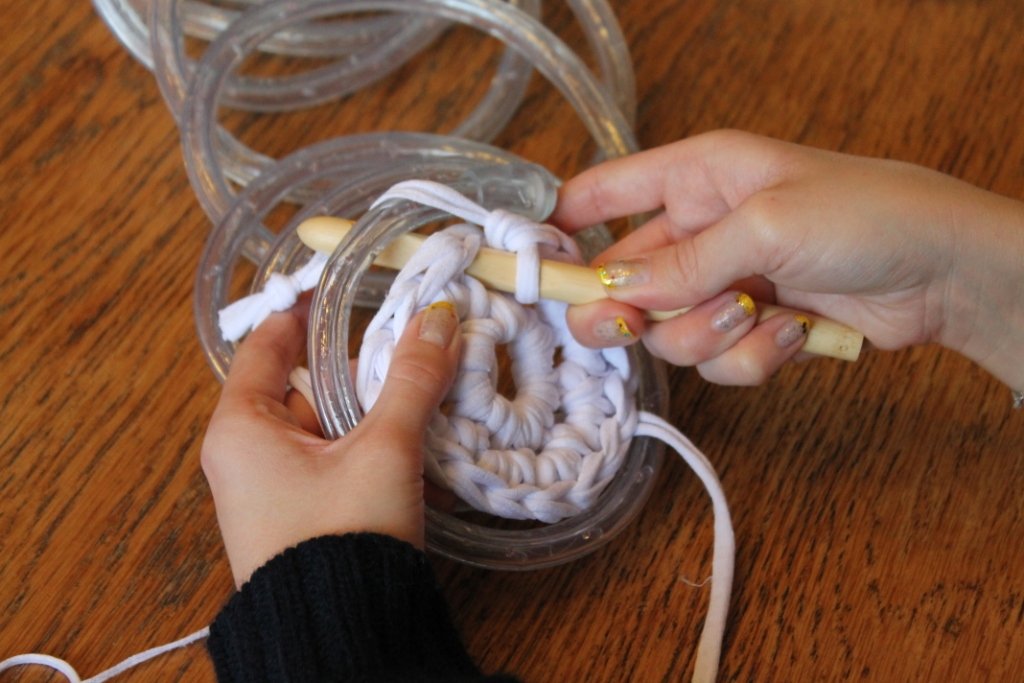

Het is wat lastig om eromheen te haken, maar als je het onder de knie hebt, gaat het bijna vanzelf. Ga verder met *1v, 2v* voor de komende twee rondes. Haak zo los mogelijk! Na een paar rondes ben ik overgestapt naar de hele tijd maar 1 vaste te haken in elke steek. Als je los genoeg haakt, hoef je bijna niet te meerderen. Als je dan toch wil meerderen (dit deed ik om de 6 steken), haak dan 1 losse tussen de steken in. Als je namelijk 2 vaste in 1 steek haakt, bedek je de lichtslang met meer garen. Je ziet het licht er alsnog wel doorheen, maar het leek mij leuker als er wat meer gaten in vallen. De allerlaatste ronde haakte ik wel weer soms 2 vaste in een steek, omdat dat voor een mooiere rand zorgt.
It’s kind of tricky, but you’ll get the hang of it. For the first few rounds, keep crocheting with *1sc, 2sc*. Crochet very loosely! After the 3rd round, I noticed that if you just crochet loose enough, you don’t have to increase that much. When you do need to, just chain 1 in between stitches. ( I did this every 6 stitches) I found that doing 2SC covers the lights too much. It would still shine through, but I thought it was nicer to leave larger gaps. If you need to increase in the last round, however, use 2SC instead of chains, as it makes for a nicer edge.


Mijn mat werd wat kleiner dan ik had gedacht, dus misschien leg ik het wel gewoon op de tafel, met een decoratieschaal erop. De lichtslang die ik gebruikte was trouwens 6 meters lang.
Mine turned out to be smaller than I wanted it to be, so maybe I’ll put it on the table instead. The lights cord I used was 6 meters long.

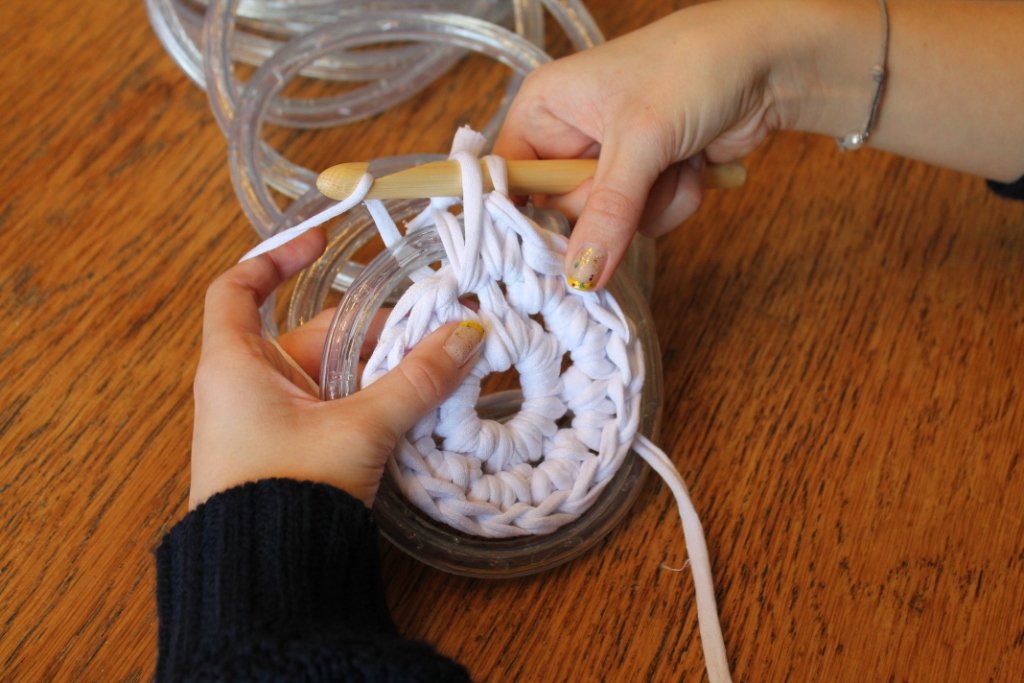
Als je bij het eind bent gekomen, haak je nog een paar vasten zonder het lichtkoord erin, zoals op de onderstaande foto.
When you’ve come to the end of the cord, crochet some SC without the cord in it, like in this picture:

Haak dan 2 halve vasten (over 2 steken) om het af te ronden.
Then, crochet 2 slip stitches (1 per stitch), to make a nice circle.
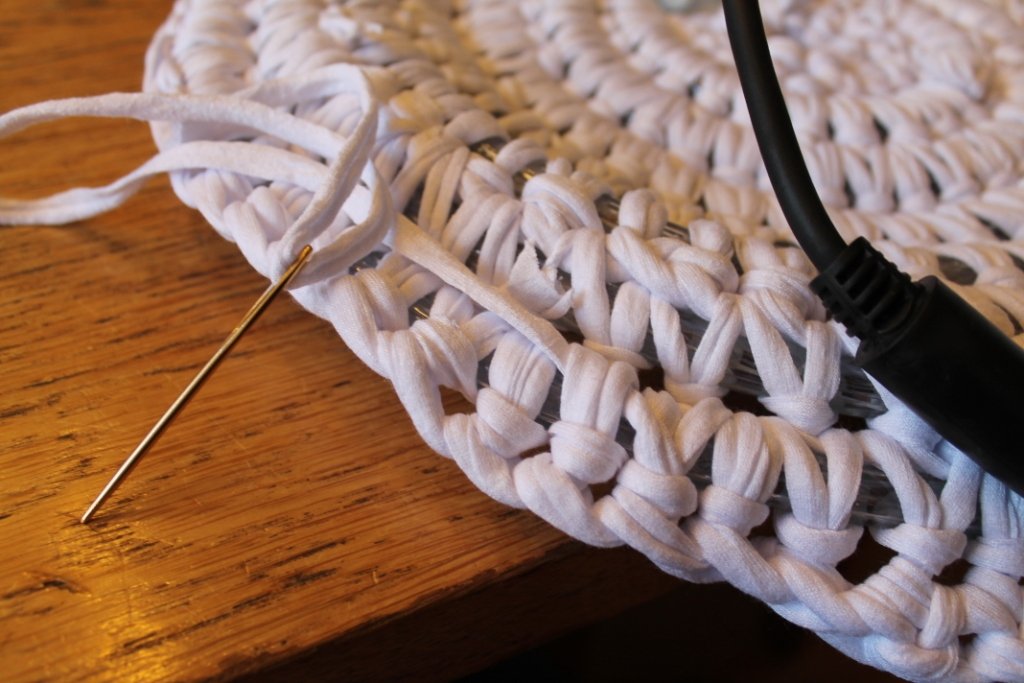 Weef het eind in. Je hebt hier wel een grote naald voor nodig. Als je die niet hebt, kun je het misschien met een haaknaald inweven.
Weave in the ends. You’ll need an extra large needle for this. If you don’t have one, maybe a crochet hook will do the trick too.
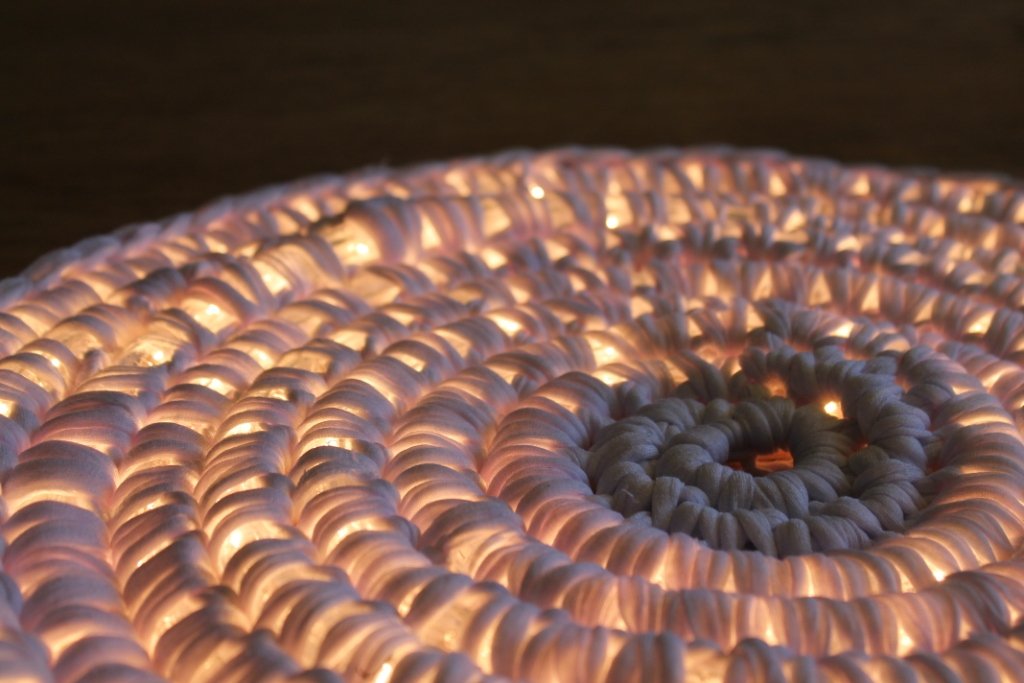

En hij is klaar! De volgende keer ga ik echt wel voor een langer lichtsnoer. Ik had wel nog genoeg garen over voor nog wat andere projecten! Heb jij ook een lichtgevend tapijt gemaakt? Zet je foto erbij op de Ravelry pagina!
And it’s done! I’ll use a longer cord next time, but it’ll look nice anyway. I think it was originally intended as a Christmas tree skirt. Best part is, I still have 3 skeins of yarn left for other projects! I would love to see your finished products! Post them on the Ravelry page 🙂
Miss no more DIY’s and patterns, follow New Leaf Designs on Bloglovin!
Shop ropelights via Amazon! *affiliate link
Shop T-shirt yarn via Amazon!*affiliate link


121 Comments
Thank you SO MUCH for posting this! Would you mind telling me what the finished dimensions of your rug are?
Hi Ashley! You’re most welcome 😀 My rug turned out a bit too small for my taste, it was only about 50 cm. I used 6 meters of lighting cord, so if you want an actual rug I would go for at least 10 meters. You could try out the size by laying the cord in a spiral before starting to crochet, then you kind of have an idea of the size it’s going to be. Hope this helps! xx
Im confused, i so want to make this but don’t get it. Maybe boys can’t crotchet 🙂
Hey Stu! Oh I’m certain you can make this too 😉 Can you tell me exactly where the problem is? To make this rug, you have to be able to make a chain, a single crochet and a magic ring. If you don’t know how to make those, there are lots of youtube videos that show you exactly how to do it. But if you’re having trouble with anything else, I am happy to help you with that.
boys can crochet
i’m a boy too
Can you walk on the lights? I love this idea and think I will try it if I can find the lights! Thanks for sharing.
Hi Mary! You can walk on the lights, although it could make it easier for the lights to break (and you don’t want that!). Maybe you could still find some Christmas ropelights on sale in this time of year! Good luck! xx
I can’t seem to find textile yarn. Any hints would be helpful.
Hi Sheri, I’ve bought my textile yarn here in the Netherlands. In Europe they’re not hard to find, but they might be in other parts of the world. I’ve seen some at Lion Brand yarns but not in white. You could also make your own t-shirt yarn (loads of tutorials available online), or just opt for a different kind of bulky yarn. Even multiple strands of regular yarn will work. Good luck!
Is there any fire hazard? Does it heat up if left on for a while? Beautiful work by the way!
Thank you for your lovely comment! It all depends on the lights you use. I used regular lights, and they get warm after a while. I don’t know if there would be a fire hazard though, but to be safe, I would go for LED lights. I don’t think they heat up at all 😉 Good luck!
Oh wow I love this and I would love to make it. I was wondering do you mind if I sell the finished products. Thank you
Thank you for your lovely comment! I’m not making the rugs at the moment, so I’ll give you permission to sell your products as long as you credit me for the tutorial.
[…] Image credit: wordpress […]
[…] Lumineus haakidee uitgelegd door een Crafty Queen. […]
[…] And I did find a tutorial on a small one that was made here: http://creacarmen.wordpress.com/2012/12/29/add-some-light-to-your-living-room/ […]
[…] or would enjoy putting in my hallway. Then I was talking to one of my friends and she said she saw this neat thing online that is a wall décor piece with a light rope inside that I could make myself. She showed me […]
Love this idea, Great mood lighting. Are you able to tell me what size hook you used? Thanks
Tania
Hi Tania, Thank you for your comment! I used a 12 mm hook for this project, but it kind of depends on your yarn which hook you will use. Some textile yarns are thinner than others, so you could need either a 10 or 12mm hook. Hope this helps!
[…] Zdroj a autor: craftyqueens […]
Hoi, super idee om zo’n verlichtings tube te gebruiken en om te haken.
waarschijnlijk kan je er ook een soort kantenkleedje van maken met erom heen te haken.
Je hebt me helemaal geinspireerd met nieuwe ideen.
super dank en ook voor het delen.
its great!!! what were the dimensions of the small rug that you used 6m of light?
Hi Shirley! I’m so sorry I didn’t respond sooner! The small rug was about 50-60 cm 🙂
[…] This was one of my absolute favorites created by crocheting around rope lights. The tutorial for crocheting over rope lights is posted at the blog Crafty […]
Instead of a circle I did an oblong, just did a large area in the middle of just fabric, added the lights then finished with more fabric. I use mine on the front porch for Halloween night.
Is it ok to walk on??
Hi! I have no idea actually, but it could cause some of the lights to break. Which you really don’t want, since you can’t simply replace the rope light, haha. I would avoid walking on it if possible, or ask the supplier of the rope light if they know any more about it. Hope this helps!
[…] Machts euch gemütlich… […]
[…] me gusta tanto que me da pena relegarla sólamente a ese uso estacional… La he encontrado en Crafty Queens, un divertido blog holandés que hace una bloguera llamada Carmen Jorissen, y que creo que voy a […]
My daughter saw this on Pinterest as well and I am going to make one for her. My problem is the light rope I purchased has a huge adapter in the end to add another string of lights. Can you purchase the lights without this? And if so, where do I find them?
Hi Rene! Yes, you can purchase the lights without an adapter, I know I did! I can only give you addresses for shops here in the Netherlands. I would check out the local hardware store, I bet you can get those lights at a lot of places around Christmas time. Good luck!
Thanks so much! I hadn’t checked hardware stores! LOL
This is such a great idea! You could turn this into a wall hanging and wouldn’t have to worry about people walking on it and it would be great as a night light in a kids room, mood lighting in the bedroom, accent lighting in any spa room. Thanks for sharing!!
There’s no way you could throw it in the washer. So how would you wash it. ?
Hi Donna! That’s right, this is a rug that would be very hard to clean. You could wipe it, but not really wash it. I’ve been trying to think of a solution, but in the meantime you just have to be extra careful around this rug!
oh I love this, it would make a great wall light to.
If used as a wall hanging do you have the cord hanging down the wall?
Hi Connie, that depends on where your power outlets are! In some houses power outlets are found in the center of the wall, so in that case you could simply hide it at the back. Otherwise, you would have it hanging down the wall. Maybe you could find some white tape to hide it with!
[…] Add some light to your living room! […]
I’m excited to try this, though I have no crochet experience. Thanks for the tutorial. Rope lights can be bought at hardware, craft, or online stores like Amazon. There are even some powered by battery packs or solar panels, if you plan on hanging it on a wall, or somewhere far from an outlet.
[…] a heart, a rectangle or a spiral. Oh, decisions. The tutorial for the project can be found here at Crafty Queens. I was able to purchase two 9′ light ropes from Big Lots for $10 each. My plan for the second […]
This is awesome thank you for the tutorial! Now if only I knew a thing about crochet lol any suggestions on very beginner type youtube vids to start with?
[…] Crafty Queens – Add some light to you room […]
beautiful work would be good idea to keep it clean .if you cover it with glad wrape
Thank you. Thank you. Thank you. I came across a similar ‘tutorial’ using t-shirt yarn but have been pulling my hair out to get the rope to curl, and there weren’t any instructions to help me, just pictures. You’re right, it’s just too stiff. But you’re tutorial has helped me so much. Thank you.
You’re so welcome Sophie!! I’m glad I could help 🙂
Hi Carmen: What a great idea!! I’m thinking to leave an opening in the centre for the Christmas tree stand and then crochet from there. I have a 4 foot tree that I have on a table because of 2 cats and 1 dog but I think I might use a red colour lights with white yarn..Thanks for the idea! Linda
This would also work for a hearth rug and a half circle just back and forth instead of in a circle. Great idea.
Hi Edie! Great idea, but you would need a very flexible rope light for this to work out. I hope it works!
[…] >Full tutorial and Free Pattern << […]
Thanks for this! It’s very generous of you to share your knowledge.
Hello! Thank you so much for this! I have had people ask me to make this and I tried a couple years ago and gave up on it. Your instructions show me two things that are different from the last time I did this. First, I used macrame cord which is what the original instructions did and that was impossible to crochet with. Secondly, I like that you made a circle in the center THEN attached the lights. I am excited to try it again thanks to you! I have one question though. Would you say what you are calling “textile yarn” is possibly what we call “t-shirt yarn” here in the United States? Does it seem to be strips of t-shirts? Thanks again for your great explanation! My friends will be thrilled that I think I can do it now!
Hello Bonnie, you are very welcome! I’m so glad my tutorial was helpful. I also tried to immediately attach the lights, but they were just too stiff, I’m sure you experienced the same. Yes, it’s the same as T-shirt yarn! Actually, any bulky non-acrylic (will melt!) yarn will do, but T-shirt yarn is the one I used. Good luck and I would love to see pictures of your rug if you finish it! You can upload them on the Ravelry page (link in tutorial). Happy crafting, Carmen
Thanks for your quick response! Yes, it was too stiff with the lights in the middle and then the macrame cord was too hard to crochet. I am so excited to try it your way! Thanks again!
Can you do an instructional YouTube video to show how it’s done?!
Hi Jacque, I’m sorry, I don’t do videos (yet). If you look for a video which shows you how to crochet in the round, I’m pretty sure you can follow this pattern. Good luck!
just concerned about the extension cord and it tripping someone up.
You could probably clean it worth one of those apolstery or carpet cleaners with the attachment as long as you knot your ends and joining parts tight.
Does anyone know if this light mat can be knitted,I cannot crochet but would love to knit it if anyone knows the pattern
Hi Kate, I’m afraid I don’t know of a way to knit around something, not sure if it can be done.
I love this!!! Have bought my lights and yarn and can’t wait to get started!!!
For those looking for cleaning solutions I too thought I too thought about that right off!! What occurred to me was spraying the mat with Scotchgaurd and allowing to dry thoroughly before using… Doing so would allow MOST spills or dirt to just be wiped off…
Sorry.. That is a name brand here in the states for a spray fabric stain protector/semi water proofer.
Definitely need to use LED lights. the regular ones get hot and will melt at the connections. At least that is my experience. Lovely idea.
Thanks for this great tutorial! For those looking for lights outside of the Christmas Season, check your thrift stores! They get bombarded with Christmas decorations when people start spring cleaning! Just ask the clerk if you can test them BEFORE you buy… no clerk needs to get yelled at because you lost a dollar on used lights that didn’t work the way you needed. 😉
Great piece of advice, Leslie!
Great idea! The rug is really nice! Can you tell me where in Netherland I can buy kind of textile yarn that you have used?
Hi Monika! I got this yarn at Action, at the time they also had it at Kruidvat, but it wasn’t in their regular product line. Yarns like ‘Zpagetti’ from Hoooked or Nooodle from Scheepjes will be perfect aswell 🙂
Could you please tell me the size of the crochet hook????? I am going to make this for my daughter and maybe make them for the rest of my kids. Thank you!
Hi Gayle! Sorry for the late reply. I used a 12mm crochet hook 🙂
I think your size could make a great Wall hanging
[…] more details here… […]
[…] Blog/Crafty Queens […]
[…] Alles wird kommt irgendwann wieder zurück! Genau so siehts aus mit den guten alten Handarbeitstechniken wie dem Häkeln aus! Diesen neuen Trend müsst ihr euch einmal angeschaut haben, denn alle Nadelfreunde werden Augen machen! Für alle die eine neue Herausforderung suchen, sollten einmal bei Bloggerin Carmen vorbeischauen. […]
[…] a more detailed tutorial for how to make Carmen’s rug click Here. Pictures are well and good but details and details are the best. Personally is all I need. […]
[…] Here is a more detailed tutorial for how to make Carmen’s rug. Pictures are well and good but details and details are the best. That’s what I personally need. Lol. […]
[…] Carmen from Crafty Queens was motivated to create a light carpet of her own after seeing Hyrkas’. […]
[…] CRAFTY QUEENS […]
[…] A teljes bejegyzést hollandról angolra fordítva megtalálod itt. […]
[…] not a total crochet noob, but I had some difficulty figuring this out,” Crafty Queen writes on her blog. “Soon enough though, I got it right! I’m sharing this tutorial with all of you, to […]
Hoi Carmen,
Ik kreeg deze link doorgestuurd van m’n moeder, maar het viel me op dat er helemaal niet naar jouw pagina doorgelinkt wordt. http://leeftips.nl/een-vrouw-haakt-8-steken-rond-een-led-lichtslang-op-dit-idee-zou-ik-zelf-nooit-gekomen-zijn/
De credits verdien je wel!
Bedankt Ilona! Ik heb gemerkt dat het bericht de laatste tijd heel veel wordt gedeeld en meestal vermelden ze netjes mn naam en blog erbij, maar deze inderdaad niet. Ik heb ze meteen een bericht achtergelaten!
[…] Here is a more detailed tutorial for how to make Carmen’s rug. Pictures are well and good but details and details are the best. That’s what I personally need. Lol. […]
[…] Source: Blog/Crafty Queens […]
I teach Earth Science 2 to juniors and seniors. Part of my class is environmental science where one of the concepts I teach my students is repurposing plastic bags into plarn (plastic yarn) to make sleep mats we donate to a local homeless shelter. I think I may try to use some plarn to see if I can get the same results.
As for one of the earlier posts from a guy saying he didn’t think guys could do this, I’m a manly man, and have many football players and other jock types (including several college athletes) that really get into this project and do really well.
[…] 資料來源:Craftyqueens/Facebook/Instagram […]
[…] There are plenty of great lighting projects floating around out there, but this one by Carmen of Crafty Queens might be the most unique one yet. If you can crochet, you’ll definitely want to check this […]
[…] this light-up carpet is some […]
[…] There are plenty of great lighting projects floating around out there, but this one by Carmen of Crafty Queens might be the most unique one yet. If you can crochet, you’ll definitely want to check this […]
[…] are a lot of excellent lighting initiatives floating close to out there, but this 1 by Carmen of Crafty Queens may possibly be the most exclusive 1 however. If you can crochet, you may certainly want to check […]
[…] There are plenty of great lighting projects floating around out there, but this one by Carmen of Crafty Queens might be the most unique one yet. If you can crochet, you’ll definitely want to check this […]
[…] There are plenty of great lighting projects floating around out there, but this one by Carmen of Crafty Queens might be the most unique one yet. If you can crochet, you’ll definitely want to check this […]
[…] you can find lots of excellent illumination tasks going swimming out-there, but this 1 by Carmen of Crafty Queens may be one of the most distinctive one nonetheless. If you may crochet, you will certainly wish to […]
[…] There are plenty of great lighting projects floating around out there, but this one by Carmen of Crafty Queens might be the most unique one yet. If you can crochet, you’ll definitely want to check this […]
[…] de grands projets d’éclairage qui flottent par-ci ou par-là, mais celui-ci par Carmen de Crafty Queens pourrait être l’un des plus uniques. Si vous pouvez crocheter, vous aurez certainement envie […]
If you were to use 10 meters of the light cord then how many skeins of yarn would you have to use?
Anybody who wants to do this in the U.S., if you’re near a Menards store they carry 12 foot length of these lights for $7.99 i n all colors. I’m using Tshirt yarn by World of Yarn whichis 5/8 inch wide and a Q hook. Lion Brand Fettuccine would work good but is narrower. Mine is 58 yards but will need part of another one,I think. Found mine in clearance section of local yarn shop for $6.99. Half done and it appears interesting!
Thank you for your comment Patti!
For those in the USA, Hobby Lobby sells t-shirt yarn for $9.00. More than enough for a 6 meter light rope rug. I used the 15mm hook. I would be interested if you ever make a youtube tutorial.
[…] To view the complete tutorial/pattern, don’t forget to follow Carmen’s original post here. […]
[…] There are plenty of great lighting projects floating around out there, but this one by Carmen of Crafty Queens might be the most unique one yet. If you can crochet, you’ll definitely want to check this […]
[…] Via: craftyqueens […]
I’m looking forward to making this for my daughters for christmas to replace night lights. I saw someone ask about cleaning them. It would be difficult, I’m going to scotch guard mine to help it wipe clean easier. Thanks for the tutorial!
That is going to be wonderful!! Great idea to apply scotch guard 🙂 Happy crafting!
[…] can check out Carmen’s tutorial on her blog and also view some more cool projects people have created using her Wimp. You’ll need to […]
[…] IMU DESIGN This is the beautiful Johanna Hyrkäs design that has inspired so many people. In order to reproduce this gorgeous craft yourself, you’d need to find a standard pattern for spiral crochet, for example this one shared bysnovej or this one shared by The Mercerie. Once you have the pattern, it’s time to start crocheting, as shown by Carmen Jorissen from Crafty Queens. […]
[…] the pattern, it is time to start the crocheting, as it is demonstrated by Carmen Jorissen from Crafty Queens. (adsbygoogle = window.adsbygoogle || […]
[…] Here is a more detailed tutorial for how to make Carmen’s rug. Pictures are well and good but details and details are the best. That’s what I personally need. Lol. […]
Could this be done in wool
It could be done in wool! That would actually be safer since wool is less prone to fire.
I love this idea! It would look great with some color changing rope lights for kids rooms or parties. Has any one tried this? Would love to see some pictures. I have done a few projects here and there with rope lighting however i must admit i don’t crochet. I use Briddog for all my lighting needs. Please check them out.
[…] people go even wilder in their crochet creations. Look at this LED Crochet Rug made by crocheting around a LED lights. Original desing by Johanna Hyrkäs. Hope you […]
[…] le site Crafty Queens, vous pouvez en savoir plus sur la façon de […]
[…] Craftyqueens, Facebook, […]
[…] There are plenty of great lighting projects floating around out there, but this one by Carmen of Crafty Queens might be the most unique one yet. If you can crochet, you’ll definitely want to check this […]
I loved this project. I just have one problem….what to do with that bulky connector!! I could not find light without the darn thing.
For the row of school NOT around the rope, did you use some kind of count?? How did you know where to add the round without the rope??
Hi Betty, thank you for your message! I did not use a specific amount of stitches, it depends on how many stitches you need to hide the connector. It is not a whole round, just a few stitches.
[…] to New Leaf Designs from Netherlands, we have the steps on how to make this […]
Hello, I was wondering if you know how i may go about knitting this. It’s beudifulll by the way!
Hi Trudi, thank you! This pattern is for crocheting, which is really easy to learn!
Hello! The Rope Light on Amazon that you have the link to is currently unavailable. Do you think I could use this Rope Light instead? https://www.amazon.com/dp/B07PR58W73/?coliid=I3LO5EYJBSYKT3&colid=2MT6D49TFV19W&psc=1&ref_=lv_ov_lig_dp_it
Hi! Thank you for your comment 🙂 It’s difficult to say if they’ll work, I can’t find the diameter of the lights. If they are thinner, you might need a thinner yarn, since the lights might be less visible if you use a t-shirt yarn. My lights were about 1cm (about half an inch) in diameter, just to give you a reference point.
Hi,
I want to contact the marketing team of newleafdesigns.nl. Would you be able to keep me in touch with your marketing team?