
This crochet purse is a quick and fun little make, to explore with colour and just enjoy crocheting! The colours for this project were inspired by rainbow sprinkles we sometimes put on our icecream cones here in the Netherlands, called ‘discodip’! These purses make for great last-minute presents and have many uses! Use it for your make-up, pens, sunglasses.. anything!
Dit tasje is leuk en snel om te maken, en vooral leuk om veel verschillende kleurtjes in te gebruiken! De kleuren voor dit projectje zijn geinspireerd op de welbekende discodip. Mmm…. jammie! Deze tasjes haak je vlug als last-minute cadeautjes en kun je overal voor gebruiken. Make-up, pennen, je zonnebril.. wat dan ook!

Materials // Materialen
For this purse I used a bunch of colours from the Scheepjes Cahlista range, which is a non-mercerized worsted weight cotton. You’ll also need a crochet hook that’s a tiny bit smaller than you would normally use for this yarn, just so the fabric is sturdy enough for a bag. I used a 4mm crochet hook, where I would normally use a 4.5mm hook for this yarn. You’ll also need 2 buttons.
Voor dit tasje heb ik een heleboel kleuren van Scheepjes Cahlista gebruikt, een mat katoenen garen. Gebruik hiervoor een kleinere haaknaald dan je normaal zou gebruiken voor dit garen, dit zorgt ervoor dat je tasje stevig genoeg wordt. Normaal zou ik 4,5mm of 5mm voor Cahlista gebruiken, maar voor dit tasje gebruikte ik een 4mm haaknaald. Je hebt ook 2 knopen nodig.
Scheepjes Cahlista (100% cotton) Colour pack: 109 x 15gram balls – I used this one but you will only use a little bit!
OR
Scheepjes Cahlista (100% cotton; 50gram/85 meters) – choose a few colours for a more minimalist version
Gebruik het Colour Pack van Scheepjes Cahlista (109 kleurtjes x 15 gram balletjes) – hier heb je maar een beetje van nodig
OF
Scheepjes Cahlista (100% katoen; 50gram/85 meter) bolletjes – gebruik minder kleuren voor een minimalistische versie
This yarn is available from Scheepjes stockists. If your local store does not stock it, please consider shopping via the affiliate links below. They don’t cost you anything more, but in turn for your purchase the store gives me a little percentage as a thank you.
Scheepjes Cahlista (100% katoen; 50gram/85 meter) is verkrijgbaar via de verkooppunten van Scheepjes. Als de garenwinkel bij jou in de buurt geen Scheepjes heeft, kun je ook bij onderstaande online ‘affiliate’ winkels terecht. Je betaalt niets extra’s voor deze affiliate inkopen, maar in ruil voor jouw aankoop geeft de winkel mij een klein percentage als bedankje.
Wool Warehouse – Cahlista 50gram (Ships worldwide) – Cahlista colour pack (Ships to UK)
Caro’s Atelier (NL) – Cahlista 50gram – Cahlista colour pack
Used abbreviations (US) // Gebruikte afkortingen
SC – single crochet
SC2TOG – single crochet 2 stitches together
HDC – half double crochet
DC – double crochet
TR – treble crochet (yarnover 2 times)
CH – chain
CH-SP – chain space
SL ST – slip stitch
ST – stitch
V – vaste
2VSH – 2 vasten samen haken
HST – half stokje
ST – stokje
DST – dubbel stokje (garen 2 keer omslaan)
L – losse
L-opening – Lossen opening
HV – halve vaste
STK – steek

Notes // Opmerkingen
This little bag can be made using just 1 colour, using a few colours, or using every colour in the box! To recreate the sample I have made, change colour EVERY round or row. To make a nice and balanced colour scheme, try to use as many ‘cool’ colours (greens, blues, purples) as ‘warm’ colours (yellows, orange, reds, pinks). Try to alternate 1 round of a cool colour with 1 round of a warm colour. I would use a maximum of 4 same-temperature colours right after each other to avoid an overkill of the one or the other. Of course you can choose to use ONLY warm or ONLY cool colours, that is up to you!
TIP: when changing colour, complete the last slip stitch of a round with the new colour.
Dit tasje kan gemaakt worden in 1 effen kleur, met een paar kleuren, of met elke kleur die je hebt! Om het tasje na te maken dat ik heb gemaakt, wissel je na ELKE toer of rij van kleur. Om een mooi en evenwichtig kleurenschema te maken gebruik je ongeveer evenveel ‘koude’ kleuren (groen, blauw, paars) als ‘warme’ kleuren (geel, oranje, rood, roze). Probeer ze vaak af te wisselen, al kun je tot 4 kleuren van dezelfde temperatuur achter elkaar gebruiken. Natuurlijk kun je er ook voor kiezen om juist alleen maar koude of alleen maar warme kleuren te gebruiken, dat is helemaal aan jou!
TIP: voor het wisselen van kleur wordt dit het mooiste als je op het eind van de toer de halve vaste maakt met de nieuwe kleur.

Pattern // Patroon
SQUARE PATTERN (make 4) // VIERKANT PATROON (maak er 4)
Start with a magic ring.
- ch1, 6sc into ring, sl st into 1st st (6st)
- ch1, 2sc into each st, sl st into 1st st (12st)
- ch2, 2hdc into each st, sl st into 1st st (24st)
- ch2, *1hdc, 2hdc in next st, repeat from * to end of round, sl st into 1st st (36)
- ch2, *2hdc, 2hdc in next st, repeat from * to end of round, sl st into 1st st (48)
- ch1, *3sc, 1hdc, 1dc, (1dc, 1tr) in next st, (1tr, 1dc) in next st, 1dc, 1hdc, 3sc, repeat from * to end of round, sl st into 1st st (56)
- ch1, *6sc, (1sc, 2hdc) into next st, (2hdc, 1sc) into next st, 6sc, repeat from * to end of round, sl st into 1st st (72)
Begin met een magische lus.
- 1l, 6v in ring, hv in 1ste stk (6)
- 1l, 2v in elke stk, hv in 1ste stk (12)
- 2l, 2hst in elke stk, hv in 1ste stk (24)
- 2l, *1hst, 2hst in de volgende stk, herhaal vanaf * tot eind toer, hv in 1ste stk (36)
- 2l, *2hst, 2hst in de volgende stk, herhaal vanaf * tot eind toer, hv in 1ste stk (48)
- 1l, *3v, 1hst, 1st, (1st, 1dst) in de volgende stk, (1dst, 1st) in de volgende stk, 1st, 1hst, 3v, herhaal vanaf * tot eind toer, hv in 1ste stk (56)
- 1l, *6v, (1v, 2hst) in de volgende stk, (2hst, 1v) in de volgende stk, 6v, herhaal vanaf * tot eind toer, hv in 1ste stk (72)

MAKING THE FRONT AND BACK // VOOR EN ACHTERKANT MAKEN
Determine which 2 squares you want to use for the front, and which for the back. You will crochet these together with another strand of Cahlista yarn. Please follow the instructions below on how to crochet them together.
Bepaal nu welke 2 vierkantjes de voorkant van het tasje worden, en welke de achterkant. Hiervoor gebruiken we ook Cahlista garen. Volg de instructies hieronder.
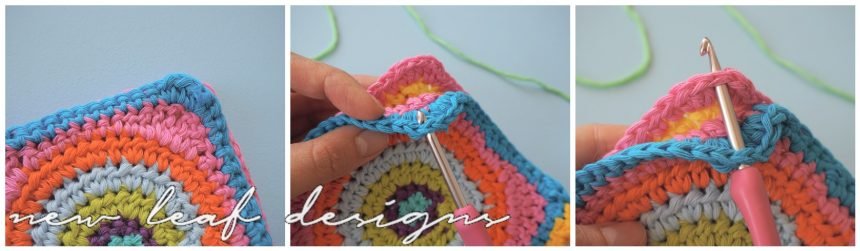
Lay the two to-be-joined squares on top of each other, right side facing each other! (Photo 1 above) Then, insert your hook through the second half double crochet (hdc) in the corner. (Photo 2) Then, insert your hook into the CORRESPONDING half double crochet (hdc) stitch on the other square. (Photo 3)
Leg de twee vierkantjes die je aan elkaar wilt haken bovenop elkaar, met de voorkant naar elkaar toe! (Foto 1) Dan steek je je haaknaald in het tweede halve stokje in de hoek. (Foto 2) Steek dan je haaknaald in het OVEREENKOMENDE halve stokje van het andere vierkantje. (Foto 3)
Pull up a loop with your yarn and ch1. (Photo 1) *Ch1, 1sc in the next SET of stitches (Photo 2). Repeat from * until you reach the other corner. The last set of stitches to crochet together will be the first half double crochets of that corner.
Haal je garen door de twee steken heen en maak 1l. (Foto 1) *1l, 1v in de volgende SET van steken (Foto 2). Herhaal vanaf * tot je de volgende hoek bereikt. De laatste set steken die je samenhaakt zijn de eerste halve stokjes van die hoek.
Repeat this for the other set of 2 squares, and you will have made 1 front and 1 back.
Herhaal dit voor de andere 2 vierkantjes, en dan heb je 1 voorkant en 1 achterkant.
CROCHETING THE FRONT AND BACK TOGETHER // DE VOOR- EN ACHTERKANT SAMENHAKEN

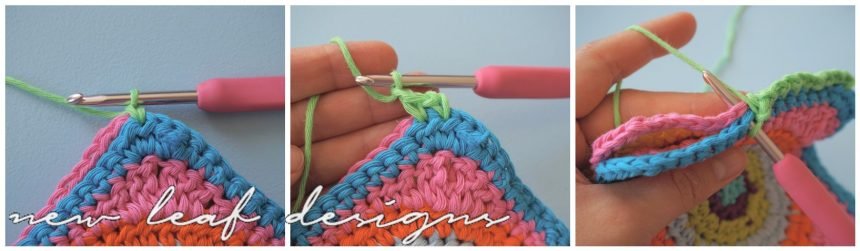
This same technique is used to crochet the front and back of the purse together. In the picture above you see the finished front + back turned outwards. Lay the front and back on top of each other with right side facing each other, and attach your yarn in the righthand corner of a shorter side. Then crochet 1 short side, 1 long side and 1 short side of the rectangles together using the same *ch1, 1sc* technique, leaving 1 long side open to be used as the opening of the purse.
Dezelfde techniek wordt gebruikt om de voor- en achterkant van het tasje aan elkaar te haken. In de foto hierboven zie je hoe je tasje eruitziet na het aan elkaar haken, binnenstebuiten. Leg de voor- en achterkant op elkaar, weer met de goede kanten naar elkaar toe. Bevestig je garen in de rechterhoek van een van de korte kanten. Dan haak je met dezelfde *1l, 1v* techniek 1 korte kant, 1 lange kant, en weer 1 korte kant samen. Je laat dus 1 lange kant helemaal open om gebruikt te worden als de opening van het tasje.
Turn your work right side out again, and crochet 2 rounds of single crochet along the top edge of the purse. I used different colours for each round.
Draai je werk weer met de goede kant naar buiten en haak 2 toeren helemaal rondom de bovenkant van het tasje. Ik gebruikte weer per toer een andere kleur.

FLAP
The flap of the purse will be worked directly onto the back of the purse. Attach your yarn and single crochet along the back of the purse, in the BACK LOOPS ONLY! This will create a fold line so that the flap will close over the purse easier.
De flap van het tasje wordt direct aan de achterkant gehaakt. Bevestig je garen eraan vast en haak vasten over de gehele achterkant van het tasje, maar alleen in de ACHTERSTE lussen! Zo creëer je een vouwlijn zodat het flapje makkelijker dichtvouwt over je tasje.
Then:
Row 1 (RS): ch1, 1sc until end, turn work
Rows 2-4: Repeat Row 1
Row 5: ch1, 1sc, sc2tog, sc to last 2 sts, sc2tog, turn work
Row 6: ch1, sc2tog, sc7, ch2, skip 2 sts, sc until 11sts before end, ch2, skip 2 sts, sc7, sc2tog, turn work
Row 7: ch1, 1sc, sc2tog, sc until ch-sp, sc2 into ch-sp, sc until next ch-sp, sc2 into ch-sp, sc to 3sts before end, sc2tog, 1sc, turn work
Row 8: ch1, sc2tog, sc to last 2 sts, sc2tog
Attach yarn at side of flap and sc all the way along the edge.
Dan:
Rij 1 (GK): 1l, v tot eind rij, keer werk
Rijen 2-4: Herhaal Rij 1
Rij 5: 1l, 1v, 2vsh, v tot laatste 2 stkn, 2vsh, keer werk
Rij 6: 1l, 2vsh, 7v, 2l, sla 2 stkn over, v tot laatste 11 stkn, 2l, sla 2 stkn over, 7v, 2vsh, keer werk
Rij 7: 1l, 1v, 2vsh, v tot l-opening, 2v in l-opening, v tot volgende l-opening, 2v in l-opening, v tot laatste 3 stkn, 2vsh, 1v, keer werk
Rij 8: 1l, 2vsh, v tot laatste 2 stkn, 2vsh
Hecht garen aan in hoek flap en haak een randje vasten om de hele flap.
FINISHING // AFWERKING
Close the purse and mark the places where the buttons should be. Sew the buttons into place.
Vouw het tasje dicht en markeer de plekken waar de knoopje bevestigd moeten worden. Naai dan de knopen erop.

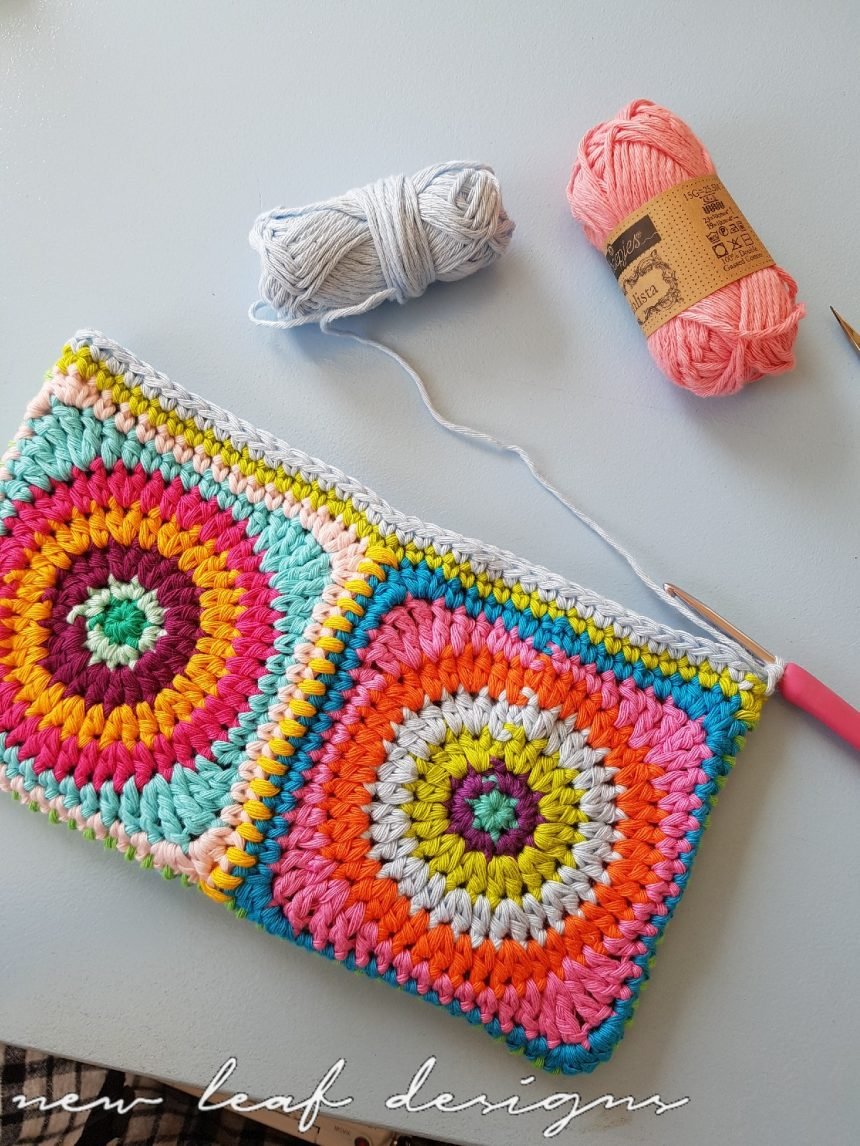
Your purse is all done!! Use them to store your colouring pencils, make up utensils, sunglasses.. or use it as a purse on a night out! I use mine as a small first-aid kit for on holiday, with band aids and aspirines for example. Handy!
Share pics on social media with #rainbowsprinklespurse and #newleafdesigns. Thank you! Find other free patterns of mine HERE.
Je tasje is klaar!! Gebruik hem als etuitje voor je pennen, voor je make-up, voor je zonnebril, of misschien wel als tasje bij een avondje uit. Ik gebruik de mijne als mini EHBO-kitje, met pleisters en paracetamol etc voor op vakantie mee te nemen. Handig!
Deel foto’s op social media met #rainbowsprinklespurse en #newleafdesigns. Bedankt! Vind andere gratis patronen van mij HIER.
You might also like
![]()


2 Comments
Thank you for the cute and colourful design 😊💕☀️
You are very welcome Eliso!