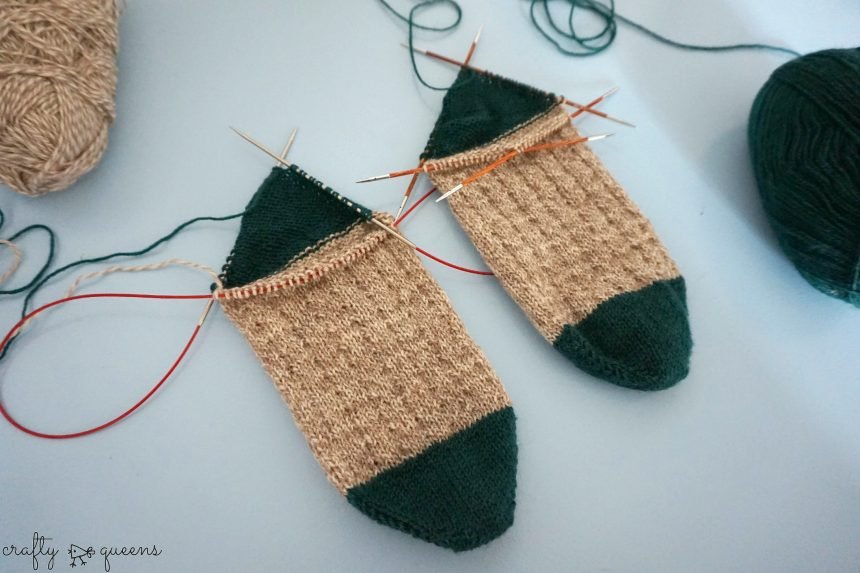
Welcome to the first part of my Toe Up Sock Guide! This will be a pattern for Simple Toe Up Socks, broken down into fun and easy steps for you to follow, so you can create your own socks. In this first part, I’ll show you how to cast on for the toe! – Also watch the instruction video below! Welkom bij Deel 1 van de Simpele Sokkengids voor sokken vanaf de teen omhoog. Dit patroon zal ik in stappen uitschrijven, die je volgt om jouw eigen paar sokken te breien. In dit eerste deel laat ik je zien hoe je opzet voor de teen. – Bekijk ook de instructievideo!
Shop the PDF version here Purchase on Ravelry
GET YOUR YARN / GAREN KOPEN
For one pair of adult sized socks, you will need 2 balls of Scheepjes sock yarn. You can use either Scheepjes Invicta Extra, or the new Scheepjes Metropolis with 80 colours!! Get your yarn via Scheepjes retailers or via this webshop*:
Voor één paar sokken in een volwassen maat heb je 2 bollen Scheepjes sokkengaren nodig: Scheepjes Invicta Extra of het nieuwe Scheepjes Metropolis sokkengaren in wel 80 kleuren! Koop je garen via Scheepjes retailers of deze webshop*:
Wool Warehouse (UK)
Caro’s Atelier (NL)
NEEDLES / NAALDEN
Depends on gauge, I used 2.25 mm Knitpro DPNs
Hangt van draadspanning af, ik gebruik 2,25 mm Knitpro DPNs (dubbelpuntige naalden)
USED ABBREVIATIONS
K : Knit
P : Purl
KFB : Knit Front Back – Knit into front and back strand of the same stitch
WYIF : With yarn in front
SL1P: Slip 1 st purlwise
GEBRUIKTE AFKORTINGEN
R : Recht
AV : Averecht
RVA : Brei de volgende steek recht, eerst in de voorste lus, daarna in de achterste lus
1.AV.AFH : 1 steek averecht afhalen
GAUGE / SPANNING
15 sts x 21 rows = 5cm square, in stockinette stitch.
15 steken x 21 rijen = 5cm vierkant, in tricotsteek.
If getting fewer stitches per 5cm (stitches are too wide/long), switch to smaller needles.
Als je minder steken krijgt per 5cm (steken zijn te breed/te lang), gebruik dan kleinere naalden.
First, determine which size you will be knitting. In the chart below, you will see the stitch count your sock will have around the foot and leg. When increasing for the toe, you will increase up to this number of stitches.
Bepaal eerst welke maat je gaat breien. Hieronder in de tabel vind je stekenaantallen voor verschillende maten. Dit stekenaantal is het aantal steken dat je sok rond de voet en rond het been gaan hebben. Als je vanaf de teen meerdert, meerder je tot aan dit aantal.
| SIZE | Women S | Women M | Women L /
Men S |
Men M | Men L |
| sts | 56 | 60 | 64 | 68 | 72 |
CASTING ON / OPZETTEN
Use Judy’s magic cast on. Watch the instruction video above to see how you do this. The video includes instructions for DPNs and circular needles.
We gebruikten de techniek ‘Judy’s Magic Cast On’, bekijk bovenstaande video hoe je dit doet.
For Women sizes: CO 10 sts on each needle
For Men sizes: CO 12 sts on each needle
Voor een vrouwenmaat: Zet 10 stn op voor elke naald
Voor een mannenmaat: Zet 12 stn op voor elke naald
TOE / TEEN
Round 1: Knit all sts
NOTE: All sts on the first needle except for the first one will be twisted, knit into the back strand of the stitch to straighten them (Watch Pt 1 Tutorial video)
Round 2: kfb, k to last 2 sts, kfb, k1 (Watch Pt 2 Tutorial video)
Round 3: Knit all sts
Repeat rounds 2-3 until you reach the desired nr of sts for the size you are knitting.
Toer 1 : Brei alle steken R
NB: vanaf de 2e steek zullen alle steken op de eerste naald verdraaid zijn, brei deze door de achterste lus. (Meer hierover in instructievideo nr 1 hierboven)
Toer 2: rva, r tot laatste 2 stn, rva, 1r. (Zie instructievideo nr 2 hierboven)
Toer 3: Brei alle steken r.
Herhaal toeren 2-3 totdat je het gewenste aantal steken hebt bereikt.
FOOT / VOET
Optional: Switch to Main Colour
Optioneel: Wissel hier van kleur
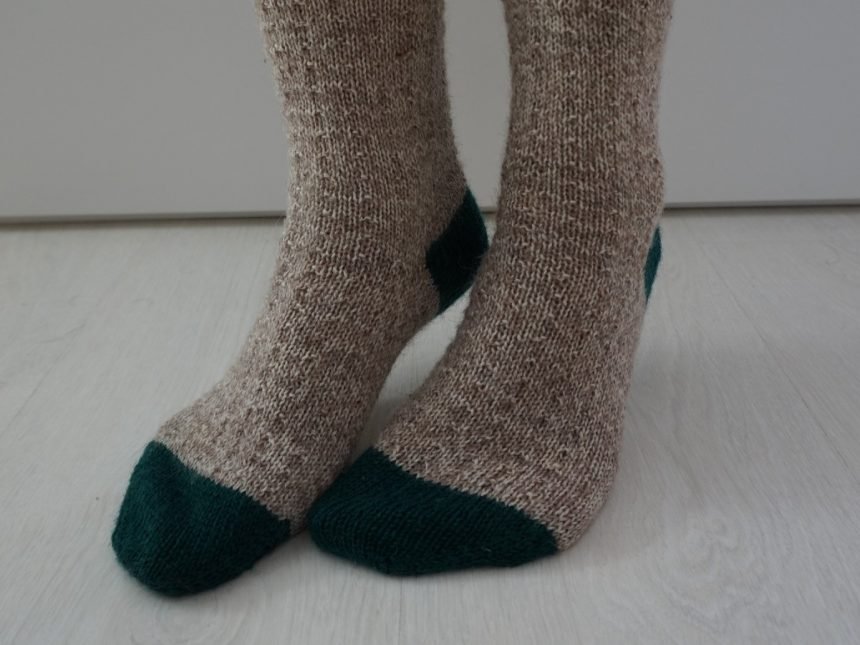
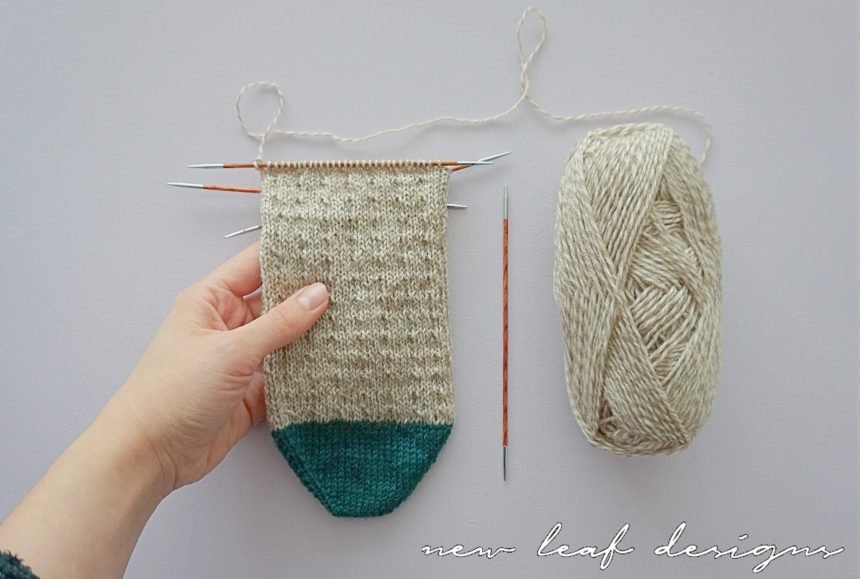
Texture pattern:
Rounds 1-3: Knit all sts (3 rounds)
Round 4: On top of foot, purl every 4th stitch. Do not do this for the sole of the foot, textured patterns on the sole might take away wearing comfort. For the sole, simply knit stockinette.
Repeat this until you’ve reached the desired foot length for the size you are knitting. To do this, it’s easiest to trace your foot on cardboard and cut this out, so you can measure the sock around this cardboard representation of your foot. Don’t knit the entire lenght of your foot, just until where the heel starts.
Textuurpatroon:
Toeren 1-3: Brei alle steken R (3 toeren)
Toer 4: Aan de bovenkant van de voet (bepaal zelf welke naald dat is, het maakt op dit punt niet uit) brei je een textuurpatroon: elke 4e steek brei je averecht. Dit doe je niet voor de zool van de voet, textuur in de onderkant van de voet kan het draagcomfort verminderen. Voor de zool brei je simpelweg alle steken recht.
Herhaal tot totdat je de gewenste lengte voor je voet hebt bereikt. Om dit te meten kun je het beste je voet omlijnen op karton en dit uitknippen zodat je een mal hebt. Je breit niet voor de gehele lengte van je voet, maar tot waar je hak begint.
You might like
Toe Up Socks Part 2 here
Simpele Sokken Deel 2 hier
*Affiliate links are used in this blogpost. If you choose to purchase materials via this link, you will not pay anything extra, but the shopkeeper will reward me with a small fee. It’s how I keep my website running! Thanks in advance for considering to shop via affiliate links
*In deze blogpost gebruik ik affiliate links. Als je via deze link materialen koopt, betaal je niets extra, maar dan beloont de winkelier mij met een klein percentage van je aankoop. Zo houd ik mijn website gaande! Bedankt voor het overwegen om via affiliate links te kopen.



35 Comments
Ohh wat leuk deze ‘cursus’ sokken breien. Zal ik me er dan toch eindelijk eens aan gaan wagen? Leuke uitdaging, proces making……
Zeker een poging wagen, Ingrid! Tip: kies een garen met superveel kleurtjes en die sokken vliegen van je naalden!
My goal this year; learn to knit socks! Thanks for the video!
You’re very welcome, Evy! 🙂
Hoi Carmen,
Ik ben begonnen met mijn eerste gebreide sok! Je tutorials zijn prima te volgen. Ik was snel op weg. Leuk patroontje ook. Eenvoudig, maar het motiveert om te zien hoe snel je weer 4 toeren verder bent. Ik heb wel twee vraagjes. Ik ben inmiddels ongeveer halverwege de voet. 1. Hoe strak moet de sok om de voet zitten? Hij zit vrij losjes bij mij nu, maar misschien krijg ik ‘m strakker door eerder met de hak te beginnen? Of toch maar uithalen en een paar steken smaller maken. 2. Je schrijft dat je door moet gaan tot waar de hak begint. Bedoel je dan de hak van de voet, of de hak van de sok? Als het ‘t laatste is, hoe weet ik dan waar dat is? Hoeveel cm komt er dan nog bij? Gewoon maar proberen denk ik…
Groet, Hilde
Hoi Hilde, bedankt voor je reactie! Ik ben blij dat het je bevalt! 🙂 Over je vragen: als de sok nu al los om je voet zit is hij zeker te groot. Een sok moet je eigenlijk juist te strak breien, daarom raad ik ook aan om een kartonnen ‘mal’ van je voet te maken. Als hij daar goed om past, past hij jou perfect. En over je tweede vraag: je moet de voet van de sok net zolang breien totdat hij bij jouw voet van de teen tot aan het begin van de hak komt. Als je ‘deel 2’ bekijkt zie je dat ik een tabel heb ingevoegd met indicatielengtes per maat, die kun je zeker proberen. Mochten ze toch ietsjes te los zijn weet je sowieso al hoe je het bij het tweede paar beter kunt doen om jouw voet te passen. PS vanaf komende week ben ik even niet bereikbaar via mn blog, als je hulp nodig hebt kun je me het beste via Instagram een persoonlijk bericht sturen, dan kan ik nog tips geven 🙂 Groetjes!
Ik heb ‘m uitgehaald en wat smaller gemaakt, en ook een mal gemaakt. Hij gaat goed nu! Ik heb ook al je bonus video voor de gaatjes gebruikt. Hak is ook klaar. Nu op naar de boord.
Ha Carmen,
Ik ben bezig met je sokken maar ik heb 2 vraagjes: houd jij de standaard 8 st/inch aan voor de draadspanning en stop jij 2 inch voor de voetlengte van de persoon voordat je met de hiel begint? Ik kan deze info helaas niet uit je tutorial halen.. verder schrijf je “herhaal toer 2 en 3 tot je het gewenste aantal steken hebt”, ik neem aan dat je hier cm/toeren bedoelt?
Alvast bedankt!
Hoi Barbara, dit deel is geschreven voor het opzetten van de teen, het meerderen, en het eerste gedeelte van de voet. De toeren 2 en 3 zijn onderdeel van het meerderen zodat je genoeg steken hebt voor de voet. Bekijk daarvoor de matentabel. Voor de maten wat betreft de hiel en hoeveel cm je moet breien voordat je de hiel begint, moet je even Deel 2 bekijken 😉
[…] So you need two for a pair of adult socks. The colourway is called Red Chili (number 159). I use Crafty Queens’ great video tutorial for […]
An excellent tutorial! Your version of the German short row heel is better than the one I have been using. I also really like the toe method, which looks great – toe up is definitely the best! Thanks 😊
Hi Carmen,
Bij het opzetten van de teen op rondbreipennen zie ik dat je de voorste naald uittrekt om te breien. Maar bij het breien naar de hiel toe, zie ik dat je de achterste naald uittrekt.
waar maak je de wissel van de voorste naald naar de achterste naald en hoe doe je dat?
Ik heb rondbreien geleerd met uittrekken van de achterste naald: kan ik dat ook doen bij het opzetten van de teen?
Beste Monique, bedankt voor je bericht! Bij het opzetten van de teen trek ik ook de achterste naald uit, maar omdat je de sok vanuit een ander perspectief bekijkt dan wanneer je wat verder bent met breien, lijkt het alsof het de voorste naald is. De wissel gaat op een gegeven moment vanzelf, kwestie van niet denken maar doen!
Dank voor je reactie Carmen! Ik ben nu wat verder en snap wat je bedoelt! Werkdraad zit nu achter, super, bedankt.
Subscribed to your wonderful tutorials.
I’ve failed at finishing nice socks for years. Your tips may just be enough for me to succeed!
Question: I’m always stumped by gussets. Your tutorial doesn’t cover this, is that correct?
Thank you again.
Hi Sharon! Thank you so much for your comment 🙂 True, this sock pattern does not use a gusset, it uses a German Shortrow Heel which is usually done without a gusset. I agree with you, gussets are difficult! I haven’t been able to incorporate one into my patterns yet but I will keep trying 🙂
Hi there!
I am going to make these socks! For the pattern, though, you say to purl every 4th stitch. I looks like you are doing something every 4th row, or some thing. Is there more besides the purl every 4th stitch?
Thanks, Judy
Hello Judy! Yes, the texture pattern is to purl every 4th stitch on every 4th round, the texture pattern is repeated over 4 rounds as stated in the text 🙂
Happy knitting!
Carmen
I really like your videos I am able to follow and create my sock. I first learned the old way gusset knit and turn. I can knit more evenly with short rows. No my problem is to find the best yarn. I don’t know if we have sheepjees in US but I will look for it.⭐⭐⭐⭐⭐
Hello Irene, thank you for your comment! I’m so glad you like my videos 🙂 You can use any yarn that has 70-80% wool or merino, and has at least 15% nylon or polyamide, otherwise it might not be strong enough for socks. You can find the Scheepjes yarn online at Deramores and Wool Warehouse, they also ship to the US!
Hi this is my first attempt at toe up socks. And I have a question. On the foot part it says to only do pattern on the top part of foot. I am using dpns and have 30 st on 1 of the and 15 st on the other 2. Which of these is considered the top of the foot.
Thank you
Erica
Hello Erica! Thank you so much for your message. If you’re knitting a sock toe-up, until you get to the heel part you have the freedom to choose which of the two halves is the top of the foot. For your convenience, I would choose the one needle where you have exactly one half of the sts (30sts) to knit the texture pattern. Just make sure that when you get to the heel instructions, that you knit these over the two needles each holding 15 sts.
Hope this helps! If you’re looking for more in-depth knitting tutoring, please take a look at my Patreon page: http://www.patreon.com/newleafdesigns.
Happy knitting!
Carmen
Hi, you mentioned for women L size, the toes would have 64 stitches. Does it means on 1 needle or both needles add up to be 64 stitches? I am using circular needles. Thanks
Hello 🙂 This means total stitch count, so whatever needles you are using, you need 64 sts in total. I usually divide in half: 32+32 sts.
Thank you for the great tutorials you provided here! I’ve always had a hard time with socks that are knit from the cuff down, but your method has worked out really well for me. I love the way you cast on, and I appreciate how patiently you show to make the heel using the German short rows. I watched tutorials from other youtubers who just wound up confusing me. I think this will finally be the year that I make socks. Thank you so much for making this fun again!
Thank you so much!!
Hi there
I was wondering if the thickness of the yarn would affect the pattern. I have a yarn i’d like to use that requires 4mm needles and I wanted to know if that’ll affect the sock pattern.
Hello! Thank you for your question. Yes, the thickness of the yarn will affect the pattern, thicker yarn will give you bigger socks. It’s a little bit more complicated than what the suggested needle size on the ball band is though, because the suggested needle size is usually to create a supple, flowing fabric. With socks, you want it to be a dense fabric, so it could be that you actually need to use a 3mm for socks. You would need to knit a smaller size sock than usual for your size feet, but you’re in luck because this pattern starts from the toe upwards. When increasing, just try it on every now and then to see when the sock fits around your toes. When it does, you can stop increasing and just follow the pattern for the foot. I hope this helps, happy knitting!
Thank you for your videos- they are extremely helpful. I have wanted to knit socks for a long time- the books aren’t always clear and some of the videos go too fast or don’t show detail. Your videos are really great!
Thank you so much, that is so nice to hear!
Hallo Carmen..sokken breien stond al lang op mijn to do lijstje en het is gelukt! Met jouw patroon van simpletoeupsocks heb ik er al 2 paar gebreid. Als ik jouw blog bekeek was ik altijd verrast toen je zei ik begin weer aan een paar sokken. Maar het gaat snel en super gemakkelijk aan de hand van de video’s. Bedankt!
Grtjs Chantal
Hallo Ingrid,
Betr. de toe-up sokken, moet je daar niet gaan meerderen voor de wreef? In het patroon lees ik dat je na de voet, direct overgaat naar de hak.
Do you have this heel in a paid for pattern? My computer will not let me open the 2nd part of the pattern in writing.
Beste Carmen, wat een duidelijke uitleg en goed passend patroon. Dit smaakt naar meer. Ga je andere sok patronen en around the world trui ook breien.
Groetjes Marjolein
[…] this part, please view the written instructions here. In this part you can find instructions on how to cast-on, how to increase for the toe, and how to […]