
Cruise Cardigan
The Cruise Cardigan is perhaps the easiest crochet cardigan you will ever make! This recipe-style pattern is based on a few key measurements, which means you can adapt it to pretty much any size. Try on as you go, and crochet the perfect cardigan for you! This cardigan was named after the amazing knitting & crochet cruises organized by the yarnstore Woll of Fame in the Netherlands.
De Cruise Cardigan is misschien wel het gemakkelijkste vest wat je ooit zult haken! Dit vest is heel simpel op maat te maken. Pas het vest tussendoor en pas aan waar nodig voor jouw perfecte vest. Dit vest is genoemd naar de geweldig leuke brei & haak cruises georganiseerd door Woll of Fame in Maasbracht.
What you need | Je hebt nodig
You can use any yarn in your stash for this cardigan. Make a lightweight summery cardigan with fingering weight or DK weight yarn, or use some thicker yarns for a cardigan suitable to wear in the colder months. Please note, because this pattern can be adapted for so many different sizes and with so many yarns, I cannot give an estimate of the yarn usage. For my own cardigan I used 285 grams of fingering weight yarn. I have a 38-40 inch bust and the cardigan is around 54cm long.
My advice? Assemble a few skeins of the same yarn weight and stripe those throughout your cardigan. This is a great pattern for stashbusting so why not go all-out? Then afterwards, you can weigh your finished cardigan and you’ll know how many grams you need of that yarnweight for your size. I hope to add more and more examples of this as we go, if you want to create a Ravelry project page with this information that would be super helpful!
Voor de Cruise Cardigan kun je elk garen gebruiken. Maak een lichtgewicht zomers vestje met een dun garen, of gebruik lekker dik garen voor een winters warm vest. Omdat dit patroon te maken is in zoveel maten met zoveel verschillende garens, is het lastig om een indicatie te geven van hoeveel garen je nodig hebt. Voor mijn eigen vest gebruikte ik 285 gram sokkengaren. Ik heb een borstomtrek van 38-40 inch en het vest is 54 cm lang.
Mijn advies is om verschillende garens te nemen uit je voorraad van dezelfde dikte, en om daarmee een gestreept vest te maken. Dit is een geweldig patroon om restjes garen op te maken en te experimenteren met kleur. Als dit eerste vest af is kun je het wegen, dan weet je hoeveel garen je nodig hebt van één kleur als je het nog eens wilt maken. Ik hoop gaandeweg meer en meer voorbeelden toe te voegen zodat het steeds minder giswerk wordt. Wil je ook jouw notities delen? Plaats dan een reactie onderaan dit patroon of maak een Ravelry projectpagina.
Gauge | Stekenverhouding
As for the crochet hook size, I would suggest the size mentioned on the ball band of the yarn. As long as you’re happy with the fabric you are getting from your yarn and needle combination, that is fine. Please do note that your fabric may stretch out after washing. It is still a good idea to make a gauge swatch so you can wash it, and see if you’re still happy with the fabric.
Ik raad aan om de haaknaald maat te gebruiken dat op het etiket van je garen staat aangegeven. Zolang je blij bent met de stof die je krijgt van jouw garen en haaknaald combinatie is het prima. Let wel op dat de stof wellicht na het wassen kan uitrekken. Het is daarom alsnog een goed idee om een proeflapje te maken en te wassen, om te kijken of je blij bent met het resultaat.

Construction | Constructie
The Cruise Cardigan is made all in one piece, there is very little seaming required. We start with the front, which is shown in blue on the image. Your starting row is the ‘inner side’ of the U shape (yellow line), and you increase at the shoulders to create the two corners there. When this part reaches shoulder width, stop increasing and only continue working on the sts in between the increases. This is where the part shown in pink starts. Continue crocheting on this part until it is long enough, this will be the back piece. The side panel is made next (optional), followed by the sleeves.
Dit vest haak je in één stuk en er komt heel weinig naaiwerk bij kijken. We beginnen met het voorpand, wat onder op het plaatje in blauw wordt getoond. Je begint met de ‘binnenkant’ van de U-vorm (zie ook gele lijn) en je meerdert bij de schouders om de hoeken te creëren. Als de korte zijde schouderbreed is, stop dan met meerderen en haak alleen verder aan deze zijde. Zo haak je het achterpand, wat in roze wordt getoond. Hierna maak je de optionele zijpanelen, gevolgd door de mouwen.

Notes on the optional side panel | De zijpanelen
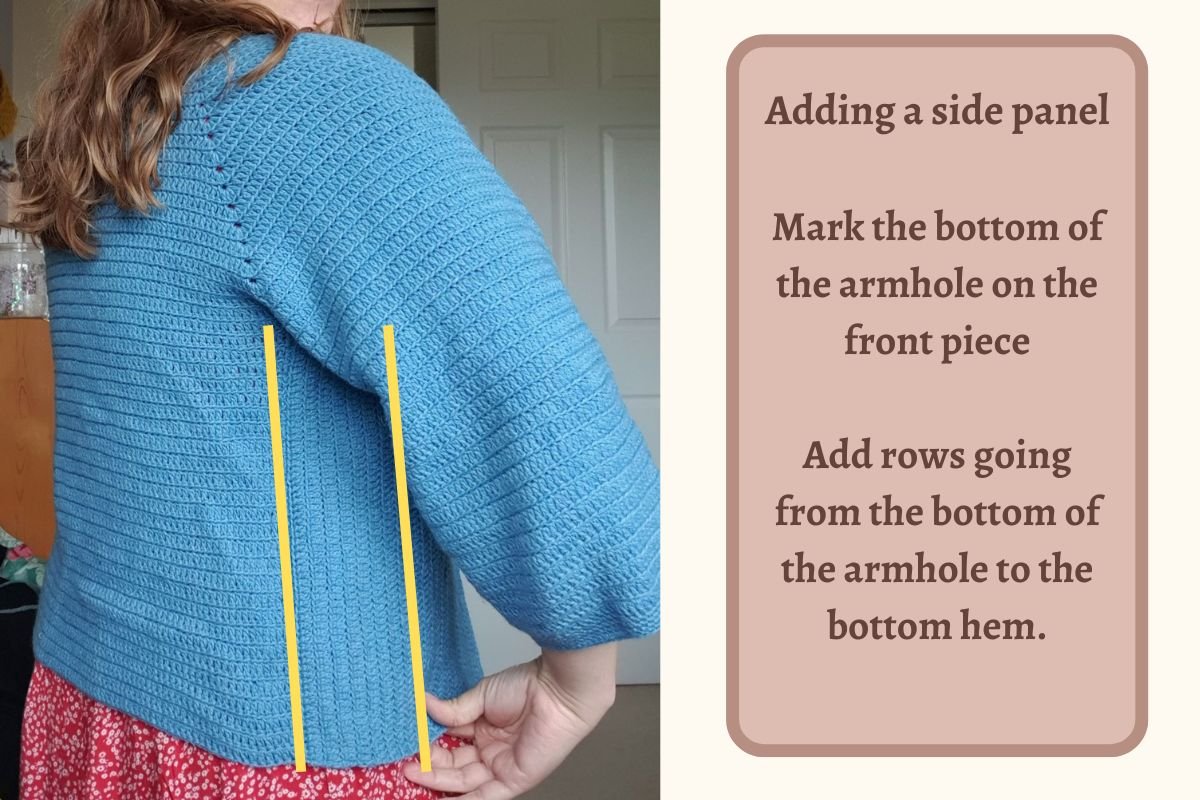
If your hips are wider than your shoulders, you will need to add a side panel to your cardigan like I did. On the lefthand picture below, you can see the backpanel on the left, and the front panel on the right. At the line of the green dots, I added more rows. At the line of the red dots, I seamed it together with the back panel.
After adding the side panel, continue to add the sleeves. For a final touch, you might like to add some more rows to the front neckline. You can even add a button band if you want, or even pockets!
Als je heupen breder zijn dan je schouders is het slim om zijpanelen te haken, zoals ik ook heb gedaan. Op de linkerfoto hieronder zie je links het achterpand, en rechts het voorpand. Vanaf de groene stippellijn voegde ik rijen toe, en bij de rode stippellijn naaide ik het samen met het achterpand.
Na het toevoegen van de zijpanelen ga je verder met de mouwen. Om het af te maken kun je eventueel nog extra rijen toevoegen rondom de hals, wellicht met knoopjes als je dat wilt. Als je nog garen overhebt is het ook leuk om zakken toe te voegen!

Pattern English
[Nederlands: Voor het Nederlandse patroon scroll je naar beneden]
Take your yarn and crochet hook, and start with one long row of Foundation Double Crochet (fdc) stitches. [tutorial video coming soon]
This row should be long enough to go around your neck and come down to where you want your cardigan to end. It’s easiest to take a cardigan from your closet that has the desired length, lay it flat and measure the buttonband. This is how long you want your row of foundation crochet stitches to be.
PLEASE NOTE: Foundation double crochet stitches are very stretchy, so try to lay it flat without stretching it at all to give the most accurate measuring result.
After you’ve decided on the length of your first row, add two rows of 1 double crochet in each st.
Bonus TIP: instead of crocheting 3 chains when turning your work, learn to create a stacked single crochet (click for video).

Increases
We will increase in two places to make room for the shoulders. Firstly, you need to know exactly how many stitches your row has, go ahead and count them.
Then, take a measuring tape and measure the back of your neck. Now lay your work flat and see how many sts fit in that measurement. For example, if the back of your neck measures 15 cm, lay your work flat and see how many sts fit into 15 cm. Take care not to stretch out your work too much. Now take that number of sts, and subtract it from your total nr of sts.
Example: If you have 200 sts for the entire row, and you have 20 sts for your back neck, then that leaves you with 180 sts. Divide this number in half (90 sts), that is the number of sts you will have on EACH front piece. Place a marker on the 90th st counted from each side, so you have 20 sts inside of the markers. Just to be extra clear, this means you have 89 sts outside of the markers.

Increase rows
From now on, you will increase on every row when you get to the marked st:
Crochet 1dc in each st until the first marked st, 5dc into marked st, 1dc in each st until next marked st, 5dc into marked st, and 1dc in each st to end.
For each next row, the increase is made in the 3rd dc of the 5dc group.
Repeat this increase row until the shorter edge of the ‘U’ shape is the same width as your shoulder width. If you prefer an oversized drop-shoulder look, add a couple more increase rows.
Back panel
Continue with the back panel by ONLY working on the marked sts and the sts in between. Begin crocheting in the 3rd dc of the first 5dc-group, and crochet on with the last st going into the 3rd st of the other 5dc-group. Keep adding rows of double crochet until the back panel is of your desired length.
It’s helpful to pin the bottom hem of your front panel to the bottom hem of the back panel and trying it on. Please note: if you make your back panel too short, the back of your neck can become too low down your back. Fine if you want a summery cardigan, but often too chilly for a winter cardigan.
Side panel
Try on your cardigan and put a stitch marker on the side of the cardigan where you would like the armhole to begin. Don’t pin too close to your underarm or the sleeves will likely be too tight. Pin the bottom hems of the front and back to eachother and take a look at the buttonband (even though it has no buttons) of the cardigan. Does it hang straight down, or does it go diagonally to the side? If it’s the latter, you need to add a side panel.
Mark the bottom of the armhole on your front piece. Add rows to your front piece, only crocheting in between the bottom hem and the bottom of the armhole. Add as many rows as you need in order to make the front of the cardigan hang straight. If they do hang straight but the cardigan doesn’t close in the front, you can add more rows along the front of your cardigan.
Seaming
Pin both sides of your cardigan from the bottom of the armhole to the hem. Seam it together with your favourite method, whether that is sewing, or crocheting them together from the wrong side.

Sleeves
Once your side seams are in place, start with the sleeves. While you are crocheting the sleeves, make sure to note down any decreases so that you can make both sleeves identical. To start the sleeves, crochet a round of double crochets going all around the armhole. It’s easy when you’re adding stitches to the front piece because you can just crochet 1 double crochet for every st you see. When crocheting over the back panel and side panel, you’ll see the side of your stitches which is less straightforward to crochet into. I’ve added an up close picture of my own cardigan so you can see what I did. Sometimes I crocheted 2dc in the side of a st, sometimes 3dc. At the start and end of the side panel I crocheted 3 sts together to make it less bulky.
If you crochet too few sts you’ll likely have some gaps in the underarm. If you crochet too many, you’ll end up with too much fabric in the underarm. When in doubt, I recommend adding more sts and decreasing them in the following rounds.
One row on your sleeve looks like this: 1 dc in every st, slip stitch into 1st dc when you come to the end of the round. To start the next round, ch 3 sts or crochet a stacked sc.
Sleeve decreases
A note on sleeve decreases, as this can be a difficult part of this cardigan. I recommend decreasing a couple sts in the first rounds. How many depends on your yarn weight. For my fingering weight cardigan, I decreased 2 sts in round 3, and another 2 sts in round 6. I then did a few more decreases during the entire sleeve. Try your cardigan on and decide if you want to decrease more.
Sleeve cuff
For a nice sturdy cuff add 4 rounds of single crochet at the end of your sleeve. Aside from looking very nice and finished, this will also prevent the cuff from stretching out too much after wearing and washing.
Finishing
Weave in all ends. Wash your cardigan and leave it to dry flat. If after washing and drying you find the cardigan has stretched, you might want to add some more rows along the front neckline of your cardigan.
Share pictures of your cardigan on social media with the hashtags #CruiseCardigan and #NewLeafDesigns. If you have a Ravelry account, I always appreciate it very much if people create a project page for one of my patterns. This really helps get the word out about my patterns and it provides helpful information for other makers. Find the Ravelry page for this pattern here.

Haak om te beginnen een lange rij van opzetstokjes. [instructievideo komt eraan] Deze rij moet lang genoeg zijn zodat het midden achterin je nek ligt en de beide uiteinden naar beneden hangen tot waar je wilt dat het vest komt. Ik raad aan om een vest uit je kast te pakken en daarvan de volledige lengte van de knoopsband te meten, zo lang wil je ook je eerste rij haken.
LET OP: Opzetstokjes zijn heel rekbaar, probeer het niet teveel uit te rekken wanneer je de lengte opmeet.
Als je tevreden bent met de lengte van je eerste rij haak je nog twee rijen stokjes, 1 stokje in elke steek.
Bonus TIP! In plaats van 3 lossen te haken aan het begin elke rij kun je een gestapelde vaste haken (filmpje in het Engels).

Opmerking over de afbeelding hierboven: ik noem hierin een garen van ‘DK weight’, dit is een universele aanduiding voor een dikte garen, waar we in het Nederlands niet echt een equivalent van hebben. In principe komt het neer op een garen dat ongeveer 2x zo dik is als sokkengaren.
Meerderingen
We meerderen op twee plekken voor de schouders. Eerst moet je weten hoeveel steken je precies hebt in één rij.
Neem dan een meetlint en meet de achterkant van je nek. Leg dan je werk plat en meet hoeveel stn er passen in die afmeting. Als de achterkant van je nek bijvoorbeeld 15 cm breed is, dan leg je je werk plat en meet je hoeveel stn er passen in 15 cm. Rek je werk niet teveel uit. Neem die hoeveelheid steken en haal die af van de totale hoeveelheid steken.
Bijvoorbeeld: Als je 200 stn hebt voor de hele rij, en 20 stn voor de achterkant van je nek, dan heb je 180 stn over. Deel dit aantal door de helft, dat is 90 stn. Dat is de hoeveelheid steken voor elk voorpand. Plaats een stekenmarker op de 90e st geteld van elke kant, zodat je 20 stn binnen de markers hebt. Voor de duidelijkheid, dan heb je dus 89 stn buiten de markers.

Meerderrijen
Vanaf nu gaan we elke rij van het voorpand meerderen:
Haak 1st in elke s tot aan de gemarkeerde s, haak 5st in de gemarkeerde s, haak 1st in elke s tot aan volgende gemarkeerde s, 5st in gemarkeerde s, 1st in elke s tot eind.
Voor elke volgende rij haak je de meerdering in de 3e st van een groep van 5 st.
Herhaal deze meerderrij tot de korte zijde van de ‘U’ vorm dezelfde breedte heeft als je schouders. Als je houdt van een oversized vest mag je nog wat rijen toevoegen.
Achterpand
Ga verder met het achterpand. Deze haak je ALLEEN aan de korte zijde. Begin met haken in de 3e st van de eerste 5st-groep, en haak 1st in elke s tot aan de 3e st van de andere 5st-groep. Blijf rijen toevoegen tot je achterpand van de gewenste lengte is.
Als je wilt bepalen of het achterpand lang genoeg is, is het handig om de onderrand van de voor- en achterpanden even aan elkaar te spelden zodat je het kan passen. Let op: als je het achterpand te kort maakt dan wordt de achterkant van je nek lager. Dat is prima als je een zomers vestje maakt, maar voor een warm vest wil je toch echt dat het vest goed aansluit in de nek.
 Zijpaneel
Pas je vest aan en plaats een stekenmarker waar je wilt dat het armsgat begint. Speld niet te dicht op je arm, anders worden de mouwen te krap. Speld ook de onderrand van de voor- en achterpanden samen en kijk naar de voorkant van je vest. Hangt de halslijn recht naar beneden of niet? Zo niet moet je een zijpaneel toevoegen aan elke kant.
Markeer de onderkant van het armsgat op het voorpand. Voeg rijen toe waarbij je alleen vanaf de onderrand tot aan het armsgat haakt (of vice versa). Voeg zoveel rijen toe als nodig zodat je vest recht hangt aan de voorkant. Hangt het wel recht, maar sluit de voorkant niet? Dan kun je dit oplossen door extra rijen aan de halslijn te haken.
Zijnaad
Speld beide zijdes van je vest van de onderrand tot aan het armsgat, en naai of haak deze samen.
Mouwen
Ga verder met de mouwen. Zorg dat je ergens kan bijhouden hoeveel stn je oppakt voor de mouwen en hoeveel stn je mindert, zodat je beide mouwen hetzelfde kan maken.
Om de mouwen te beginnen haak je een toer stokjes helemaal rondom het armsgat. Het is gemakkelijk om steken te haken aan het voorpand, want daar haak je in de bovenkant van een steek. Het is lastiger om te haken in het achterpand of zijpaneel want daar zie je de zijkant van de steken. Ik heb een foto toegevoegd van mijn eigen vest, dan kun je zien hoe ik het heb gedaan. Soms haakte ik 2st in de zijkant van een steek, soms 3st. Let ook op, aan het begin en eind van het zijpaneel haakte ik 3 stokjes samen om gaten te voorkomen.
Als je te weinig stn oppakt in deze eerste toer heb je waarschijnlijk wat gaten, als je teveel steken oppakt gaat je mouw bobbelen. Bij twijfel raad ik aan om meer steken te haken en deze later te minderen.
Een toer voor de mouw ziet er zo uit: haak 1st in elke s, op het eind van de toer haak je een halve vaste in de 1e s. Om de volgende toer te beginnen haak je 3 lossen of 1 gestapelde vaste.
Mouw minderingen
Het kan lastig zijn om te bepalen wanneer je wilt minderen in de mouwen. Ik raad aan om een paar stn te minderen in de eerste paar toeren. Hoeveel, dat ligt aan de dikte van je garen. Voor mijn vest met sokkengaren heb ik 2 stn geminderd in toer 3, en nog 2 stn in toer 6. Daarna minderde ik her en der wat steken gedurende de hele mouw. Pas je vest regelmatig aan of leg het op een bestaand vest, zo kun je makkelijker zien of je moet minderen.
Mouw boord
Voor een stevig boord haak je 4 toeren vasten aan het einde van je mouw. Dit ziet er niet alleen heel netjes afgewerkt uit, maar het zorgt er ook voor dat je mouw minder kans heeft op uitrekken na het wassen en dragen.
Afwerking
Werk alle eindjes weg. Was je vest en leg het plat te drogen. Als je na het wassen en drogen merkt dat je vest wat is uitgerekt, is het handig nog wat rijen toe te voegen om de halslijn.
Deel foto’s van je vest op social media met de hashtags #CruiseCardigan en #NewLeafDesigns. Heb je een Ravelry account? Ik stel het altijd erg op prijs als mensen projectpagina’s maken van mijn patronen, ook al ben je pas net begonnen. Zo zien meer mensen mijn patroon op Ravelry, en bovendien is het erg handig voor andere makers die voorbeelden willen zien van een patroon. Vind de Ravelry pagina hier.


No Comment