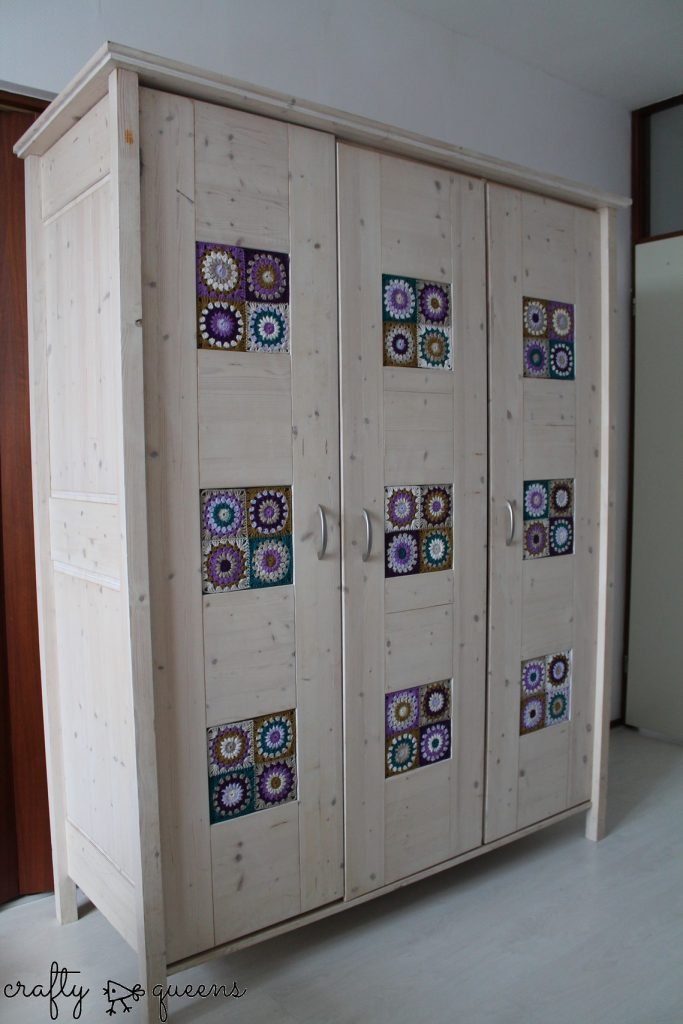
Een halfjaartje geleden ben ik ingetrokken in mijn allereerste appartement, en sindsdien heb ik er al heel wat in ge-DIY-d! Ik verfde alle tafels en stoelen, behing de muren met brei-behang, gaf een letterbak een makeover met ander behangpapier, haakte een nieuwe kap voor mijn lamp… En een paar maanden geleden begon ik ook aan mijn grootste meubel-makeover ooit, die ik vandaag mag onthullen!
About half a year ago I rented my first apartment!! I did quite a lot of DIY project, such as painting the chairs and tables, hanging wallpaper, crocheting a new lampshade for my bedside table lamp.. And a few months back I also started the biggest furniture make-over yet! And… I get to show you today!
Toen ik deze kast een halfjaar geleden kocht wist ik al meteen wat ik ermee zou doen! Herinneren jullie je nog die vierkantjes met Scheepjes Linensoft die ik de afgelopen tijd heb gehaakt? En zien jullie die raampjes?
This is the wardrobe closet I bought half a year ago. When I bought it I immediately knew what to do with it! Remember those squares I crocheted with Scheepjes Linensoft this past time? See those windows?
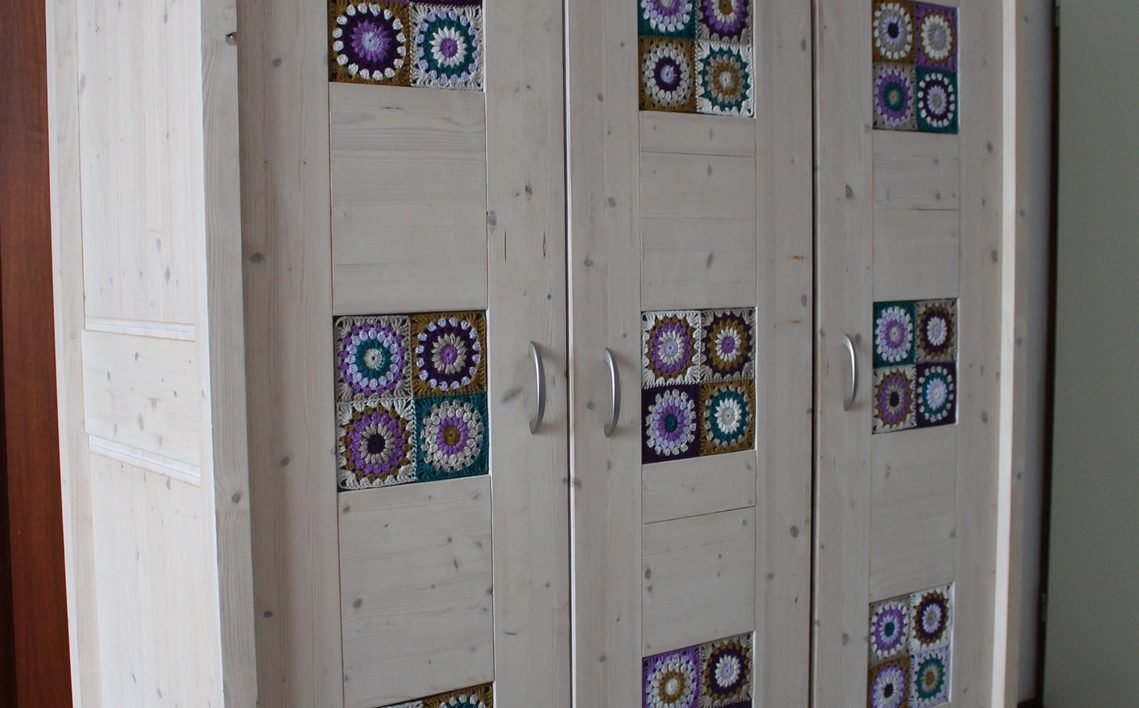
Ta-daa! Zo is mijn kast geworden!! Ik ben er zo blij mee, het is een hele verandering. En gelukkig is het ook niet te meisjesachtig zodat mijn vriend het ook nog kan accepteren 😉 Het is namelijk een wat permanentere DIY dan die ik normaal doe, dus was het wel belangrijk dat het ook echt leuk wordt, en ook blijft!
Ta-dah!! My new wardrobe closet!!! I am so happy with it, it’s such a change! And according to my boyfriend it’s not too girly, so that’s a good thing. This DIY is more permanent than others I’ve done, so it was kind of important that it turned out right.
De vierkantjes plakte ik op de raampjes met – jawel – eiwit! Deze geweldige tip kreeg ik van Francien, die op haar blog beschreef hoe ze sneeuwvlokken op haar raam had geplakt. Eiwit is een natuurlijk plakmiddel, voornamelijk gebruikt in de kookwereld. Hoe geweldig dat we het ook in de handwerk-wereld kunnen gebruiken! En ik hoor jullie al denken.. ‘Gaat dat niet stinken, of schimmelen?’ Zo dacht ik precies! Maar Francien’s haakwerkje plakte na een maand nog perfect aan het raam, en geen geur, geen schimmel, niets! Dus was ik overtuigd om het zelf ook te proberen.
Voor mijn project was eiwit van 1 ei genoeg. Doe je eiwit in een bakje. Het is heel belangrijk dat hier niet stiekem wat eigeel bij zit! Voordat je met je kwast in de weer gaat, ga je even na of je haakwerkje de goede vorm heeft. Ik had mijn vierkantjes niet geblockt en moest ze handmatig nog een beetje oprekken. Daarna bestrijk je de achterkant van je haakwerk met eiwit. Het wordt een beetje glanzend. Probeer het vooral aan de randen goed erop te smeren.
I stuck the squares on the windows with eggwhites! Yes, eggwhites. This wonderful piece of advice was given to me by Francien, who used eggwhites to stick crocheted snowflakes to a window. Eggwhite is a natural adhesive, mainly used in baking. I hear you thinking.. ‘Won’t the eggwhite go bad?’ I actually thought the same thing at first, but Francien assured me that after a month she still hadn’t noticed any funny smells or fungus, so I went ahead and tried it myself!
For my project 1 eggwhite was enough. Put the eggwhite in a bowl, please make sure there is no eggyolk in this. Before smearing it all over your crochet, make sure your crochet is the right shape first. I didn’t block my squares so I had to stretch them a little bit. Then, take your brush and kind of ‘paint’ the eggwhite onto the crochet. Pay special attention to the edges and corners. It will become a bit shiny!
Druk je werk dan op het oppervlak waar je het wilt hebben. Druk het eerst eventjes globaal op het oppervlak, en houdt het daarna ongeveer een halve minuut vast in elke hoek. Als het nodig is kun je op loslatende plekken nog wat eiwit toevoegen en het opnieuw aandrukken. Het plakte verrassend snel!
Press your work to the surface, and hold it. First press it down in the middle for a few seconds, then move on to the corners and edges. Hold each corner for about 30 seconds. It sticks really fast so this will do it. If needed, apply some more eggwhites on the edges.
En klaar! Nu nog herhalen voor de andere raampjes…
And done! Now onto the other windows..
Ik ben zo verliefd op mijn kast, ik word er elke keer blij van als ik er langs loop! En als ik toch eens bedenk wat er allemaal te doen valt met deze plak-techniek.. Denk aan gehaakte randjes op je spiegel, raamdecoraties.. misschien werkt het ook wel in het klein met een kleine applicatie op een vaasje. Wat een mogelijkheden! Welk oppervlak zou jij gaan beplakken in je huis? Haha, of toch liever niet? Laat het me hieronder weten!
Mocht je trouwens meer DIY-apartment verhalen willen lezen, kijk dan hier, hier of hier. 🙂
I’m so in love with this piece of furniture now, it makes me happy every time I see it! And if I start thinking about all the possibilities with eggwhite paste.. What about crocheted edges on mirrors, decoration on your windows… maybe even something small to stick on a vase. Which surface would you stick your crochet/knitting on? Haha, or are you going to pass on this one? Let me know in the comments below!
If you’d like to read more about my DIY-apartment, read on here, here or here.
Don’t miss another blogpost, follow me on Bloglovin’!


