


Get this pattern as a PDF
Want to support me as a designer? Buy the PDF version of this pattern in one of my pattern shops. Any purchases very much appreciated, thank you!!
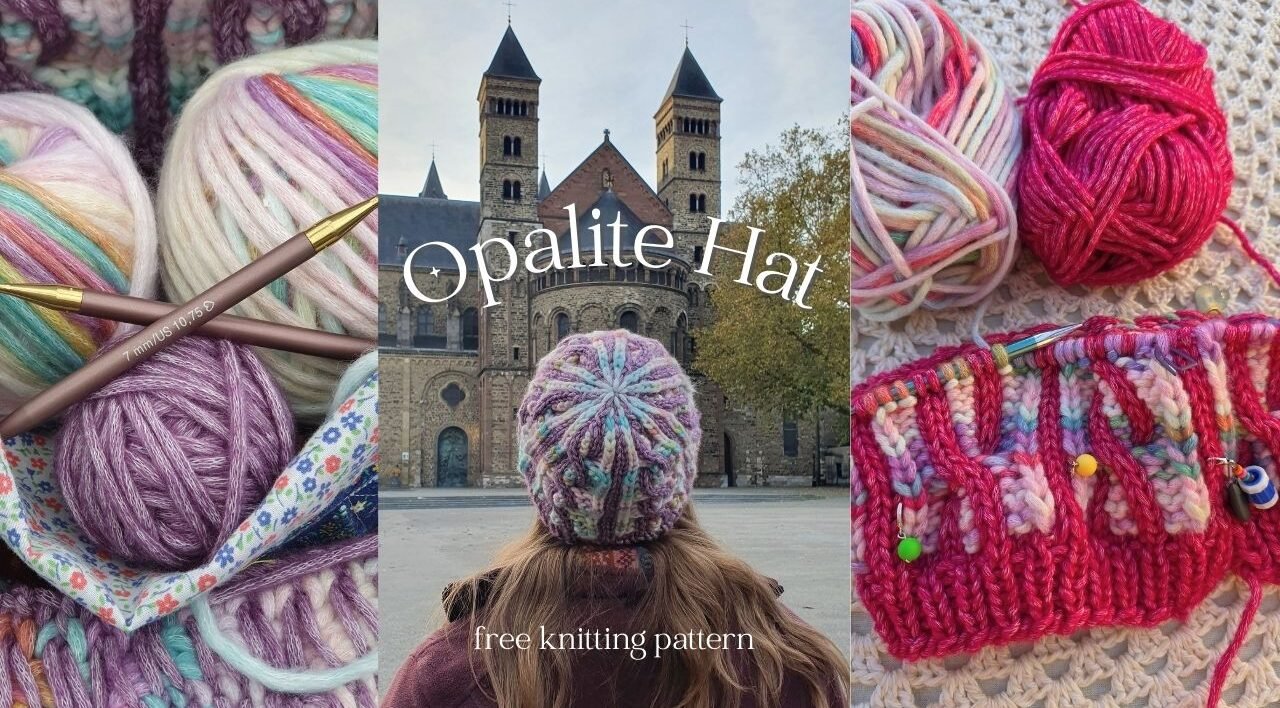
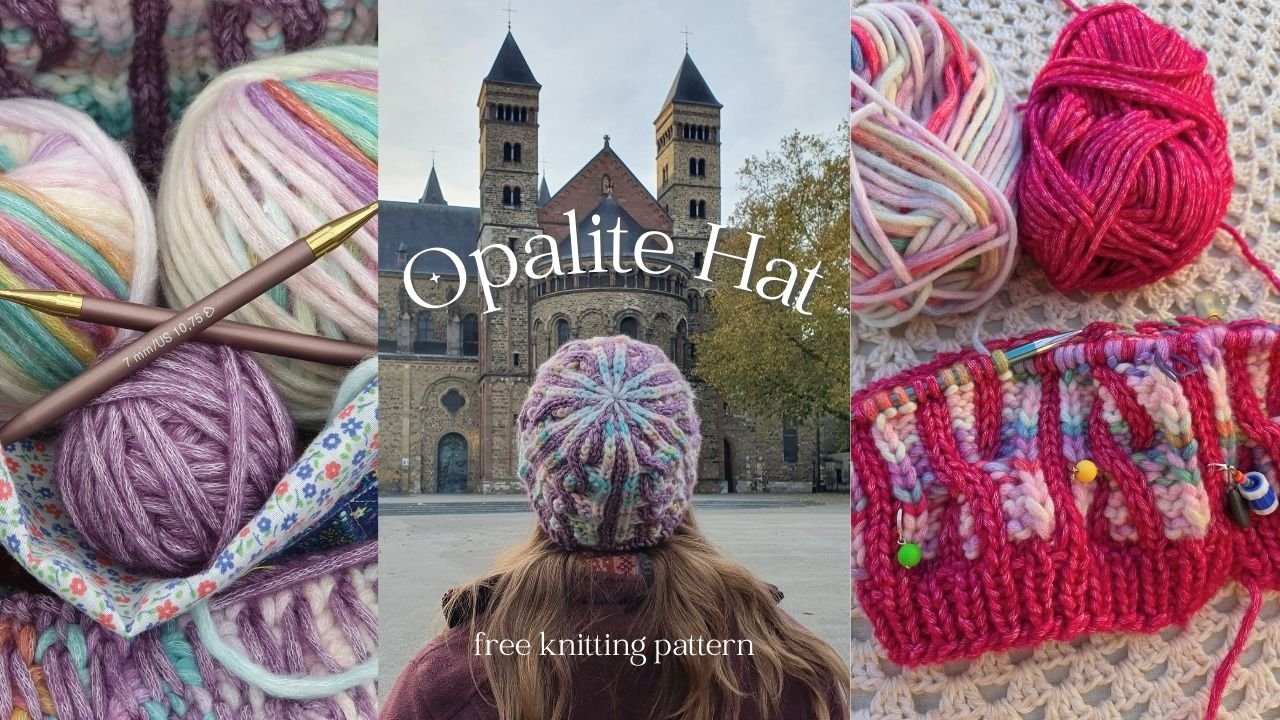
Buy in Ravelry store Buy in New Leaf WebshopOpalite Hat – Free Knitting Pattern
Why choose between cables and colourwork if you can have both! The Opalite Hat pattern is a fun challenge and is aimed at adventurous beginners and intermediate knitters. Follow the step by step tutorial with expert guidance and you’ll finish this hat in no time.
The Knitty Gritty
- Difficulty Level: Intermediate or Adventurous Beginner
- Sizes: Teen, Adult medium, Adult large
- Yarn: 2 balls of Super Chunky yarn
- Needle sizes: 7mm and 8mm
- Create a project page on Ravelry

Shop yarns at Scheepjes retailers. By shopping via my affiliate links you support me without paying anything extra!
Wool Warehouse (UK) Caro’s Atelier (NL) Knitkat (BE)Materials and Notions
Scheepjes Stone Washed XXL (58% Cotton, 42% Acrylic; 90m/100g)
Colourway 1
Yarn A: Deep Amethyst 851 x 1 ball (all sizes)
Yarn B: Beryl Blaze 914 x 1 ball (all sizes)
Colourway 2
Yarn A: Eudialyte 879 x 1 ball (all sizes)
Yarn B: Opal Ocean 906 x 1 ball (all sizes)
7mm needles for the brim
8mm needles for the rest of the hat
These can be double pointed needles (DPNs), 40cm/16″ circulars for knitting exact size, or 80cm+/32″+ circulars for knitting magic loop. Please note that the 40cm/16″ circulars can only be used up until the crown decreases, afterwards you will need either of the other two options.
Cable needle
Stitch markers
Scissors
Sizing, Gauge and Abbreviations
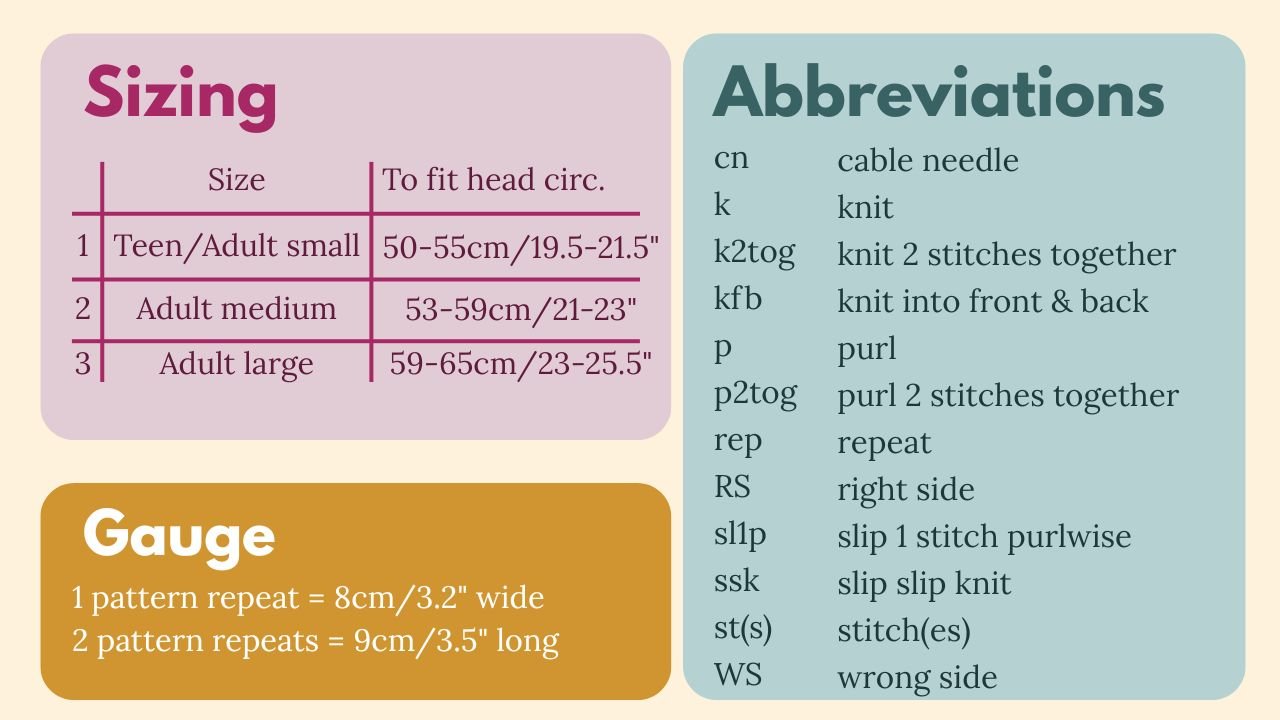
Instructions for different sizes will be given in the pattern as 1 (2) 3.
Special Abbreviations:
Any instruction with A attached – for example k1A – means to work that stitch with Yarn A. Similarly, any instruction with B attached signifies to work that stitch with Yarn B. All Yarn A specific stitches will also have purple text for easier recognition.
Sl1, k2tog, psso Slip 1 stitch knitwise, knit 2 stitches together, pass slipped stitch over (2 sts decreased)
4/4 LC Cable Also sometimes called C4F. Slip next 4 sts onto cn, hold at front of work, (p1B, k2A, p1b) from knitting needle, then (p1B, k2A, p1B) from cn.
Note: Please do watch the tutorial video, I go over all of the instructions step by step.
Charts
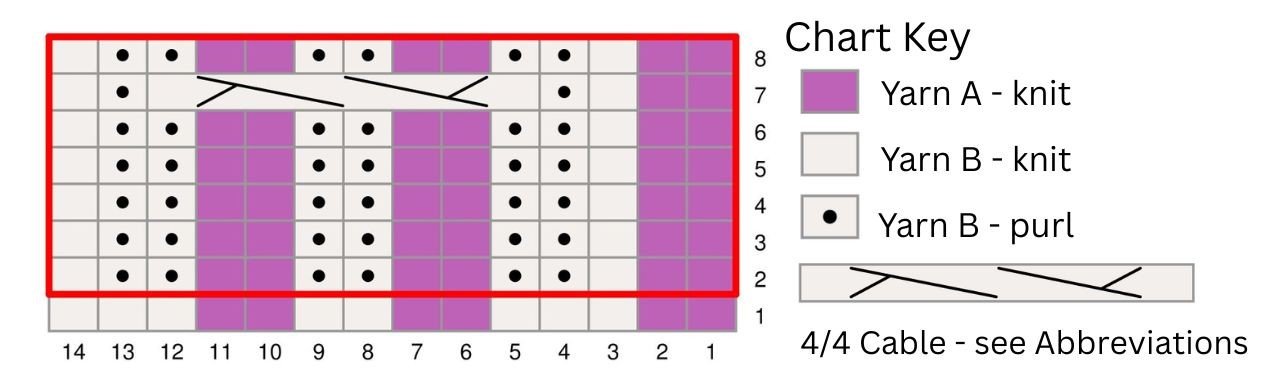

This is the main chart for the Opalite Hat, referred to as Chart 1. Read the chart from right to left, bottom to top. The first row is the setup row. Rows 2-8 form the pattern repeat which is outlined in red. The pattern repeat is 14 stitches wide, and 7 rows long. Each square signifies 1 stitch, and the Chart Key shows what the squares mean.
This pattern also contains the full written pattern so you don’t need to follow the chart if it’s overwhelming. I also recommend watching the tutorial video alongside the pattern.
Chart 2
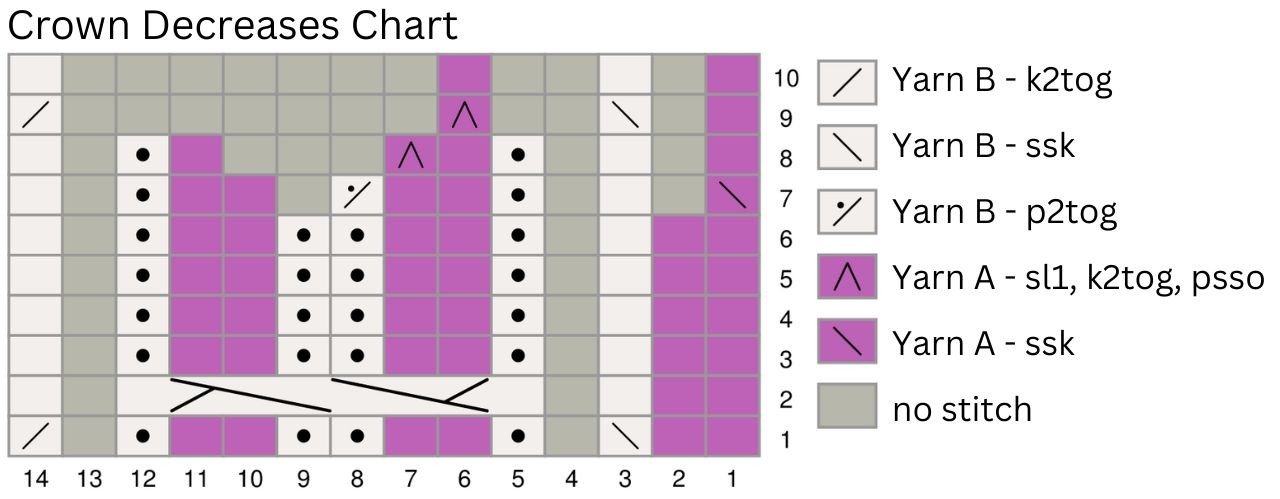

This chart shows the Crown Decreases and is referred to in the pattern as Chart 2. There are some additional stitch symbols in the Chart Key.
The pattern has these decrease rounds all written out as well so you can choose whether to use the chart or not.
Step by Step Tutorial

Pattern
Brim
Cast on 56 (62) 70 sts with Yarn A, 7mm needles and German Twisted Cast On.
To make it easier to join in the round, the first two rows are knit flat:
Row 1 (WS): *k1, p1; rep from * to end, turn work.
Row 2 (RS): *k1, p1; rep from * to end, do not turn work.
Join in the round.
Rounds 3-4 (RS): *k1, p1; rep from * to end of round.
Size 2 ONLY:
Round 5: *k1, p1; rep until 2 sts left, kfb, p1.
Sizes 1 & 3:
Round 5: *k1, p1; rep from * to end of round. (=Same as Rounds 3 and 4)
Increase round
Size 1: *K3, kfb; rep from * to end of round. [70 sts]
Size 2: *K2, kfb; rep from * to end of round. [84 sts]
Size 3: *K1, kfb, k2, kfb; rep from * to end of round [98 sts]
Main body
Switch to 8mm needles in the next round.
In the following instructions, A or B is added to refer to the yarn colour. So k2A means knit 2 sts with Yarn A.
Colourwork set up round: *K2A, k3B, k2A, k2B, k2A, k3B; rep from * to end of round.
Tips & Tricks:
You will only ever need to work knit stitches with Yarn A, but you need to knit and purl with Yarn B. Hold Yarn B in the hand you’re most comfortable purling with, and hold Yarn A in your other hand.
After purling, don’t forget to return Yarn B to the inside of your hat before continuing with Yarn A.
Place stitch markers every 14 sts to keep track of your repeats.
Cable Repeat
Read the written version below or follow Chart 1.
Rounds 2-6: *k2A, k1B, p2B, k2A, p2B, k2A, p2B, k1B; repeat from * to end of round.
Round 7 (Cable round): *k2A, k1B, p1B, 4/4 cable: (slip next 4 sts to cn, hold at front of work, (p1B, k2A, p1B) from knitting needle, then (p1B, k2A, p1B) from cn), p1B, k1A; repeat from * to end of round.
Place a stitch marker on the Cable Round, so you’ll be able to count your next 6 rounds from here until the next Cable Round. Alternatively you can use a row counter to keep track.
Round 8: Same as Round 2.
Knit 1 more full repeat of Rounds 2-8, then knit through Rounds 2-5. Continue on to Crown Decreases.
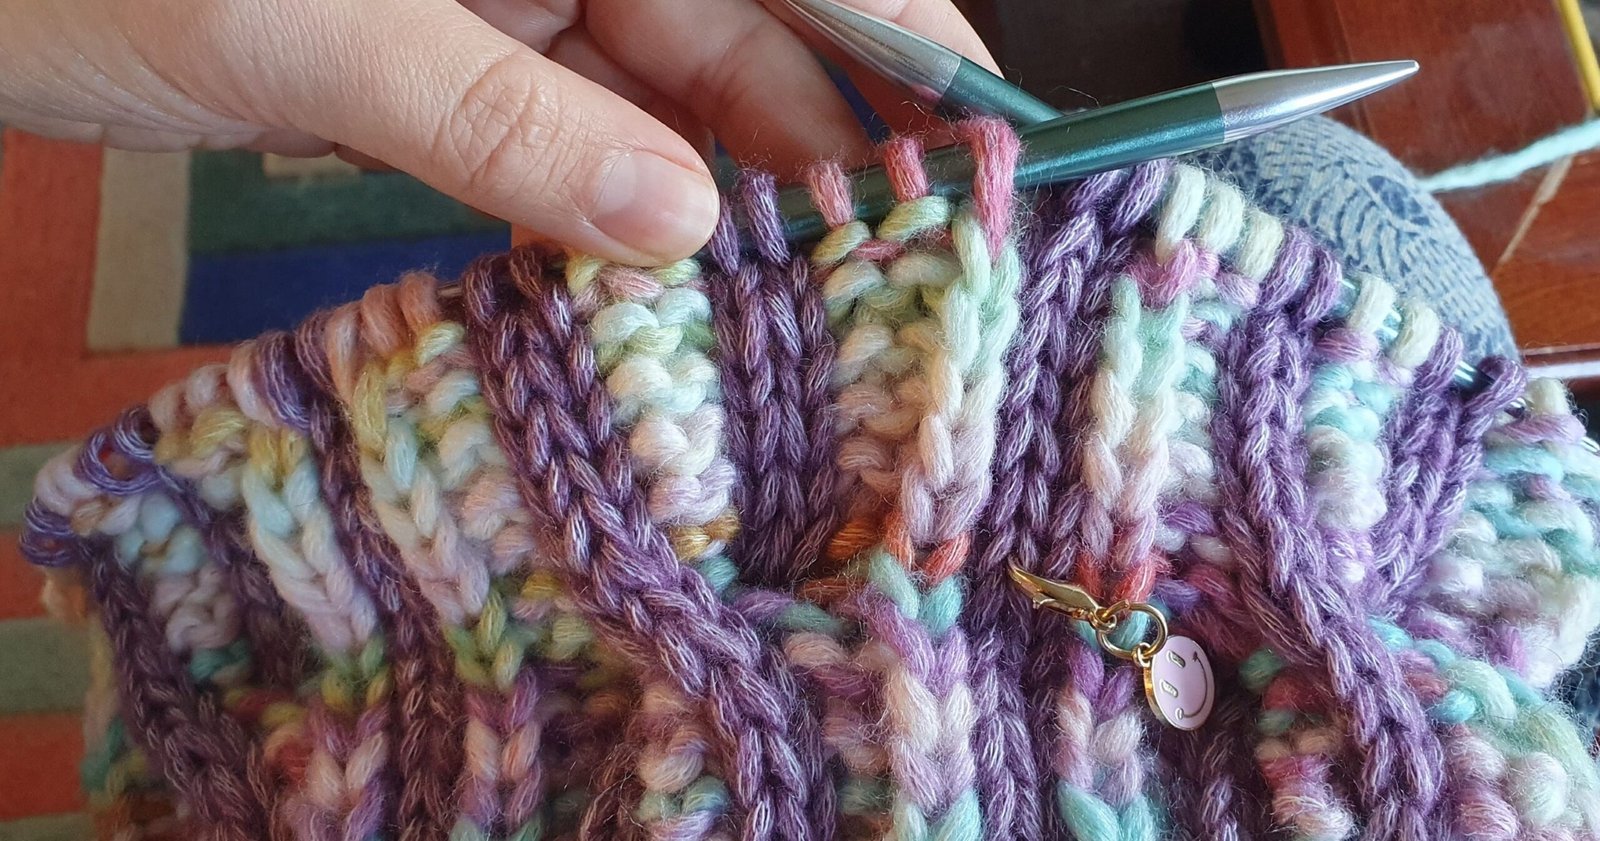

On this photo you can see the cable round stitch marker being used. Mark a knit stitch for easy counting of rows.
The Crown Decreases are also charted in Chart 2 above.
Crown Decreases
Crown Round 1: *k2A, sskB, p1B, k2A, p2B, k2A, p1B, k2togB; repeat from * to end.
Crown Round 2: *k2A, k1B, 4/4 Cable, k1B; repeat from * to end.
Crown Rounds 3-6: *k2A, k1B, p1B, k2A, p2B, k2A, p1B, k1B; repeat from * to end.
Crown Round 7: *sskA, k1B, p1B, k2A, p2togB, k2A, p1B, k1B; repeat from * to end.
Crown Round 8: *k1A, k1B, p1B, k1A, sl1 knitwise, k2togA, psso, k1A, p1B, k1B, repeat from * to end.
Crown Round 9: *k1A, sskB, sl1 knitwise, k2togA, psso, k2togB; repeat from * to end.
Crown Round 10: *k1A, k1B, repeat from * to end of round.
Finishing
Cut both yarns leaving a long tail. Tuck the Yarn A strand to the inside of the hat, and put the Yarn B strand on a darning needle. It’s best to use one with a blunt tip. If using circular needles, move all sts to the cord as it makes the next step easier.
With the darning needle, go through all remaining stitches from the start of the round to the end. Take care not to split any of the stitches. Pull the knitting needle out of the stitches, and then pull on the yarn tail so that it cinches in the stitches. Because of the chunky yarn you will not be able to pull it closed all the way, so don’t be tempted to pull too hard – because the yarn might break! Next, go through the stitches a second time, but this time we’re going to skip a few stitches. Skip 2 stitches, go through 3 stitches, and repeat until you’ve made one full round. Pull tight again, and then repeat going through even fewer stitches. It’s difficult to count the sts at this point, so just go through 2 stitches every once in a while, and pull tight again. Then insert your needle into the hole and pull your yarn through to the inside, and weave it away on the inside.
Weave in all other ends.
Blocking tip for hats: Wash your hat, squeeze excess water out with a towel, then let it dry on a balloon. The balloon will help block the cabled part without stretching out the brim.
You’re Done!
Thank you so much for following this pattern. If you’ve enjoyed this do give my other patterns a look here. Share your hat by creating a project page on Ravelry or share photos on social media with the hashtags #OpaliteHat and #NewLeafDesigns.
NEDERLANDS PATROON

Materialen
Caro’s Atelier (NL) Knitkat (BE)Scheepjes Stone Washed XXL (58% Katoen, 42% Acryl; 90m/100g)
Kleurstelling 1
Garen A: Deep Amethyst 851 x 1 bol (alle maten)
Garen B: Beryl Blaze 914 x 1 bol (alle maten)
Kleurstelling 2
Garen A: Eudialyte 879 x 1 bol (alle maten)
Garen B: Opal Ocean 906 x 1 bol (alle maten)
7mm naalden voor de rand
8mm naalden voor de rest van de muts
Dit kunnen dubbelpuntige naalden (DPNs) zijn, 40cm rondbreinaalden, of 80cm+ rondbreinaalden. Let wel dat de 40cm rondbreinaalden enkel gebruikt kunnen worden tot aan de kruin minderingen, voor de minderingen kunnen alleen een van de andere 2 opties gebruikt worden.
Kabelnaald, steekmarkeerders, schaar, stopnaald.
Maten, Stekenverhouding en Afkortingen
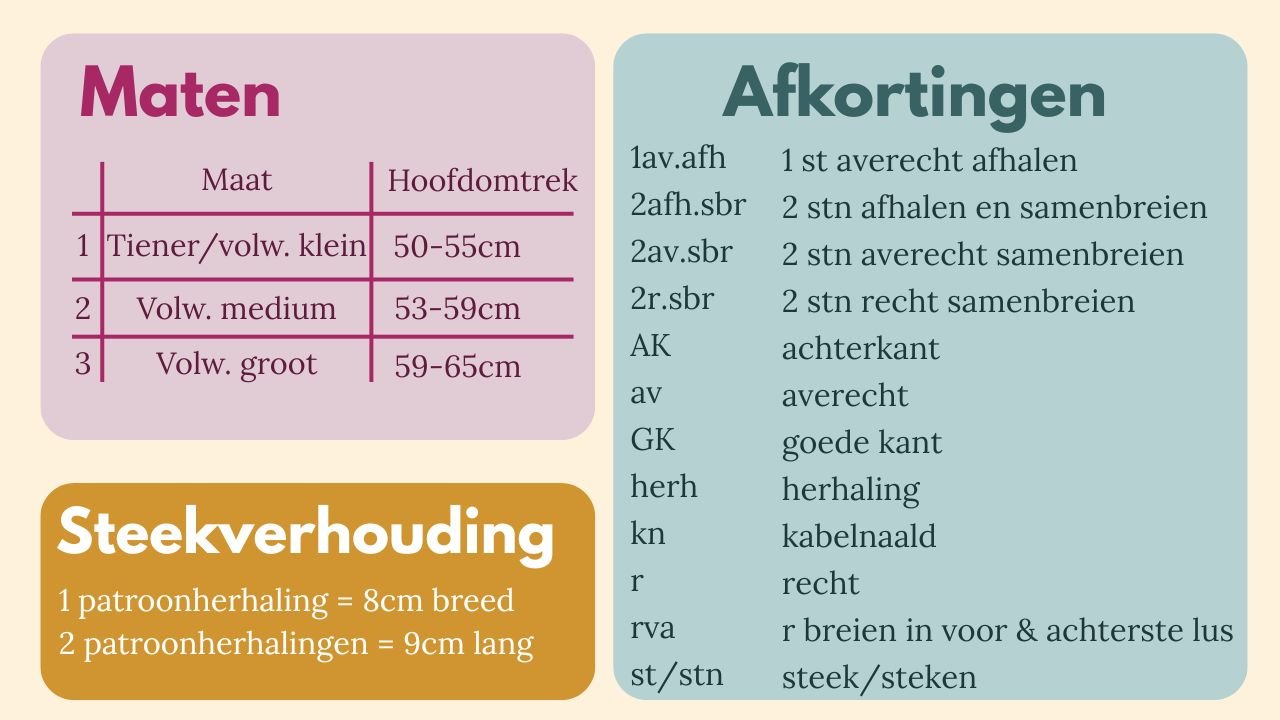
Instructies voor verschillende maten worden in het patroon aangeduid als 1 (2) 3.
Speciale Afkortingen
Elke instructie met A erachter, bijv. 1rA betekent: brei deze steek met Kleur A. Daarnaast zijn alle Kleur A steken met paars gemarkeerd voor het leesgemak.
Elke instructie met B erachter, bijv. 1rB betekent: brei deze steek met Kleur B
1r.afh, 2r.sbr, afgeh.st overhalen 1 st recht afhalen, 2 stn recht samenbreien, afgehaalde st overhalen. (2 stn geminderd)
4/4 Kabel zet volgende 4 stn op kn, houd vóór werk langs, (1avB, 2rA, 1avB) van breinaald, dan (1avB, 2rA, 1avB) van kn
Schema’s
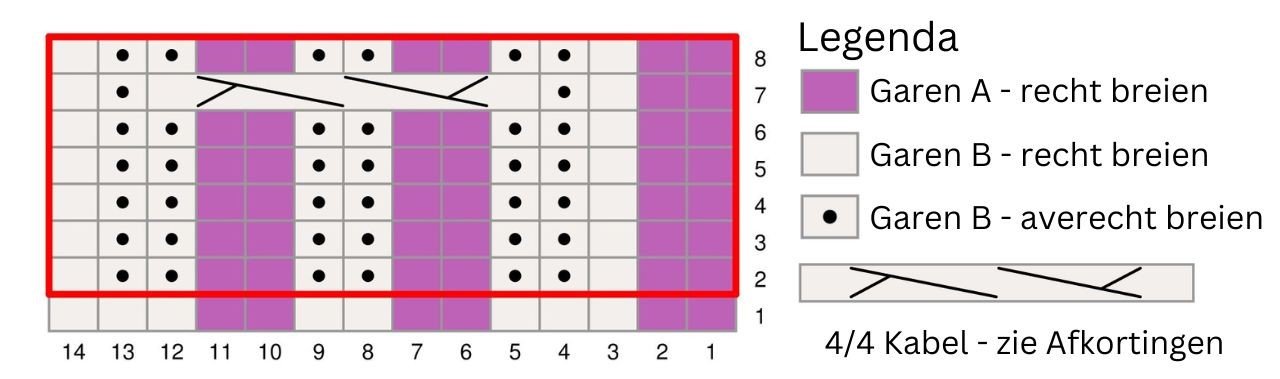

Dit is Schema 1, met het kabelpatroon voor de Opalite muts. Lees het schema van rechts naar links en van beneden naar boven. In Rij 1 beginnen we met twee kleuren te breien, en Rijen 2-8 vormen de patroonherhaling en is met een rode lijn gemarkeerd. De herhaling is 14 steken breed, en 7 toeren lang. Nadat je Toer 8 hebt gebreid begin je weer bij Toer 2. Elk vakje staat voor één steek, en in de Legenda staat welke steek hier gebreid moet worden.
Het volledig uitgeschreven patroon staat verder naar onderen. Ik raad aan om de tutorial video te kijken, hierin behandel ik het lezen vanaf de geschreven tekst én ook van het schema.
Kruin Minderingen Schema
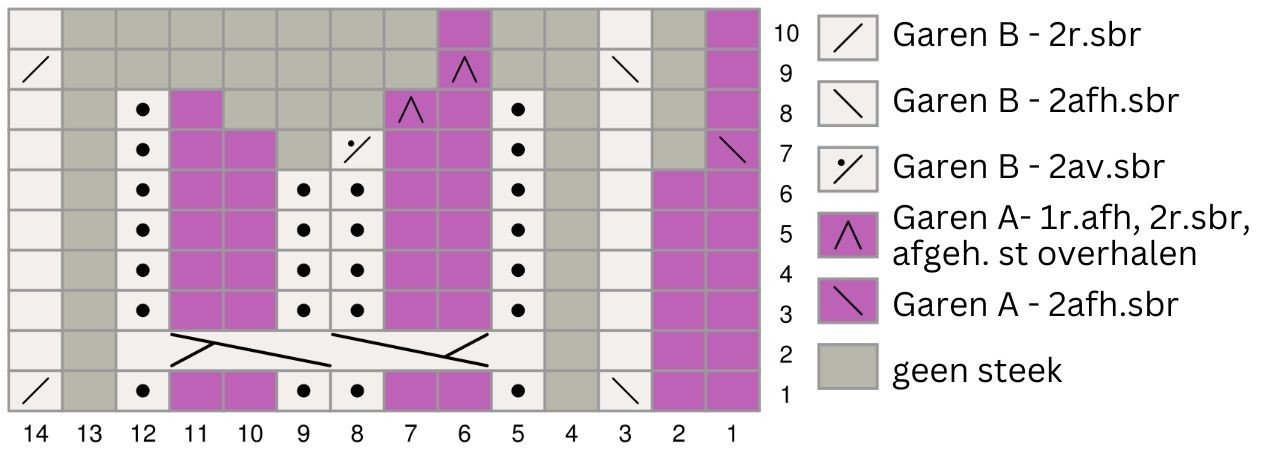

Dit schema laat de Kruin Minderingen zien en wordt in het patroon Schema 2 genoemd. Er zijn hier wat meer steek symbolen in de legenda.
De volledig uitgeschreven instructies staan verder naar onderen.
Stap voor Stap instructievideo (Engels)
Patroon
Rand
Zet 56 (62) 70 stn op met Garen A, 7mm naalden en de Duitse Gedraaide Opzet.
Om het gemakkelijker te maken later in het rond te werken, breien we de eerste twee rijen plat:
Rij 1 (AK): *1r, 1av; herh vanaf * tot eind, keer werk.
Rij 2 (GK): *1r, 1av; herh vanaf * tot eind, keer werk niet.
Ga in het rond verder.
Toeren 3-4 (GK) *1r, 1av; herh vanaf * tot einde toer.
ALLEEN Maat 2: Toer 5: *1r, 1av; herh tot laatste 2 stn, rva, 1r.
ALLEEN Maten 1 en 3: Toer 5: *1r, 1av; herh vanaf * tot einde toer. (= hetzelfde als Toeren 3 en 4)
Meerdertoer
Maat 1: *3r, rva; herh vanaf * tot einde toer. [70 stn]
Maat 2: *2r, rva; herh vanaf * tot einde toer. [84 stn]
Maat 3: *1r, rva, 2r, rva; herh vanaf * tot einde toer. [98 stn]
Jacquard gedeelte
Ga verder met 8mm naalden voor de volgende toer.
In de volgende instructies zijn A en B toegevoegd om naar de garenkleur te verwijzen. Dus 2rA betekent brei 2 r met Kleur A.
Volgende toer: *2RA, k3B, 2rA, 2rB, 2rA, k3B; herh vanaf * tot einde toer.
Tips & Tricks
In dit patroon brei je enkel recht met Garen A, maar je breit recht en averecht met Garen B. Houd Garen B in de hand waar je het meest comfortabel averecht mee breit en houd Garen A in de andere hand.
Vergeet niet om na het averecht breien Garen B terug naar de achterkant van je werk te brengen.
Plaats elke 14 stn stekenmarkeerders om de herhalingen beter bij te kunnen houden.
Kabel Patroon
Volg de geschreven versie hieronder of volg Schema 1.
Toeren 2-6: *2rA, 1rB, p2B, 2rA, p2B, 2rA, p2B, 1rB; herh vanaf * tot einde toer
Toer 7 (Kabel toer): *2rA, 1rB, 1avB, 4/4 kabel: (zet volgende 4 stn op kn, houd vóór werk langs, (1avB, 2rA, 1avB) van breinaald, dan (1avB, 2rA, 1avB) van kn), 1avB, 1rA; herh vanaf * tot einde toer
Plaats een stekenmarker op de Kabel Toer, zodat je de volgende toeren goed kan tellen. Je kunt ook een toerenteller gebruiken.
Toer 8: Hetzelfde als Toer 2
Brei nog 1 volledige herhaling van Toeren 2-8, brei vervolgens Toeren 2-5 nogmaals. Ga verder met Kruin Minderingen.
Op deze foto kun je de kabeltoer stekenmarker in actie zien. Markeer een rechte steek om het tellen makkelijker te maken.
Kruin Minderingen
Zie hiervoor ook Schema 2.
Kruin Toer 1: *2rA, 2afh.sbrB, 1avB, 2rA, p2B, 2rA, 1avB, 2r.sbrB; herh vanaf * tot eind.
Kruin Toer 2: *2rA, 1rB, 4/4 Kabel, 1rB; herh vanaf * tot eind.
Kruin Toeren 3-6: *2rA, 1rB, 1avB, 2rA, p2B, 2rA, 1avB, 1rB; herh vanaf * tot eind.
Kruin Toer 7: *2afh.sbrA, 1rB, 1avB, 2rA, 2av.sbrB, 2rA, 1avB, 1rB; herh vanaf * tot eind.
Kruin Toer 8: *1rA, 1rB, 1avB, 1rA, 1r.afh, 2r.sbrA, afgeh. st overhalen, 1rA, 1avB, 1rB, herh vanaf * tot eind.
Kruin Toer 9: *1rA, 2afh.sbrB, 1r.afh, 2r.sbrA, afgeh. st overhalen, 2r.sbrB; herh vanaf * tot eind.
Kruin Toer 10: *1rA, 1rB, herh vanaf * tot einde toer.
Afwerking
Knip beide garens af en laat een lang draadeinde. Stop het Garen A draadje naar binnen en zet het Garen B draadje op een stopnaald. Ik raad aan om een vrij stompe naald te gebruiken. Als je rondbreinaalden gebruikt, zet dan alle stn op de kabel van de naald, dat maakt de volgende stap makkelijker.
Ga met de stopnaald door alle overige steken. Let erop dat je geen steken splijt. Haal de breinaald(en) uit de steken. Trek – niet hard! – aan het draadeinde zodat alle steken samentrekken. Ga dan nogmaals door de steken, op deze manier: sla 2 steken over, ga door 3 steken, en herhaal dat tot je weer rond bent. Trek weer strak aan, en ga dan nogmaals door de steken. Het wordt nu moeilijk om steken te tellen dus ga verspreid over de toer telkens door 2 steken, en trek weer aan. Steek dan de naald door het gat en haal het eindje naar binnen.
Werk alle eindjes weg aan de binnenkant. Bekijk hiervoor de video voor extra tips.
Om je muts extra mooi af te werken kun je hem wassen en het overtollige water eruitknijpen met een handdoek. Neem een ballon en blaas deze in de muts op. Niet te groot, want dan rekt de muts teveel uit. Laat hem zo drogen.
Klaar!
Bedankt voor het volgen van het Opalite Muts patroon. Deel je muts door een Ravelry pagina aan te maken, of deel foto’s op social media met de hashtag #OpaliteHat en #NewLeafDesigns.