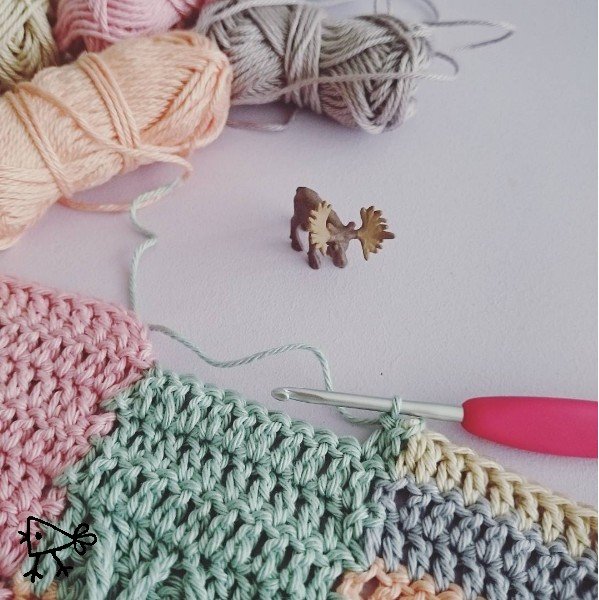
Welkom bij deel 4 van de Fleur-de-Lis Mystery CAL! We haken een tas met Scheepjes Catona 25g en 50g balletjes. Dit is mijn favoriete deel, we gaan namelijk de zijkanten maken! We maken deze op een zelfde manier als de onderkant, we haken namelijk weer direct de voor- en achterkant aan elkaar. Zo heb je aan het eind van dit deel echt al iets wat op een tas begint te lijken! Bereid je wel voor want dit deel is behoorlijk heftig. Bekijk eerst rustig de foto’s zodat je je al kunt voorstellen hoe het eruit moet komen te zien.
Welcome to part 4 of the Fleur-de-Lis Mystery CAL! We’re making a bag with 25g and 50g Scheepjes Catona balls. This is my favourite part, we’ll be crocheting the sides of the bag today! We’ll be making them in a similar fashion to the bottom of the bag, attaching them directly to the front and back sections. At the end of this part your project will already begin to look like a bag! Prepare yourself though, cause this part ain’t that easy. Take a look at the pictures first so you have an idea what it should look like.
Zie ook // See also:
Deel 1 // Part 1 + materialen lijst // + list of materials
Deel 2 // Part 2
Deel 3 // Part 3
Patroon deel 4 – Zijkanten
De zijkanten maak je op dezelfde wijze als de onderkant van de tas. Leg de tas voor je met de achterkant links, onderkant naar je toe en de voorkant rechts.
Pattern part 4 – Sides // US Terminology
The sides are made in the same way as the bottom section of the bag. Place the bag in front of you, with the bottom side facing you (right side up), back to the left and front to the right.
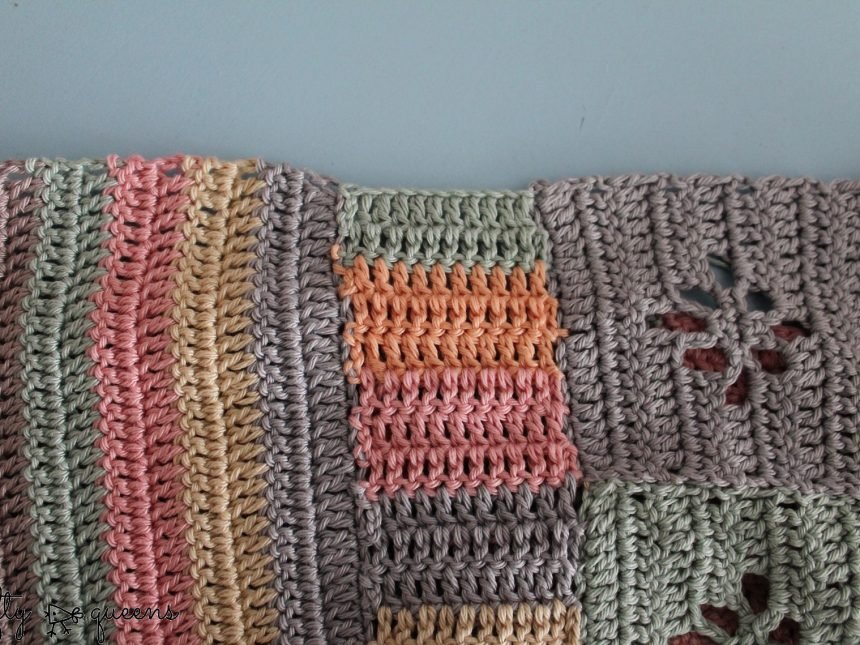
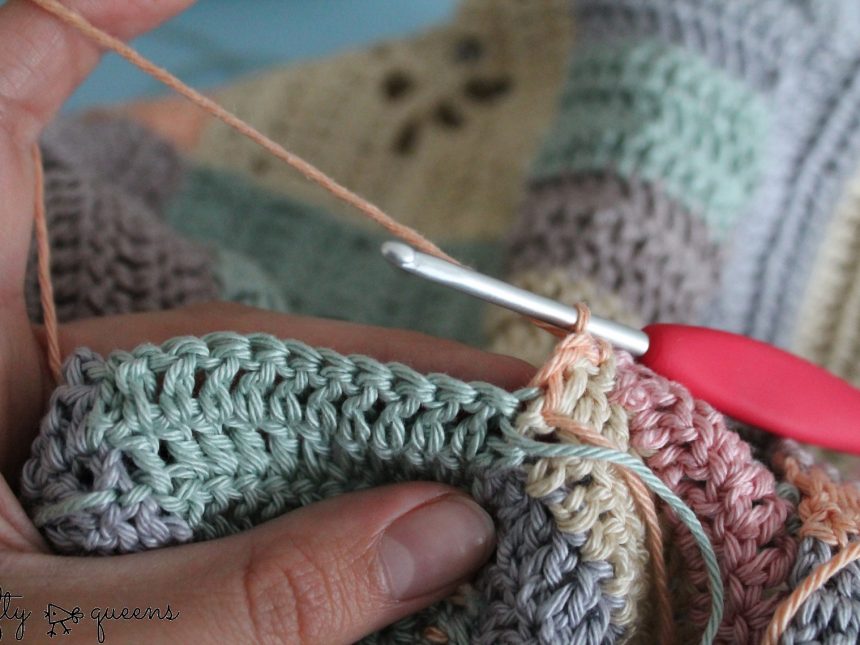
Begin met kleur 402 ‘Silver Green’ van Scheepjes Catona. Bekijk de bovenstaande foto. Zie je de onderkant van de tas in het midden van de foto, en zie je die ketting lossen aan de bovenkant daarvan? In die steken gaan we de eerste rij stokjes haken. In plaats van daar aan te hechten en keerlossen te haken, hecht je de draad aan op de voorkant, en wel aan het begin van de tweede rij, dus ter hoogte van 1 rij stokjes.
Start with colour 402 ‘Silver Green’ of the Scheepjes Catona yarn. Look at the picture above, see the bottom section in the middle of the photo? See that line of chain stitches at the top? Those are the stitches we are crocheting into for the sides. Instead of attaching your yarn to the base of those chain stitches, attach it to the front section, at the start of the second row of double crochets.
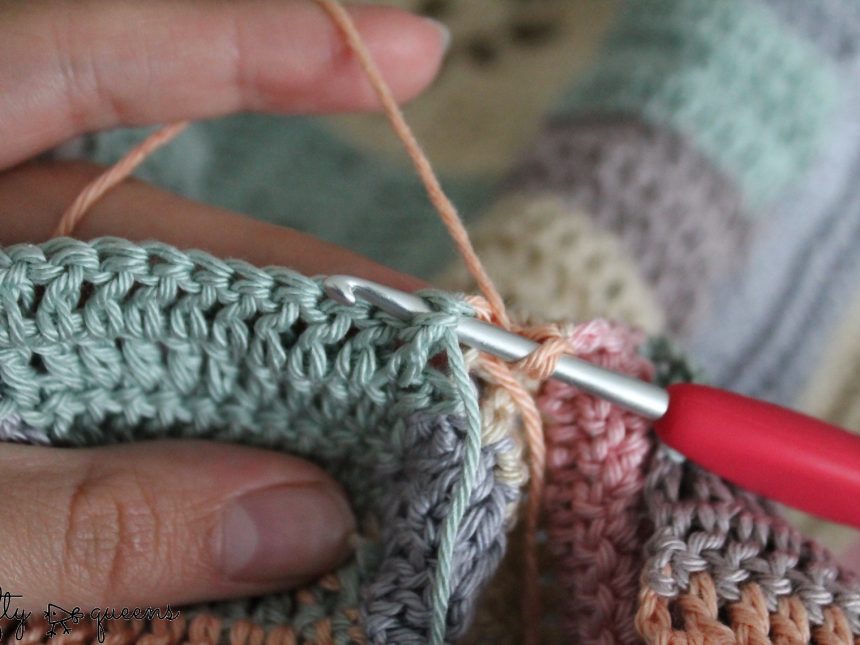
Haak 10 stokjes in de lossen. Eén stokje per losse dus. Als je aan de andere kant bent, haak je met een halve vaste in de achterkant vast, wederom ter hoogte van het begin van rij 2.
Crochet 10 double crochets, that’s one dc per chain stitch. When you reach the other side, slip stitch into the back at the start of row 2.
Haak 2 lossen, sla op de achterkant verticaal gezien 1 stokje over en haak weer een halve vaste in de opening daarna. Dit is precies zoals we de onderkant hebben gehaakt. Keer om, en haak weer 10 stokjes op de stokjes eronder. Halve vaste in de voorkant wanneer je daar aankomt, 2l, sla 1 stokje over verticaal gezien, en weer een hv.
Chain 2 stitches, skip 1 dc on the backside and slip stitch again in the space above that. This is exactly the same way as we crocheted the bottom section. Turn your work and crochet 10 dc again. Slip stitch to the front as you get there, ch2, skip 1 stitch vertically, sl st again.
Keer om en haak weer 10 stokjes, dit is inmiddels je derde rij. Als je bij de achterkant bent aangekomen, neem je kleur 414 ‘Vintage Peach’ en maak je daarmee de halve vaste. Hecht het andere garen NIET af.
Turn your work, 10 dc again, this is your third row so far. When you reach the backside, take colour 414 ‘Vintage Peach’ and make the slip stitch in that colour. DO NOT cut the other yarn.
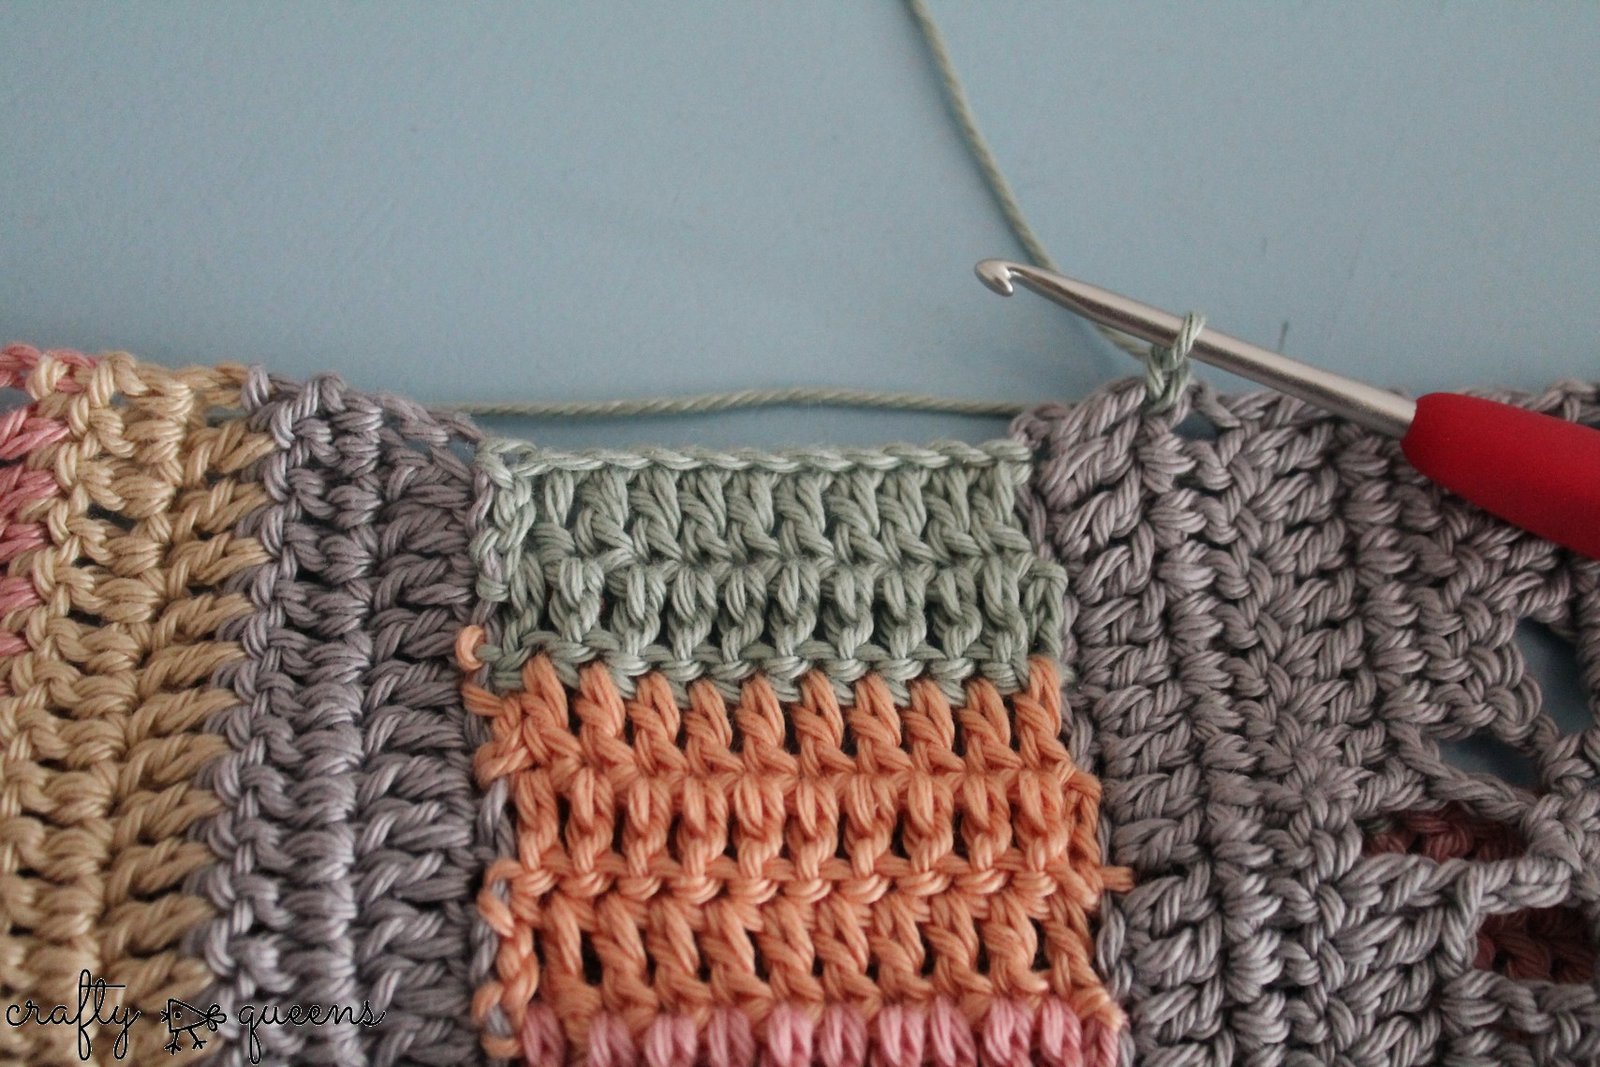
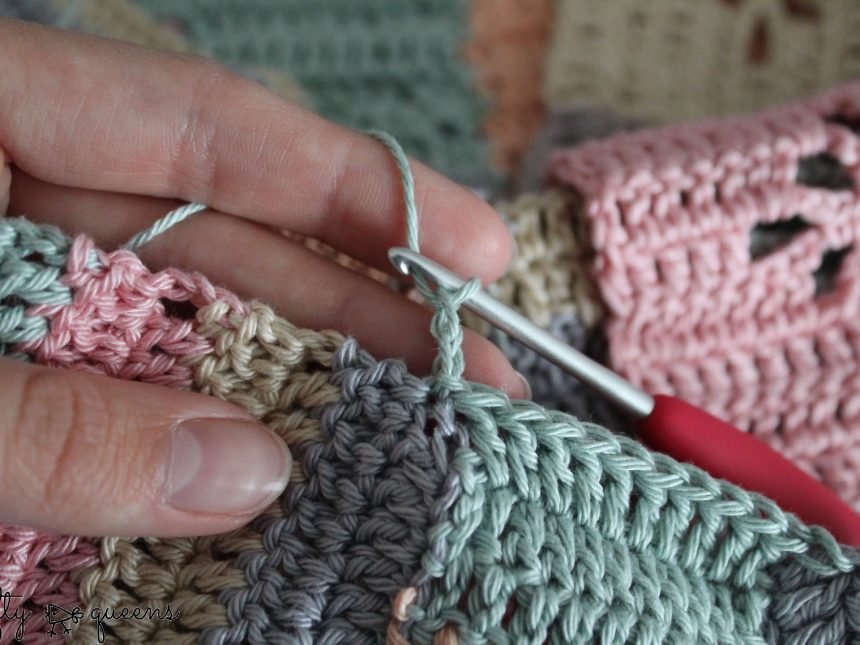
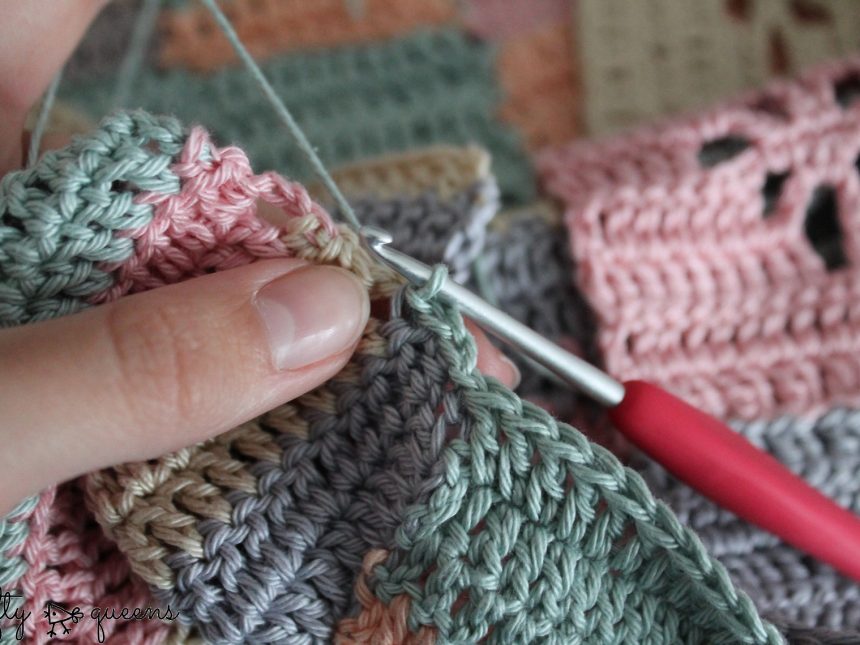
Haak 2 lossen, sla 1 stokje over, 1 hv in de steek daarboven, en draai je werk. In deze rij gaan we reliëfstokjes haken. Dit geeft een leuke textuur aan je werk. Zoals op foto 2 hierboven, sla de draad om en ga achter het eerste stokje langs. Maak daarna zoals gewoonlijk je stokje af (foto 3). Je zult zien dat je stokje wat gedraaid is, en het ‘v-tje’ van de vorige toer zal gekanteld liggen. Haak zo de hele rij af.
Chain 2, skip 1 stitch, sl st in the space above, and turn your work. In the next row we’ll be making front post double crochets, which will give a nice and interesting texture to your work. Like photo 2 above, yarnover and insert the hook around the back of the first dc. Complete your dc as you normally would. You see the dc is twisted to the side, and the little ‘v’ laying on top of the row below is shifted to the side as well. Do one back post double crochet for every next stitch this row.
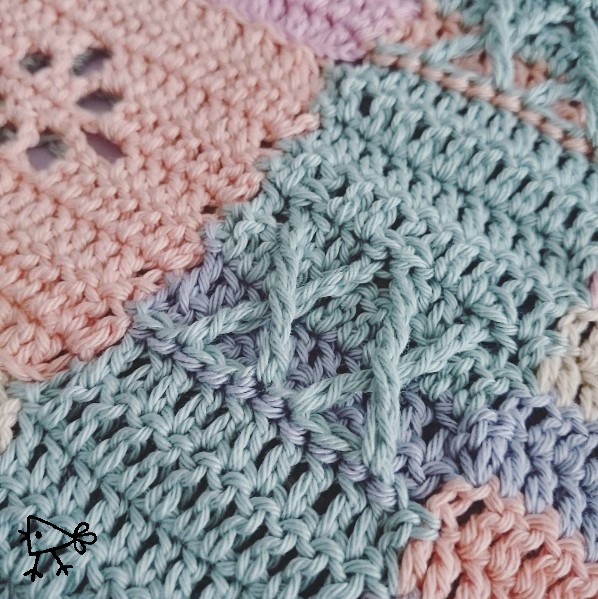
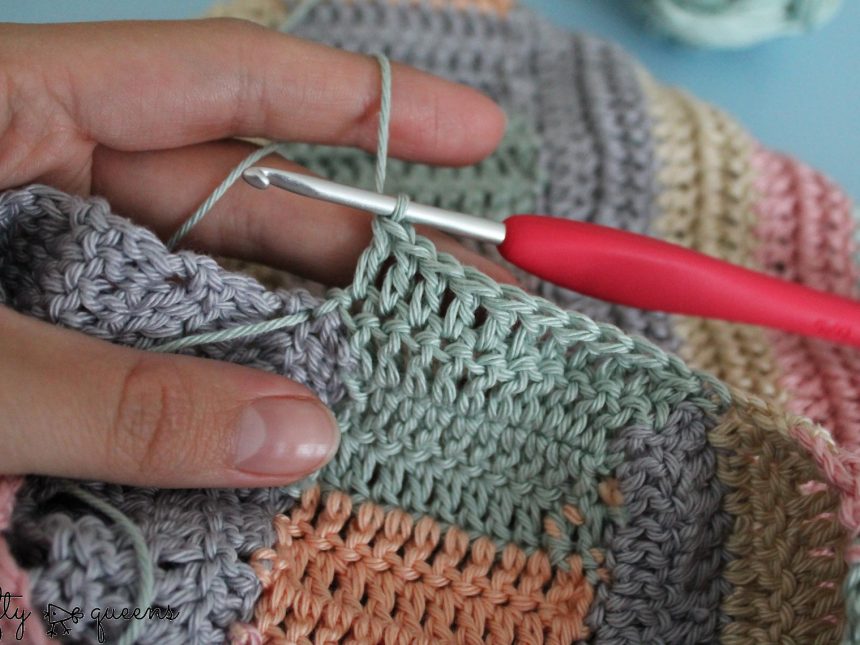
Zo ziet je werk eruit als je het daarna weer omkeert. Zie je die rij lichtgroene v-tjes? Dat is het effect van de rij reliëfstokjes.
This is what your work will look like after you turn it again. See the line of light green v’s? That’s the effect of the back post double crochets.
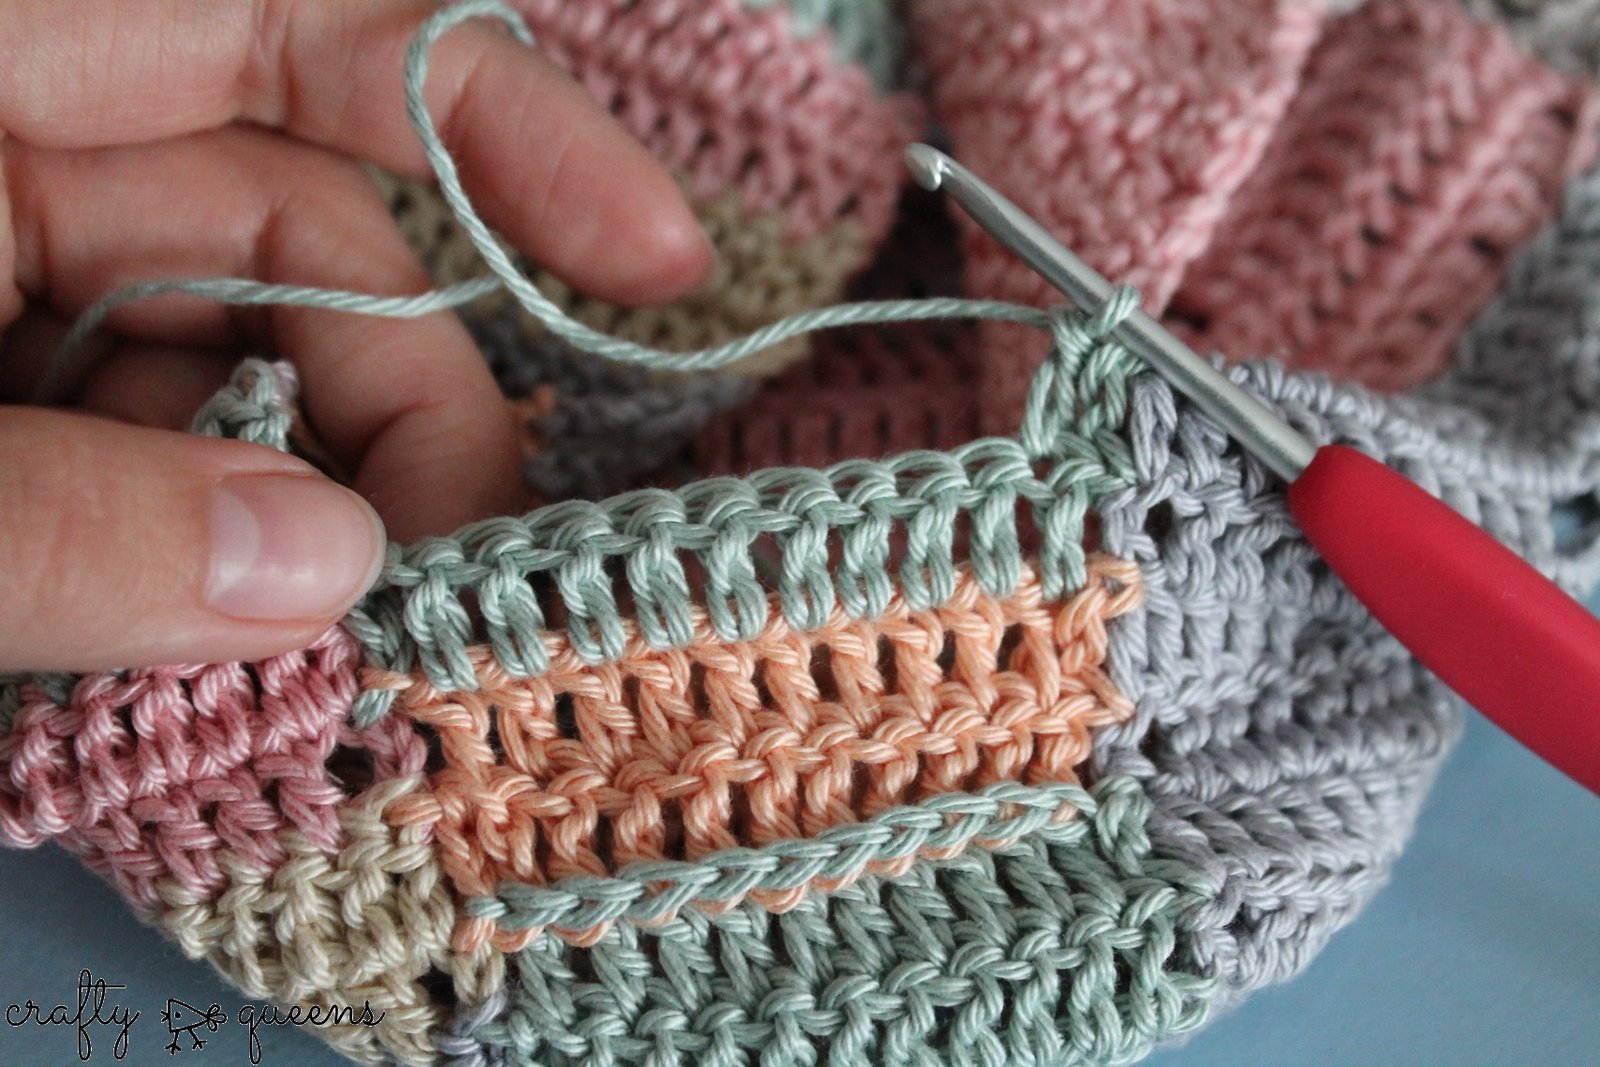
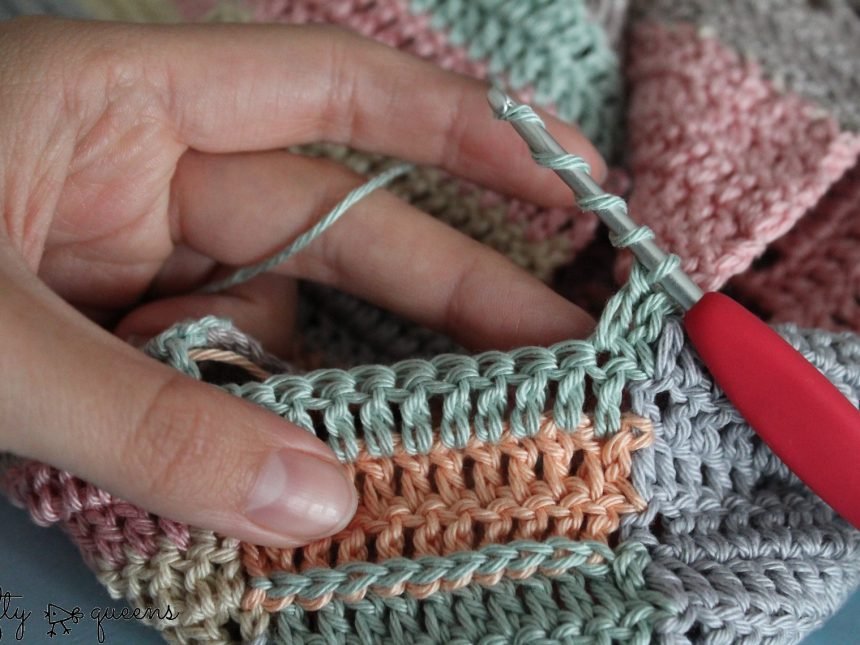
Haak nog 1 rij met oranje, alleen dan normale stokjes. Je bent dan weer aangekomen bij de kant waar je groene draad nog hangt. Pak die draad weer op – je kunt nu het oranje garen afkanten – en haak daar 1 rij stokjes mee. Haak al 1 stokje van de volgende rij.
Crochet 1 more row with orange, plain dc this time. Now, you’re back on the side where you left the green yarn. Use the green yarn to crochet another row, you can cut the orange yarn now. Crochet 1 dc of the following row.
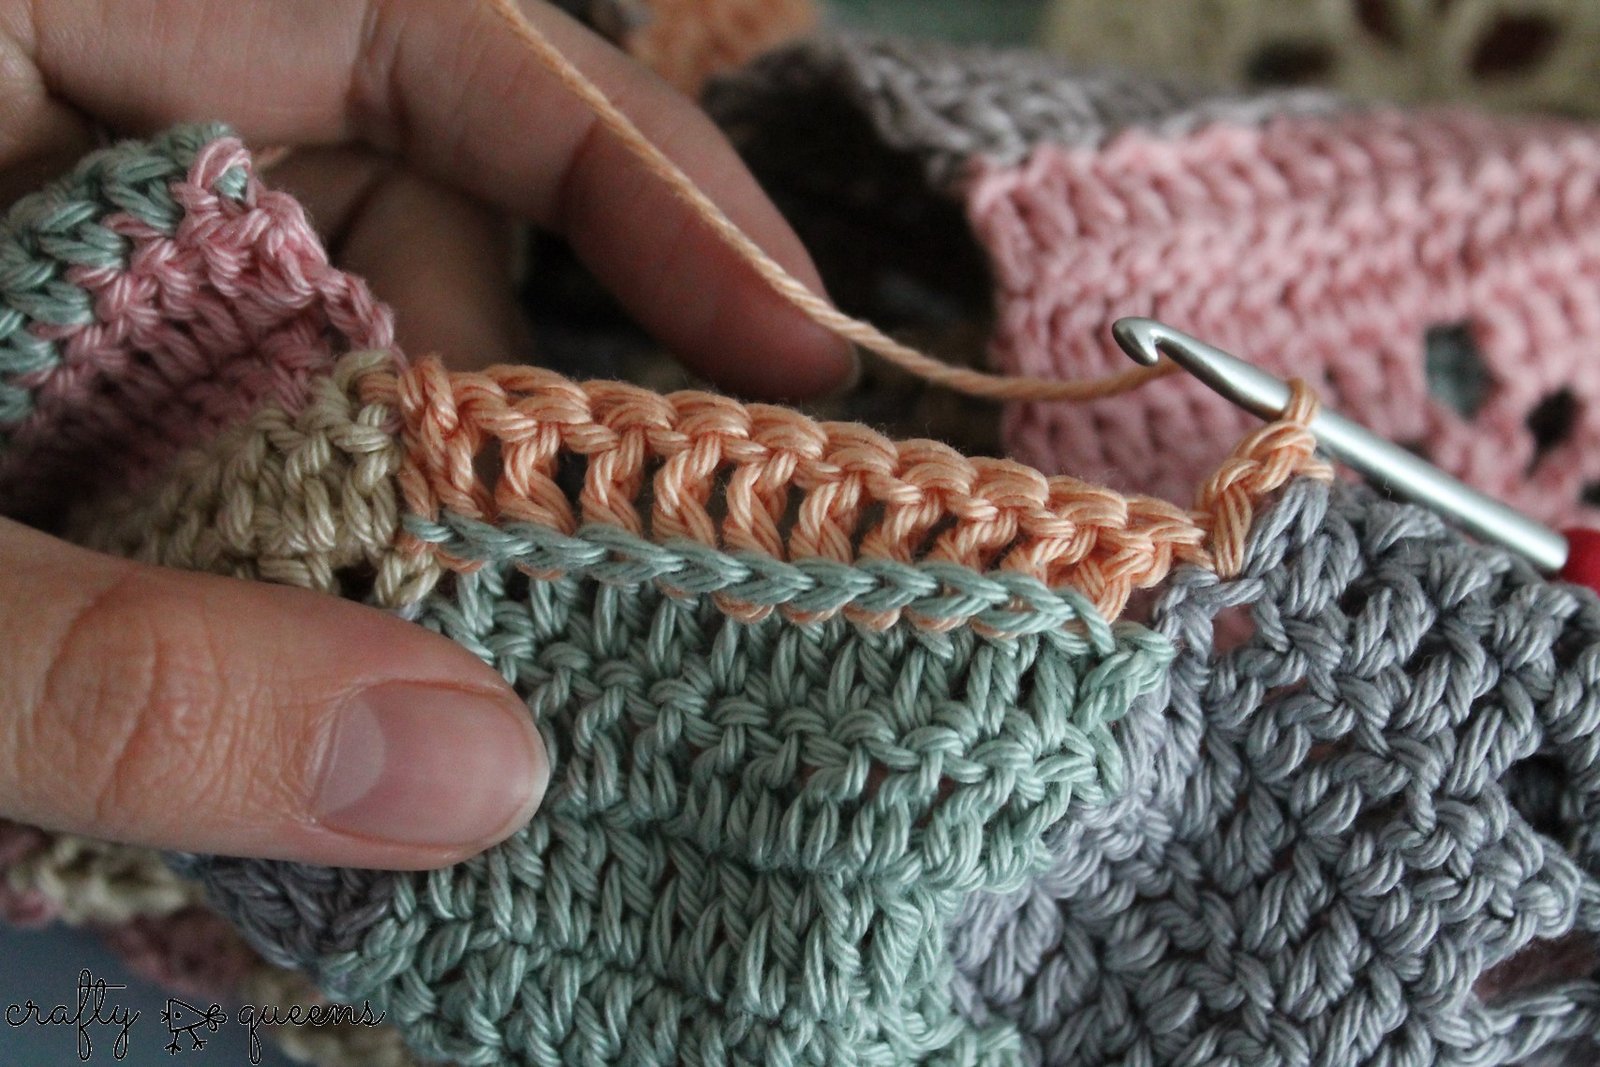
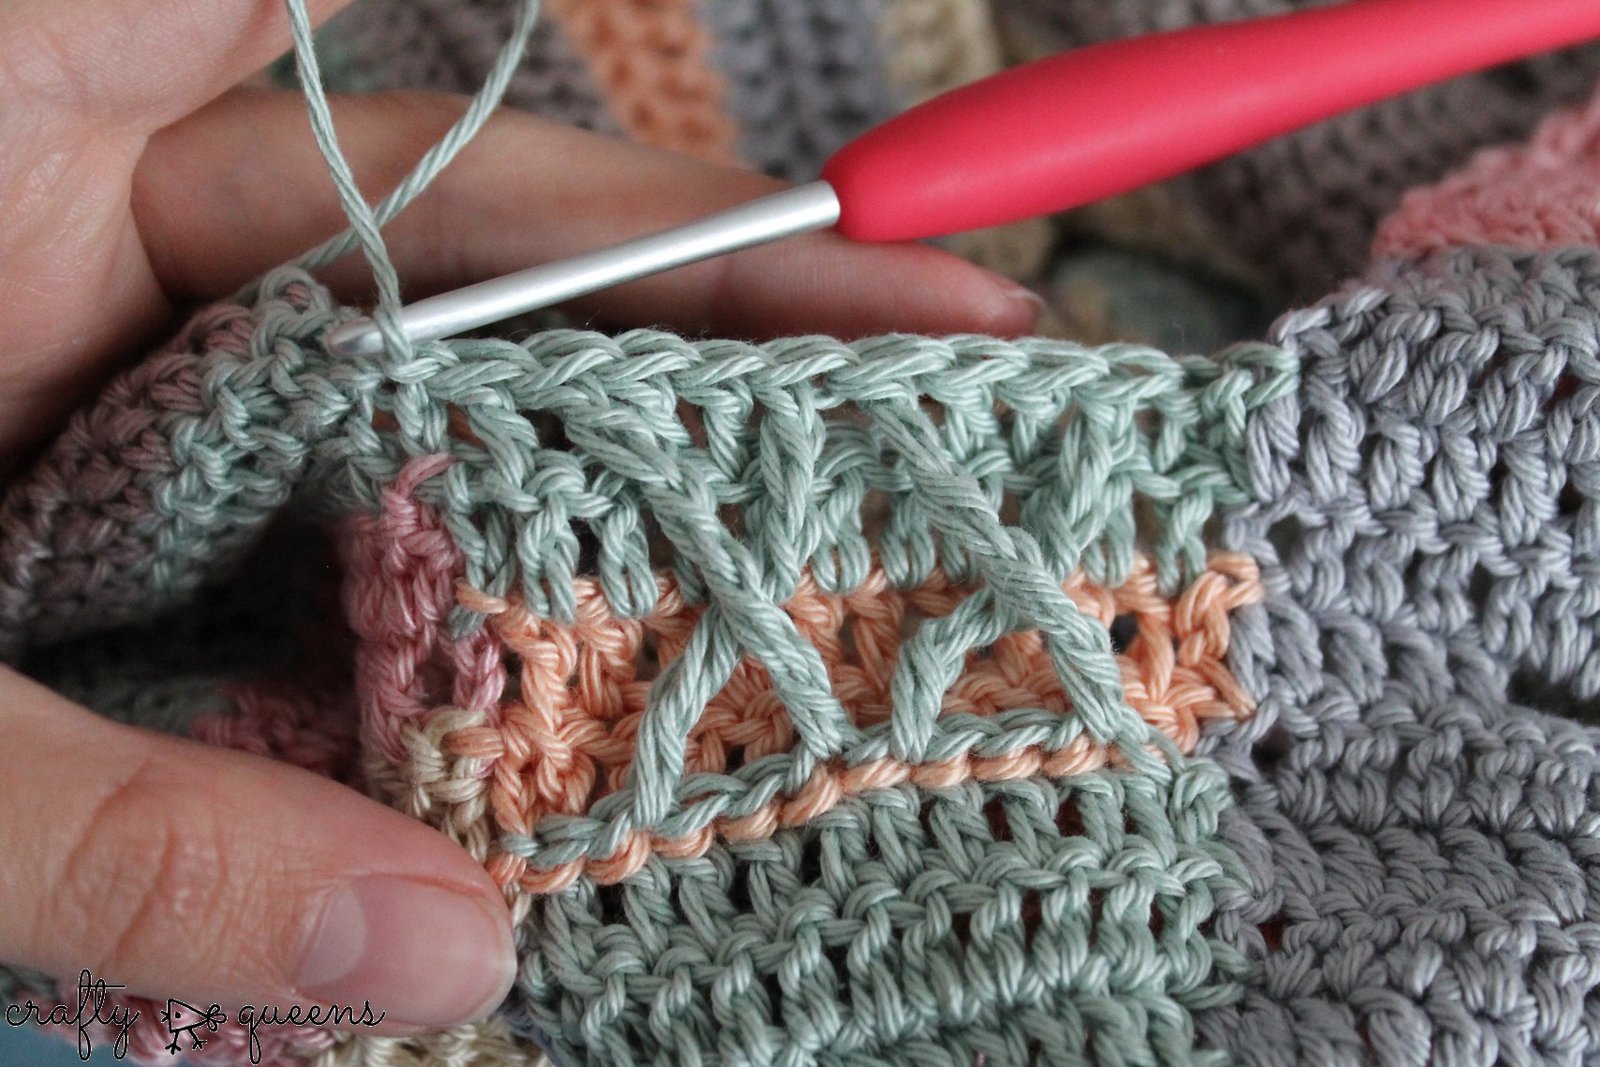
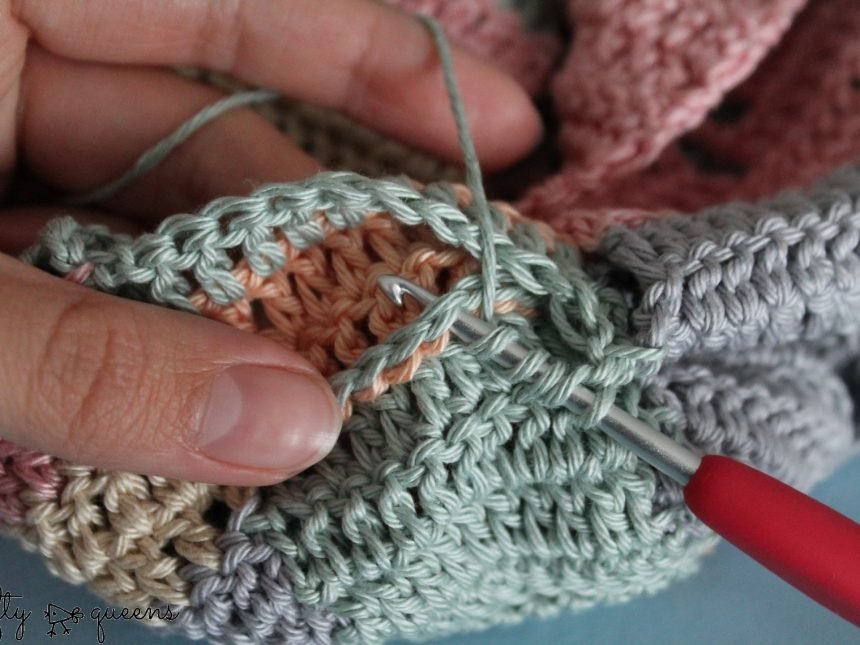
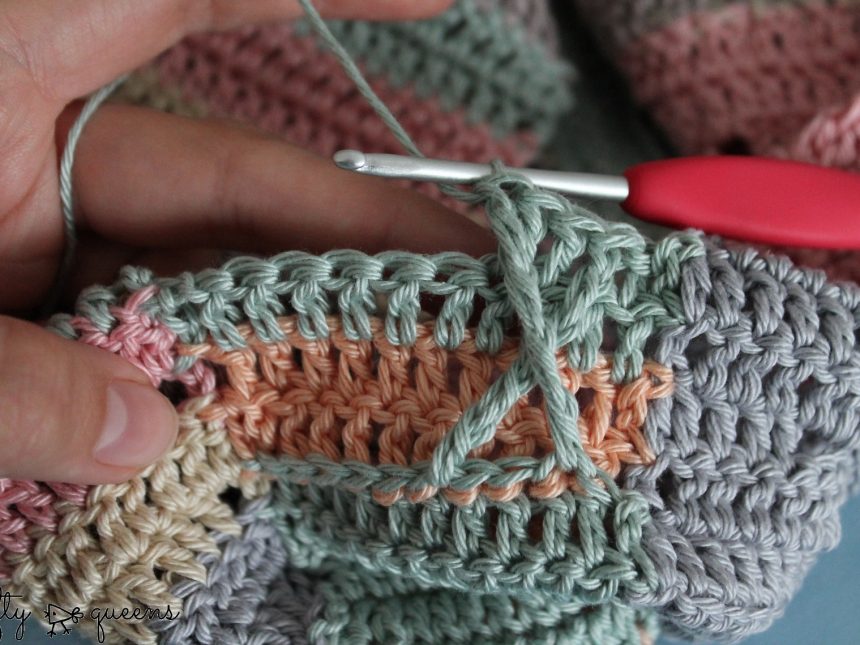
Nu gaan we een hele speciale steek doen, spannend! Sla de draad 4 (ja, 4!) keer om je haaknaald, we gaan nu een vierdubbel stokje haken. Je gaat de naald insteken in de rij van de groene v-tjes, en wel in het 5e v-tje van die rij. Haak je vierdubbel stokje af, dat wil zeggen: steeds 1 omslag, en dan door 2 lussen halen. Dat herhaal je tot je door alle lussen bent gegaan.
Now we’re going to do a very special stitch, yay! Put the yarn around your hook 4 (yes, 4!) times, we’re making a triple treble (trtr). You’ll be inserting the hook in one of the green v’s 3 rows down. Insert your hook in the 5th ‘v’, then complete your trtr: yarnover once, pull through 2 loops. Repeat this until you have just one loop left on your hook.
Haak 2 stokjes. Dan weer een vierdubbel stokje, maar nu in het 2e v-tje van diezelfde rij.
Crochet 2 dc. Then another triple treble, but this time in the 2nd ‘v’ of the same row.
Herhaal het proces nog 1 keer zodat je aan het eind van de rij 2 kruisjes hebt. Haak nog 1 rij stokjes op deze rij.
Repeat the process again so you have 2 crosses when you reach the end of the row. Crochet one more row of plain dc.
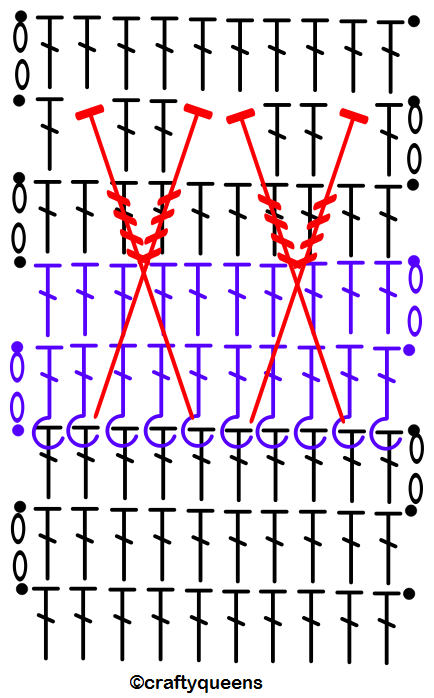
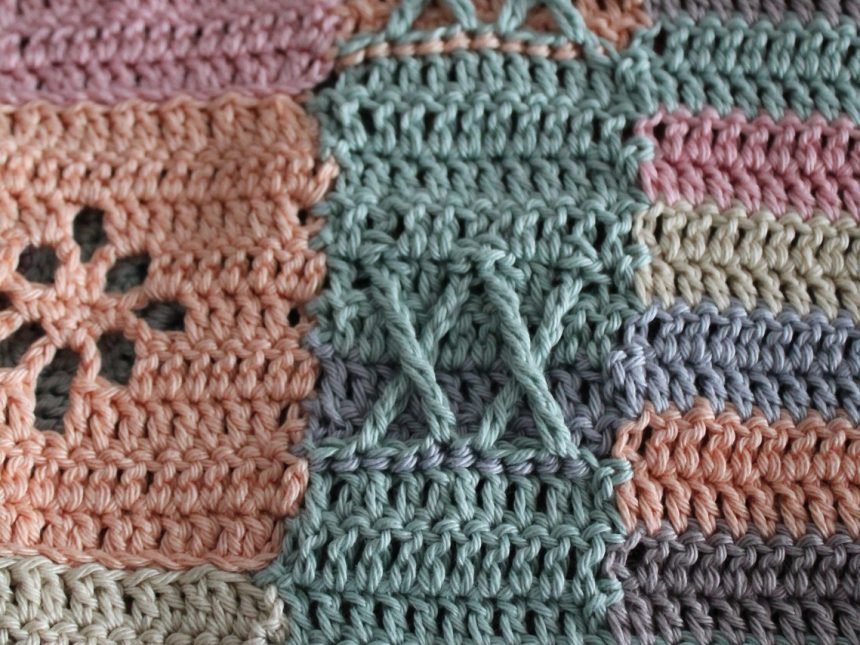
Hierboven zie je een haakschema van wat we net gehaakt hebben. Drie rijen normale stokjes in groen, 1 rij reliëfstokjes in oranje, nog een rij stokjes in oranje (aangegeven met blauw voor de contrastkleur), een rij stokjes met groen, een rij met vierdubbele stokjes (aangegeven in rood), en nog een laatste rij gewone stokjes. Dit alles is 1 patroonherhaling. Voor één zijkant herhaal je dit patroon nog 2 keer, plus nog 3 rijen stokjes extra om de hoogte gelijk te krijgen als de andere zijdes van je tas.
This is a crochet chart of the section we have just done. Three rows plain dc in green, 1 row of back post double crochet in orange, one row of dc in orange (contrast colour is indicated as blue), one row dc in green, one row with triple trebles (indicated with red), and another row dc. All of this is one pattern repeat. To complete one side, repeat the pattern twice more for 3 repeats in total, and add another 3 rows of dc in green.
Kleurenvolgorde: Per patroonherhaling haak je 2 toeren in een contrastkleur. Voor de allereerste herhaling was dit kleur 414. Voor de resterende 2 herhalingen van die zijde gebruikte ik nog 406 en 404. Voor de drie patroonherhalingen op de andere zijde gebruikte ik als contrastkleuren 074, 408 en 414.
Colours: Per pattern repeat I have chosen one contrasting colour. For the very first one, this was colour 414. The remaining 2 repeats of that side are made with 406 and 404 as contrasting colours. For the other side, use 074, 408 and 414 as contrasting colours.
Zo ziet een zijkant van de tas eruit als je hem af hebt. Klik op de foto’s om die te vergroten.
This is how the side of the bag will look once you finish it. Click the pictures to enlarge.
Pfiew, dat was deel 4! Behoorlijk beladen met foto’s maar ik wilde er zeker van zijn dat het patroon duidelijk is. Ik hoop dat het lukt, vooral met toevoeging van het haakschema. Ik ben heel benieuwd wat jullie ervan vinden! Als je het leuk vindt kun je foto’s delen op social media met de tag #fleurdeliscal en #scheepjescatona. Deel 5 is alweer in aantocht, houd mijn blog in de gaten als je hem niet wilt missen! Of schrijf je in bij mijn Bloglovin’, dan krijg je een mailtje als ik een nieuwe blog plaats. Haak ze!
Phew, that was part 4! Many many pictures, I know, but I wanted to make sure I explained the pattern correctly and clearly. I hope the crochet chart has some added value as well. I’m so excited to hear what you guys think! If you like, you can share your pictures on social media with the tags #fleurdeliscal and #scheepjescatona. Part 5 will be on the blog soon, keep an eye on my website if you don’t want to miss it. Or simply subscribe to my Bloglovin’, so you’ll get an email when it’s done. Happy hooking!


No Comment
graag wil ik op de hoogte gehouden worden van de fleur de lis mystery cal en de scheepjes cal. heb geprobeerd via je bloglovin, maar dit lukte niet. hoop dat ik u hiermee kan aangeven dat ik op de hoogte gehouden wil worden. doe hier aan beide namelijk mee en wil dit uiteindelijk tot het einde volhouden en afwerken. zou het jammer vinden als ik het niet zou kunnen afmaken
Hoi Gwenda, jammer dat het niet lukte via Bloglovin. Ik zal je een kort berichtje sturen als er een nieuw deel online staat, dan kun je het toch volgen. Groetjes!