


*This pattern is available in both Dutch and English (US terminology). The English instructions are marked light grey. Turn off your translator to avoid confusion.*
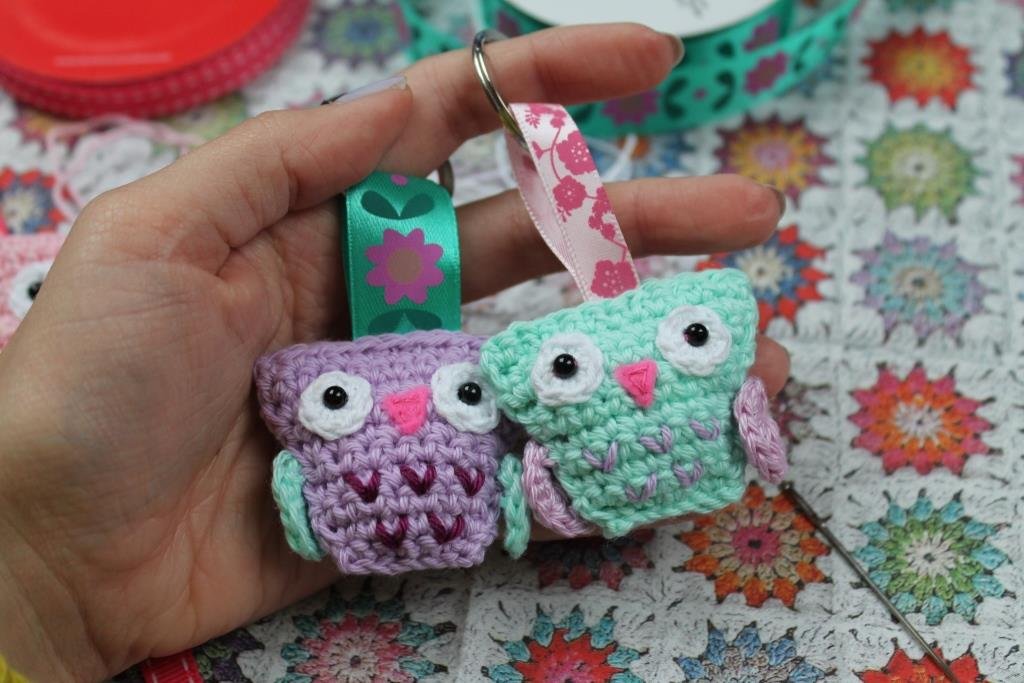
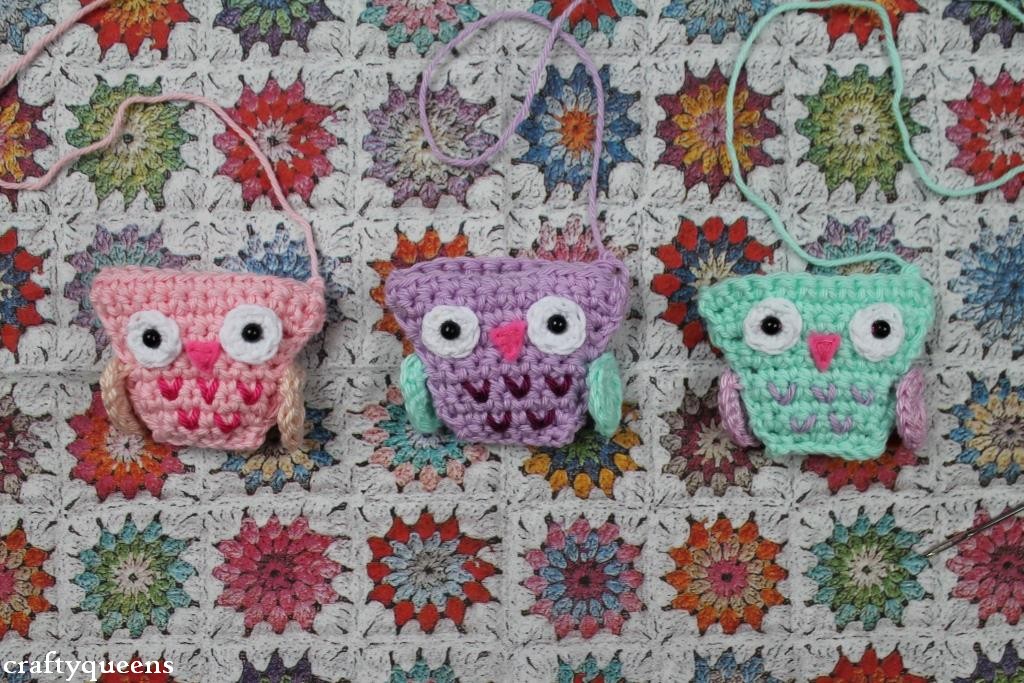
Jippie, het patroon voor de kleine uiltjes is er! Mijn moeder en ik zijn al een tijdje helemaal weg van uiltjes (en ja, wie niet?), en zelfs nu de hype een beetje aan het wegzakken is gaan we nog fanatiek door met het haken van onze kleine kwetterende vriendjes. Vandaag deel ik het patroon van de kleinste variant met jullie! Leuk voor aan een sleutelhanger, of aan een lint aan de kastdeur!
Hooray, the pattern for the tiny owl is here! My mom and I have been completely smitten with owls for a while now (and let’s be serious, who hasn’t?), and even though the peak of this trend has passed, we still keep on crafting our little feathered friends. Today I’m sharing the pattern for our tiniest specimen, perfect to attach to your keychain or to decorate closet doors with.
Voor het uiltje haak je een voor- en achterkant van het lijfje, twee vleugeltjes en twee oogjes. Ik gebruik per uiltje drie kleuren katoen. Verder heb je nog een klein stukje vilt nodig voor het snaveltje, twee kraaltjes en optioneel iets om het uiltje aan vast te maken: een lint met eventueel een sleutelring, of misschien een mobielhanger. Ik gebruikte een 2,25 mm haaknaald (maar 2,5mm is ook prima) en katoen van Scheepjeswol. Cotton 8 in lieve pastelkleurtjes, en Scheepjes Maxi in wit voor de oogjes.
For the owl you’ll be making a front and backside, two wings and a set of eyes. I used three colours per owl, but of course that’s up to you. Apart from yarn, you’ll need some felt, two beads and optionally a ribbon or mobile phone lariat: depends if you want to make a hanging ornament or not. I also used keyrings to attach to the ribbons. The hook I used is 2,25mm (a hook B in US terms I think), and Scheepjeswol brand cotton yarn. Cotton 8 for the body and wings, and Scheepjes Maxi in white for the eyes.
Gebruikte afkortingen:
v – vaste
hst – half stokje
st – stokje
Used abbreviations (US)
sc – single crochet
hdc – half double crochet
dc – double crochet

Haak 7 lossen
1. 6v
2. 2v in dezelfde steek, 4v, 2v in dezelfde steek
3. 8v
4. 8v
5. 8v
6. 2v in dezelfde steek, 6v, 2v in dezelfde steek
7. 10v
8. 2v in dezelfde steek, 8v, 2v in dezelfde steek
9. 12 v
10. 12v
Laat het draadeinde fijn lang om de twee lijfjes aan elkaar te naaien (maar doe dat nu nog niet!)
Body (make 2)
Chain 7, turn
1. 6sc
2. 2sc in the same stitch, 4sc, 2sc in the same stitch
3. 8sc
4. 8sc
5. 8sc
6. 2sc in one stitch, 6sc, 2sc in the same stitch
7. 10 sc
8. 2sc in the same stitch, 8sc, 2sc in the same stitch
9. 12 sc
10. 12sc
Leave a long tail for sewing it together later on.

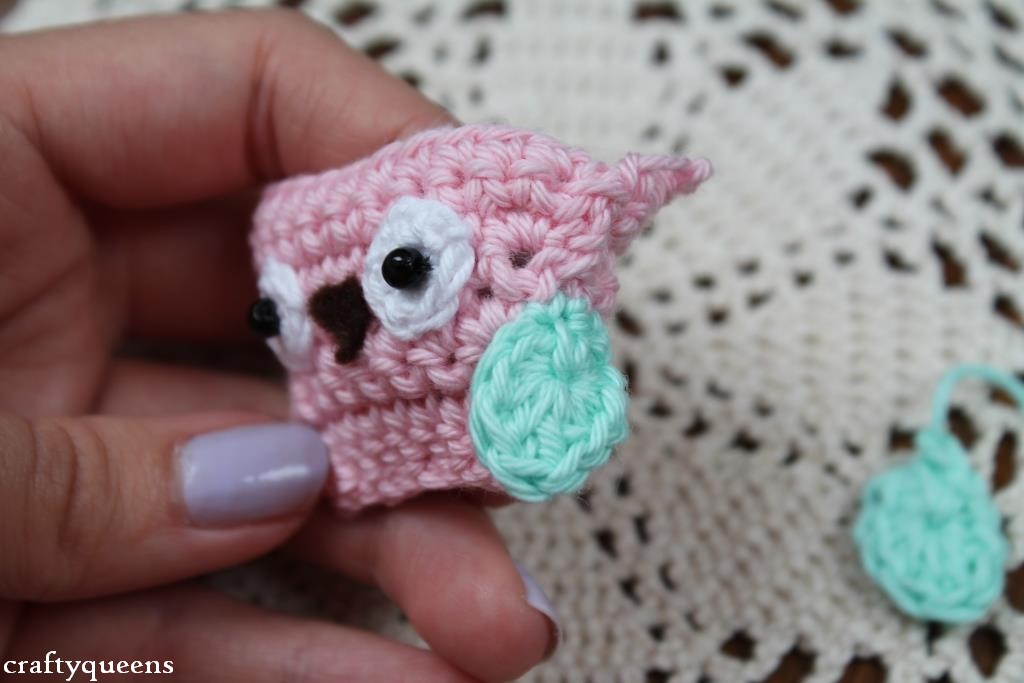
Oogje (2x)
In een magische ring haak je 7 vasten. Trek de ring daarna niet helemaal dicht zodat je een ‘kommetje’ overlaat voor het kraaltje, dan puilen de oogjes niet zo uit. Sluit de ring met een halve vaste.
Now the eyes! I always make a bunch of these in one go, I like having them ready when I need them. Plus it’s faster when you’re making several owls! I used some thinner cotton for this, the brand name is Durable cotton.
Eyes (make 2)
Crochet 7sc in a magic ring. Don’t pull the ring too tightly, leave a gap to embed the beads in later on. Close the magic ring with a slip stitch.
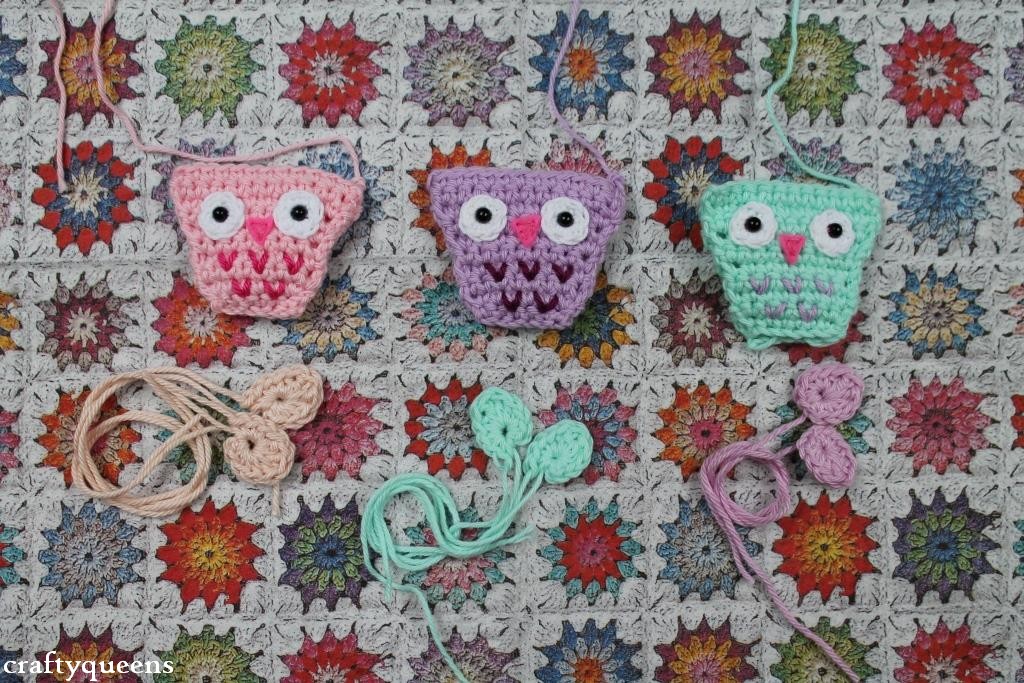
Vleugeltje (2x)
Alle steken doe je in een magische ring: 3v, 1hst, 2st, 1hst, 4v. Trek deze ring wel helemaal strak aan. Je hebt nu een soort ovaaltje.
Wings (make 2)
Crochet all of this in a magic ring: 3sc, 1hdc, 2dc, 1hdc, 4sc. Pull tight, leave no gap in this one. You’ll have a tiny oval shape now, perfect for a wing!
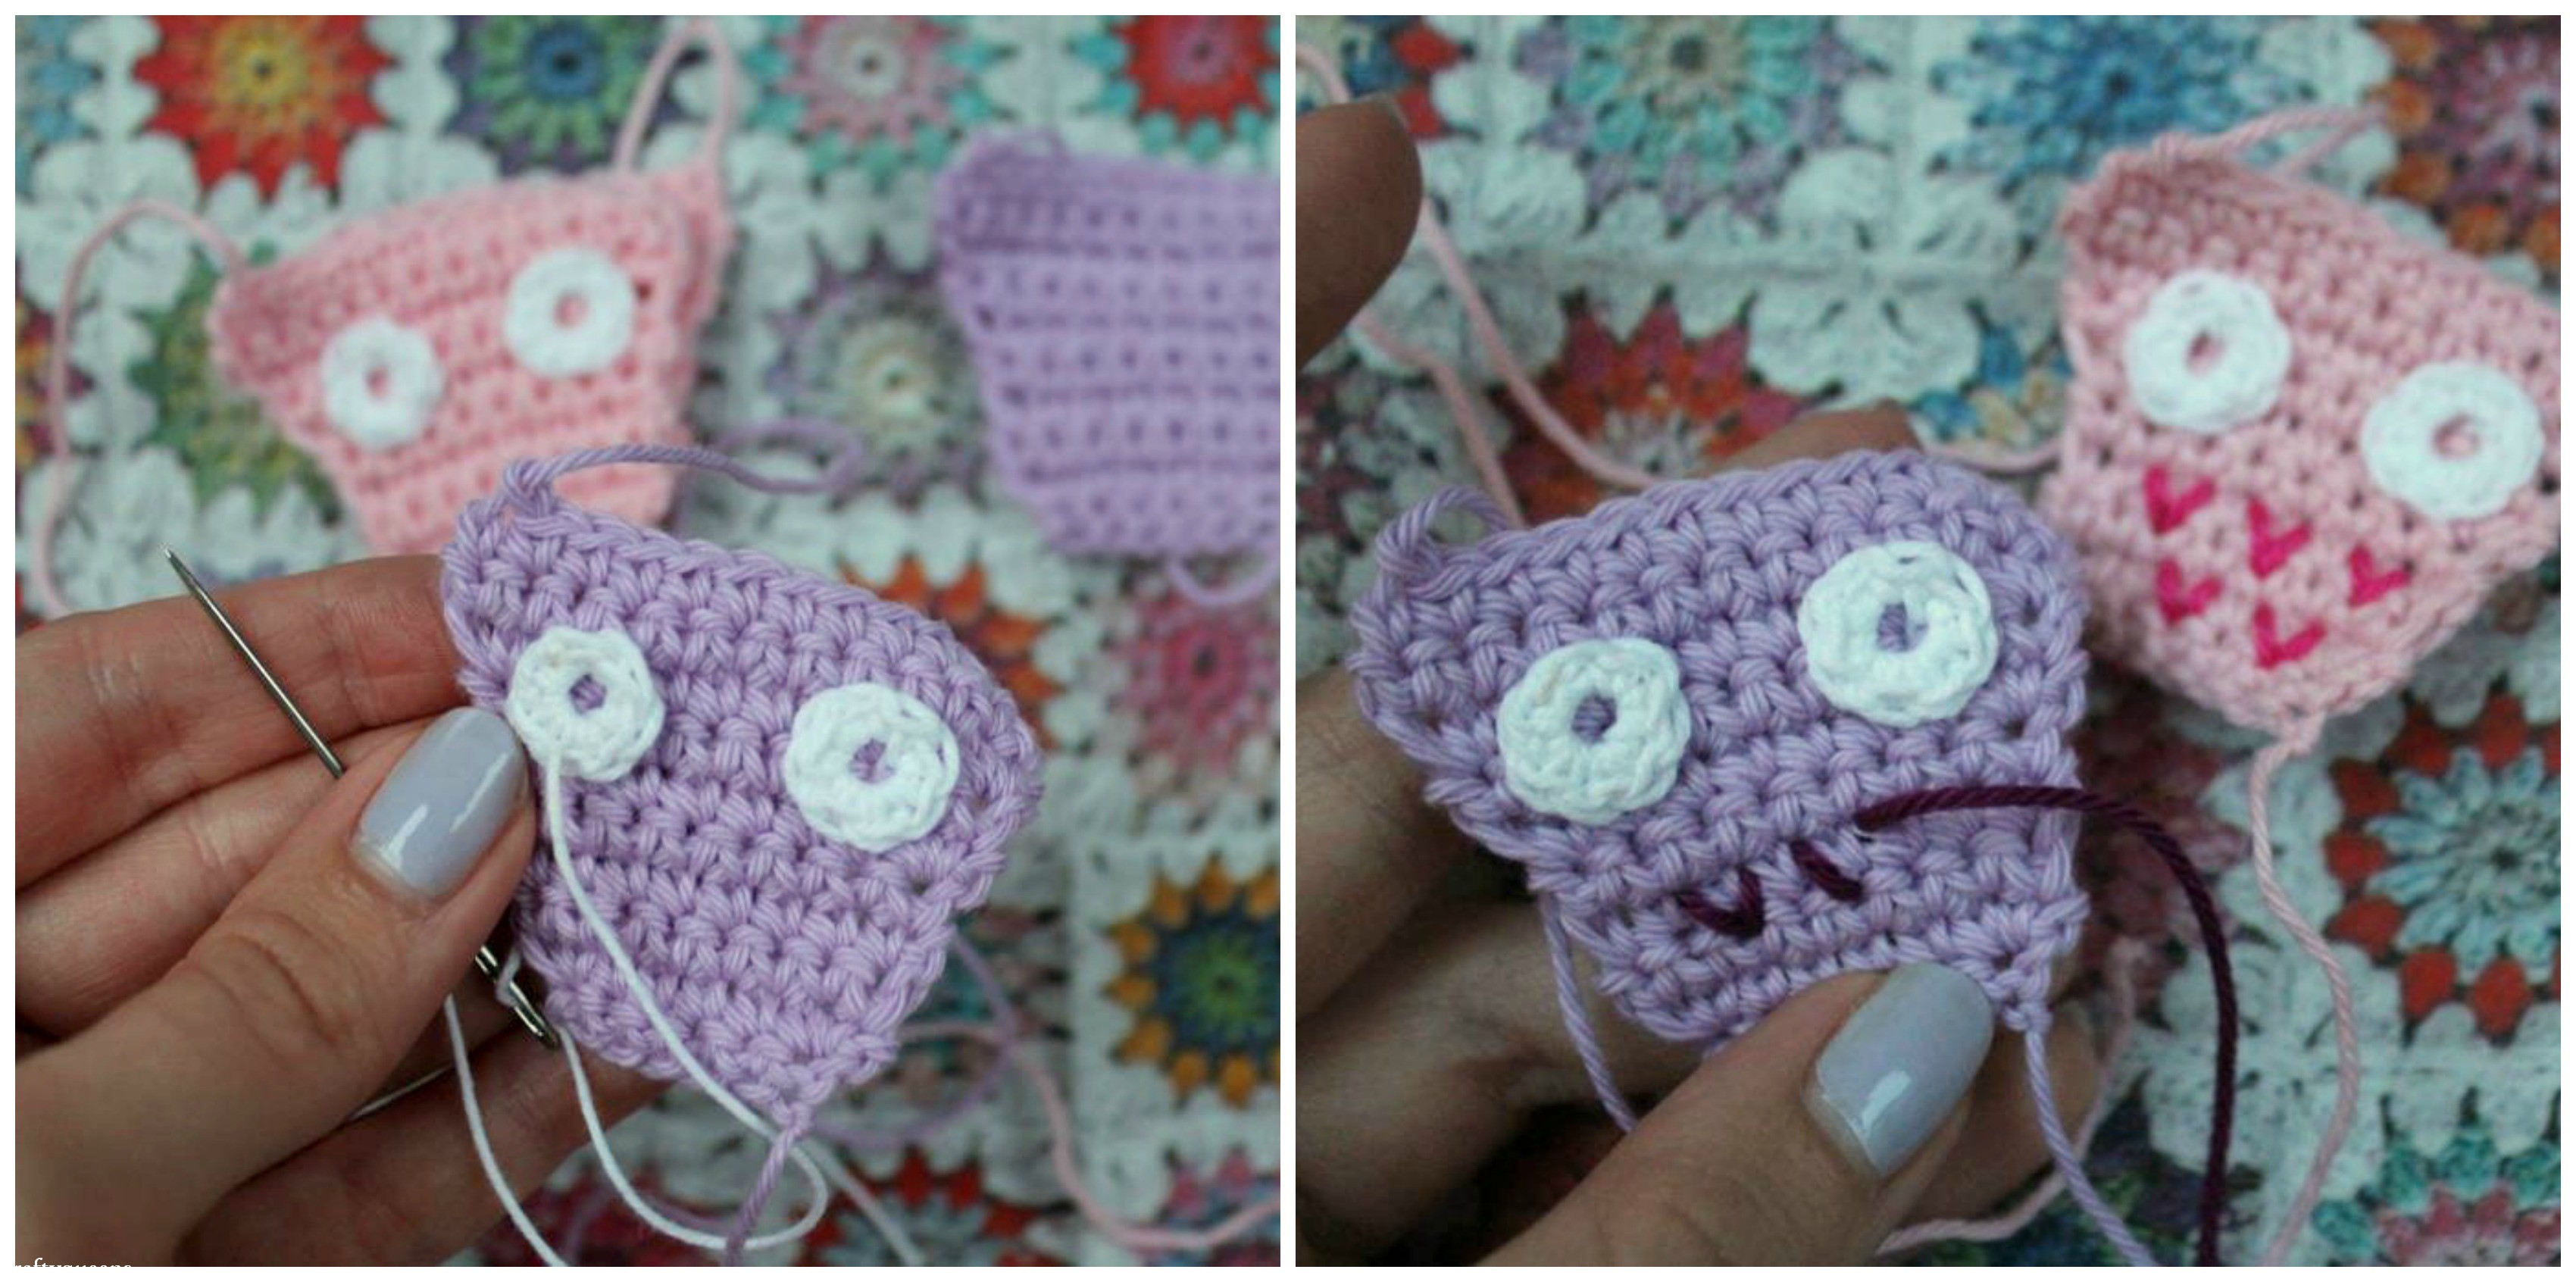
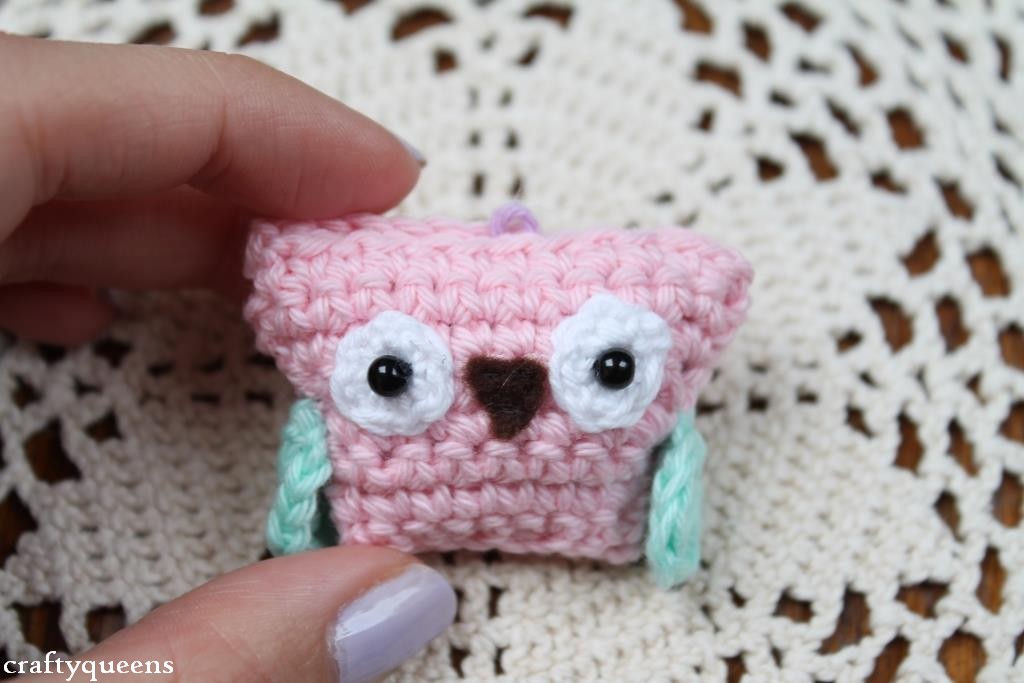
All of the crocheting is done already, wasn’t that fast? Time for the assembly. First sew on the eyes. They look a bit creepy at this stage, but I promise you it will look adorable in a minute. Next, take a contrasting colour yarn and embroider 5 little v’s on its belly. This is optional of course, but I think it’s so cute, they look like little feathers! If you don’t like to embroider, maybe consider to use different colours when crocheting the body, to give it some stripes.

This step is my fave: sewing on the black beads! Instant cuteness..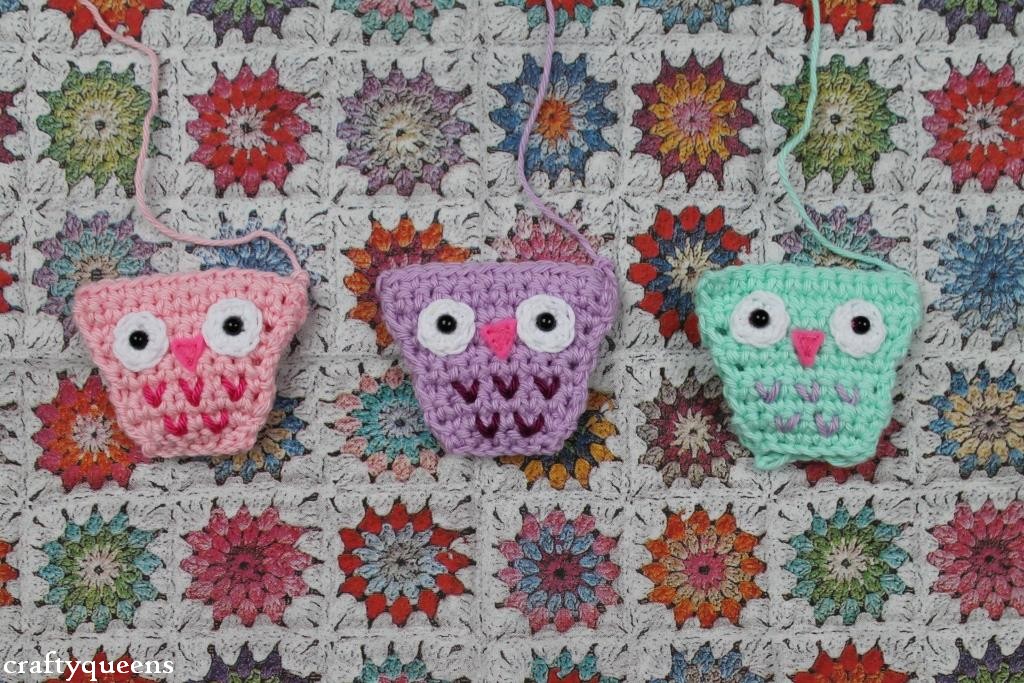

Pick a nice colour felt and cut a tiny triangle. Sew it on, using a similar colour thread. If your felt is really soft and frays easily, coat the edges with some clear nail polish.
Now you’re done decorating, you can sew the sides of the body. Leave the top edge open.
Attach the little wings.. I like to only sew the top part on, so they can still flap their wings a bit.


Now there are several options. If you want to attach a mobile phone lariat, first make a small loop like shown above. Knot the ends tightly so the loop won’t stretch afterwards.


Stuff it, sew it up and you’re done! Attach the lariat and your owl is ready to decorate your phone or purse. Supercute!


If you want to attach a ribbon instead, first choose a ribbon that matches your owl. 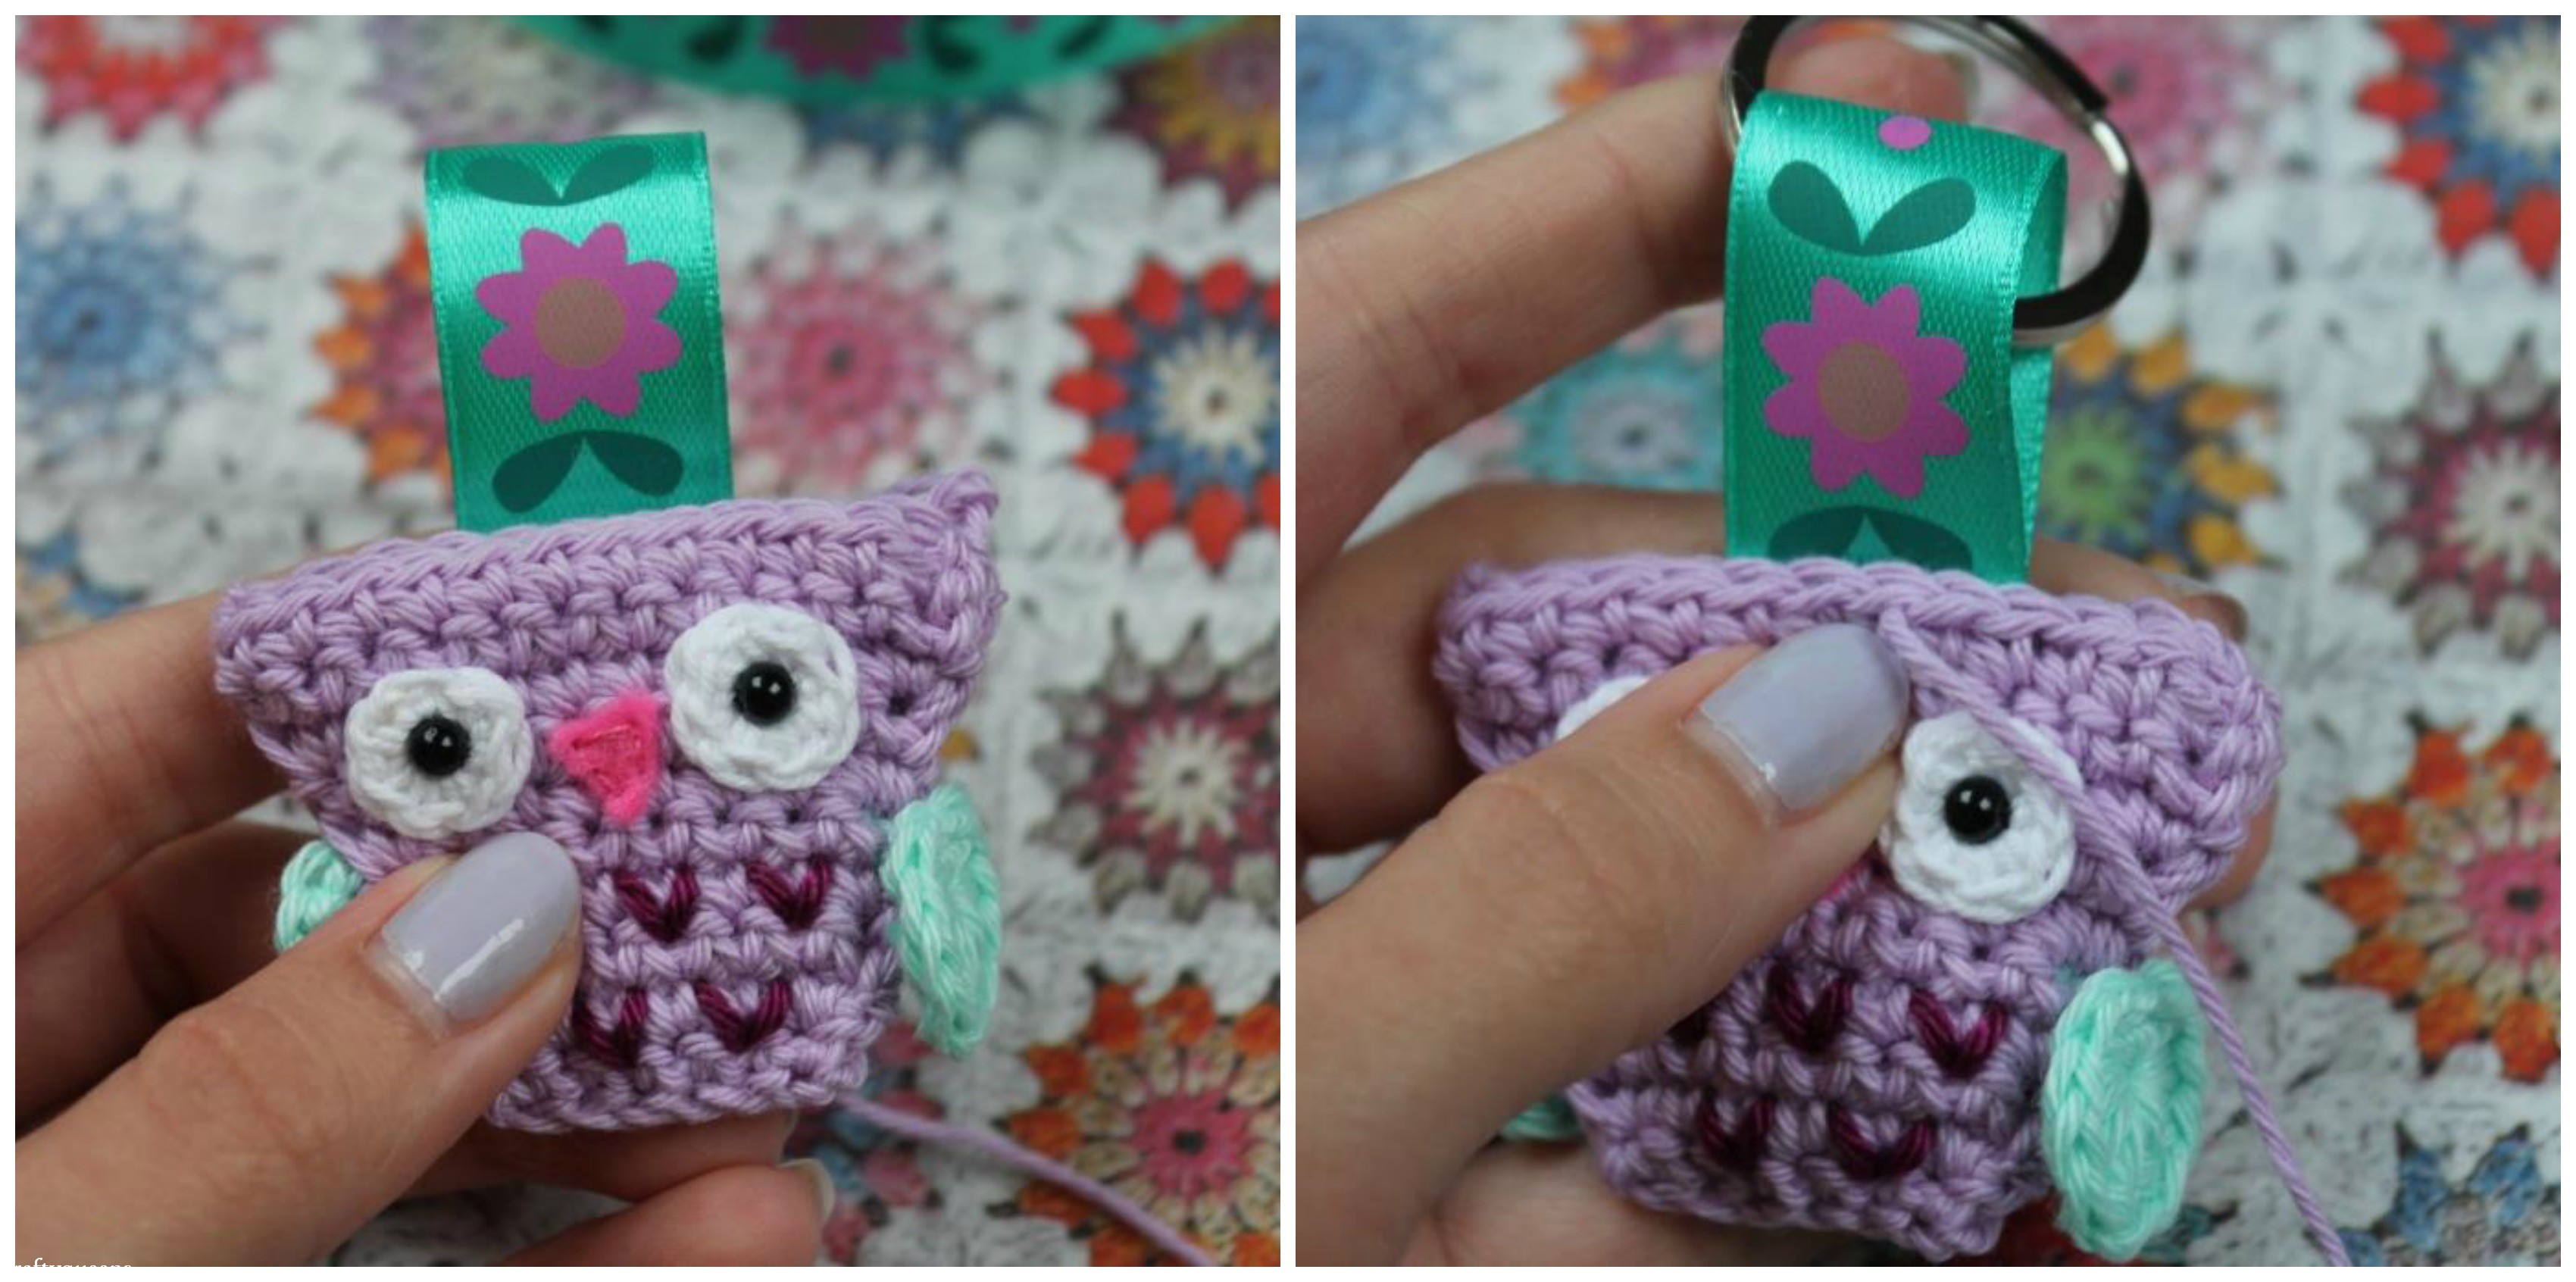
Trim it to the right length. Stuff your owl a little bit and sew the top edge together just until the part where you want to insert your ribbon. Fold the ribbon in half and place it in between the two sides. If you want to attach a keyring, do it now. Continue sewing along the top edge of the owl, poking through the ribbon as you go. Stuff it completely now and sew the rest closed.

Tadah! It’s that easy! Experiment with different colour combinations and before you know it, owls will take over every bag and purse you own! What would you attach it to?
*Dit patroon is door mijn moeder en ik bedacht, en we stellen het voor jullie beschikbaar onder voorwaarde dat je de uiltjes niet voor commerciële redenen maakt zonder mijn toestemming. Natuurlijk mag je er zoveel mogelijk maken voor jezelf en om cadeau te geven, of om te maken voor een goed doel. Het is niet toegestaan om dit patroon te kopiëren en ergens anders te delen of te verkopen, maar een link plaatsen naar dit patroon mag natuurlijk altijd. Dankjulliewel! *
Heb je zelf een uiltje gemaakt? Deel het dan op mijn Facebook pagina of op Ravelry!
Meer patronen vind je hier.
Mis geen enkele post meer, volg mij op Bloglovin’!
*This pattern was designed by my mom and myself, please respect our rights regarding this pattern. Don’t copy or sell this pattern, provide a link to this page instead. Also, while you are totally allowed to make as much as you want for yourself, as gifts or for charity, please don’t make them commercially without my consent. Thank you!*
Did you make an owl using this pattern? Please share your pictures on my Facebook page or Ravelry!
Find more of my patterns here.
Don’t miss out on any crafty stuff, follow my blog on Bloglovin’!