This pattern is written in both Dutch and English. The English parts are marked light grey. Turn off your translator to avoid confusion. 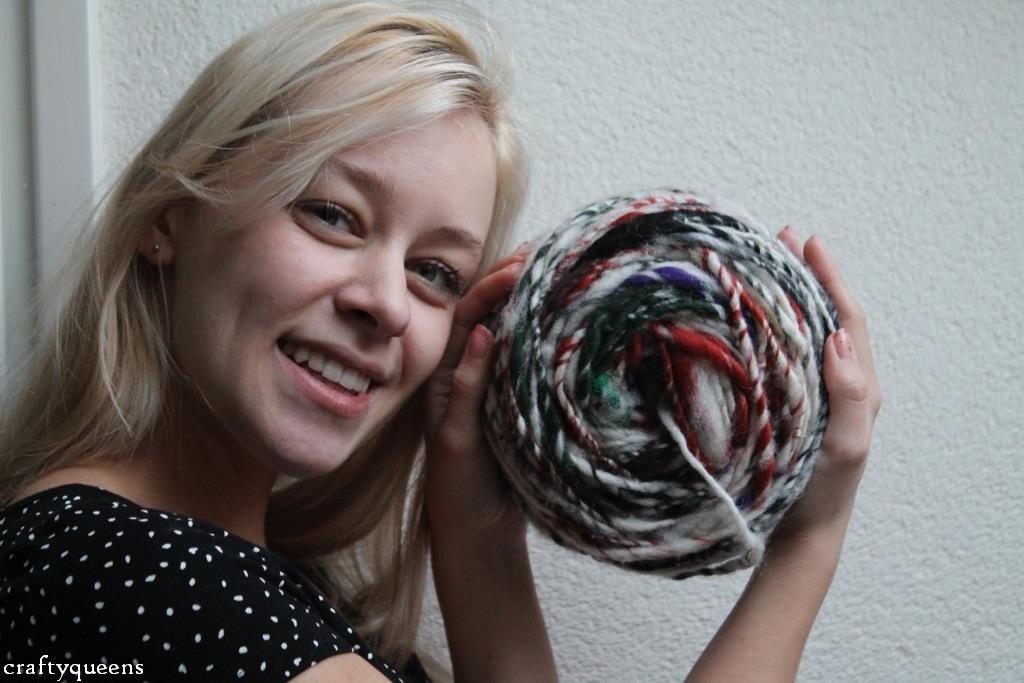
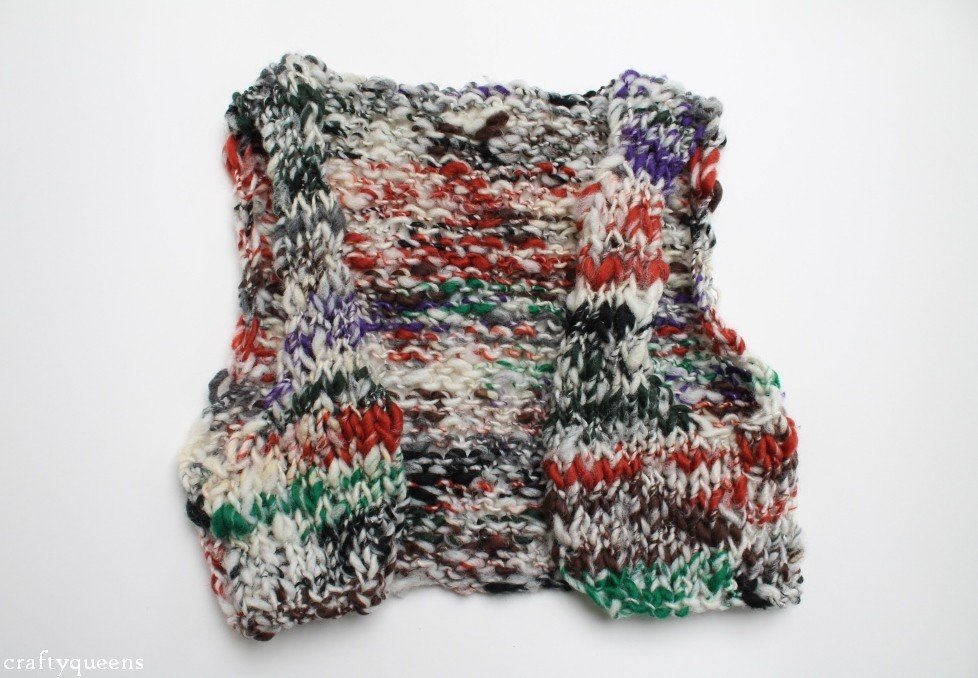
Admit it, you’ve bought yarn before while having no clue what to make from it. And of course, because you had no idea, you only bought one skein. But what can you really make with just one skein of yarn? I bought this yarn at a craft fair some time ago. It has wonderful colours and is the first handspun yarn I have ever bought. I wanted to make something really special with it! Not just an ordinary scarf, really something to show off those bright colours. Because of the uneven thickness of the yarn and the many colours, lace or cables weren’t really an option (or anything with an elaborate pattern, really). Simple stockinette stitch is best for this kind of yarn, so I decided to make a vest with it! With real chunky yarn like this, you only need about 100 grams (or maybe 150), and it works up really quickly! I bet you could finish it in a couple of hours. I used 14mm needles to make this vest. Be prepared that yarn this chunky might not fit through a regular darning needle.

Gebruikte afkortingen:
r = rechts
av = averechts
st = steken
sl1 = ‘slip 1’, je haalt 1 steek af zonder te breien, dit wordt hieronder verder uitgelegd
M1 = ‘make 1’, je haalt 1 steek op tussen de steken in, en breit hem dan. Zo creeër je een nieuwe steek (meerder techniek). Klik hier voor een duidelijke video-tutorial.
2av.sbr = 2 steken averechts samenbreien
2r.sbr = 2 steken rechts samenbreien
*…* = herhaal wat tussen de sterretjes staat tot het eind van de rij
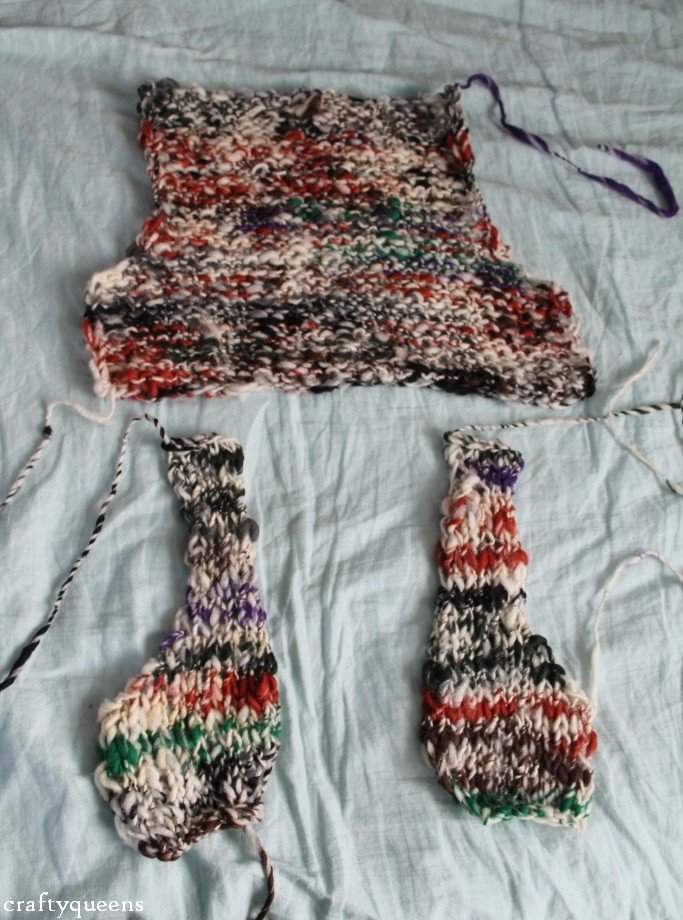
You’ll knit this vest in three parts: one backside and two front sides. Choose whichever side (knit or purl) you think looks nicer, and make that side the right side. It won’t matter for the pattern, but pay attention when you’re sewing it together.
Used abbreviations:
k = knit
p = purl
CO = cast off
sts = stitches
M1 = Make 1 stitch. This is an increasing technique, of which you can find a really nice tutorial over here.
sl 1 = slip 1 stitch
k2tog = knit 2 stitches together
p2tog = purl 2 stitches together
*…* = repeat what’s between the stars until the end of the row
Tip voor mooie zijkanten van je werk: Bij gewoon rechts/averechts breien krijg je een soort knoopjes aan weerszijden van je werk. Deze knoopjes vormen zich niet als je dit doet: De allereerste steek van élke toer brei je nooit. Dit houdt in dat je hem gewoon van je linkernaald op de rechternaald zet. Let wel op dat dit op twee verschillende manieren gaat, afhankelijk van of je op een rechtse of averechtse toer bent.
Bij een rechtse toer: Met de draad aan de voorkant, haal je de eerste steek af alsof je hem averechts gaat breien. Je steekt je naald dus van rechts naar links in de steek, en zet hem dan meteen op je rechternaald. Nu haal je de draad van voren naar achter, tússen de eerste en de tweede steek in. Brei de rest van de toer zoals beschreven, behalve de allerlaatste steek, die brei je namelijk altijd rechts.
Bij een averechtse toer: Bijna alles gaat hetzelfde zoals bij de rechtse toer. Haal dus de steek af alsof je hem averechts gaat breien. Je garen was al aan de voorkant, en het blijft ook daar voor de averechtse steken. Je hoeft hem dus niet naar de andere kant van je werk te halen. De laatste steek brei je altijd rechts.
Dit klinkt misschien best moeilijk om te onthouden, maar ik doe het nu zelfs zonder na te denken! Deze techniek wordt ook wel de kettingrand genoemd. Deze techniek pas je toe op alle rijen, ook als het er niet staat.
Tip: If you want the edges of your work to be nice and smooth, follow these directions:
On a knit row: Slip the first stitch purlwise with your yarn in front, don’t knit it. Then, take your yarn to the back of the work in between the first and the second stitch. Knit as the pattern states, except for the last stitch: you always knit this stitch.
On a purl row: Slip the first stitch purlwise with your yarn in front, don’t knit it. You don’t need to pass your yarn to the other side, just keep it in front for the purling of the next stitches. You always knit the last stitch.
That’s it! This way there won’t be any knots on the side of your work, it will look like a braid instead. This technique is applied to ALL rows, the pattern will only explicitly state this in some rows.
Achterpand:
Zet 33 steken op.
1. *r* (dus: brei alle 33 steken rechts)
2. *av*
Ga zo door tot je 10 rijen hebt gebreid (eindig met een averechtse rij).
11. Kant de eerste twee steken af, *r*. (31 st)
12. Kant de eerste twee steken af, *av* (29 st)
13. Kant de eerste steek af, *r* (28 st)
14. Kant de eerste steek af, *av* (27 st)
15. Kant de eerste steek af, *r* (26 st)
16. Kant de eerste steek af, *av* (25 st)
17 – 31. Brei de oneven rijen rechts, en de even rijen averechts. Gebruik eventueel een steek marker in rij 17 om het tellen van de rijen gemakkelijker te maken.
32. Kant alle 25 steken af
Back Panel
Cast on 33 stitches
1. *k*
2. *p*
Repeat until you’ve knit 10 rows, ending with a purl row.
11. CO 2 sts, *k* (31 sts)
12. CO 2 sts, *p* (29 sts) Don’t forget to knit the last stitch
13. CO 1 st, *k* (28 sts)
14. CO 1 st, *p* (27 sts)
15. CO 1 st, *k* (26 sts)
16. CO 1 st, *p* (25 sts)
17 – 31. Knit all uneven rows, purl all even rows. Place a stitch marker on row 17 for easier counting
32. CO all 25 stitches
Voorkant 1. Dit is de linkerkant van je giletje als de rechtse kant de ‘goede’ kant is.
Zet 8 steken op
1. *r*
2. sl1, M1, 1av, M1, av tot eind (vergeet niet de laatste rechts te breien) (10 st)
NB: Hier gebruik je de M1 techniek in een averechtse toer. Je gebruikt alsnog hetzelfde ‘lusje’, maar breit deze averechts in plaats van rechts. Als het je niet lukt om de achterste lus te breien, brei dan de voorste lus.
3. *r*
4. sl1, M1, *av* (11 st)
5. *r*
6. sl1, M1, *av* (12 st)
7. *r*
8. *av*
9. *r*
10. *av*
11. Kant de eerste twee steken af, *r* (10 st)
12. *av*
13. Kant de eerste steek af, *r* (9 st)
14. *av*
15. Kant de eerste steek af, *r* (8 st)
16-25 Brei de even toeren averechts, en de oneven toeren rechts. Tip: Plaats een marker in rij 16, dit kan zo simpel zijn als een paperclip. Dit helpt om de rijen vanaf 16 te tellen.
26. sl1, 2av.sbr, *av* (7 st)
27. *r*
28. sl1, 2av.sbr, *av* (6 st)
29. *r*
30. *av*
31. *r*
32. Kant alle steken af.
Tip: Als je garen ook onregelmatig gesponnen is zoals het mijne, kan het zijn dat je voorpand op rij 32 nog niet dezelfde lengte heeft als het achterpand. Als dit zo is, voel je dan vrij om nog een extra toer te breien en in toer 33 pas af te kanten.
Front Panel 1. This is the left panel if your knit side is the right side.
Cast on 8 sts
1. *k*
2. sl1, M1, p1, M1, p5, k1 (10 sts)
3. *k*
4. sl1, M1, p until end (don’t forget to knit the last stitch) (11 sts)
5. *k*
6. sl1, M1, *p* (12 sts)
7. *k*
8. *p*
9. *k*
10. *p*
11. CO first 2 sts, *k* (10 sts)
12. *p*
13. CO 1 st, *k* (9 sts)
14. *p*
15. CO 1 st, *k* (8 sts)
16 – 25 Knit all uneven rows, purl all even rows. Use a stitch marker if necessary.
26. sl1, p2tog, *p*(7 sts)
27. *k*
28. sl1, p2tog, *p* (6 sts)
29. *k*
30. *p*
31. *k*
32. CO all stitches. If the front and back panels don’t match in length, knit another row and then CO.
Voorpand 2. Dit is de rechterkant als je rechtse kant de ‘goede’ kant is.
Zet 8 steken op.
1. *r*
2. *av*
3. sl1, M1, 1r, M1, *r* (10 st)
4. *av*
5. sl1, M1, *r* (11 st)
6. *av*
7. sl1, M1, *r* (12 st)
8-11 Brei alle oneven rijen rechts, en alle even rijen averechts
12. Kant de eerste twee steken af, *av* (10 st)
13. *r*
14. Kant 1 steek af, *av* (9 st)
15. *r*
16. Kant 1 steek af, *av* (8 st)
17 – 26 Brei alle oneven rijen rechts, en alle even rijen averechts. Gebruik weer een marker voor gemakkelijk tellen van de rijen.
27. sl1, 2r.sbr, *r* (7 st)
28. *av*
29. sl1, 2rsbr, *r* (6 st)
30. *av*
31. *r*
32. *av*
33. Kant alle steken af.
Front Panel 2. If the knit side is the right side, then this is your right front panel.
CO 8 sts
1. *k*
2. *p*
3. sl1, M1, k1, M1, k6. (10 sts)
4. *p*
5. sl1, M1, *k* (11 sts)
6. *p*
7. sl1, M1, *k* (12 sts)
8 – 11 Knit all uneven rows, purl all even rows.
12. CO 2 sts, p9, k1 (10 sts)
13. *k*
14. CO 1, p8, k1 (9 sts)
15. *k*
16. CO 1, p7, k1 (8 sts)
17 – 26. Knit all uneven rows, purl all even rows.
27. sl1, k2tog, k5 (7 sts)
28. *p*
29. sl1, k2tog, k4 (6 sts)
30. *p*
31. *k*
32. *p*
33. CO all sts.
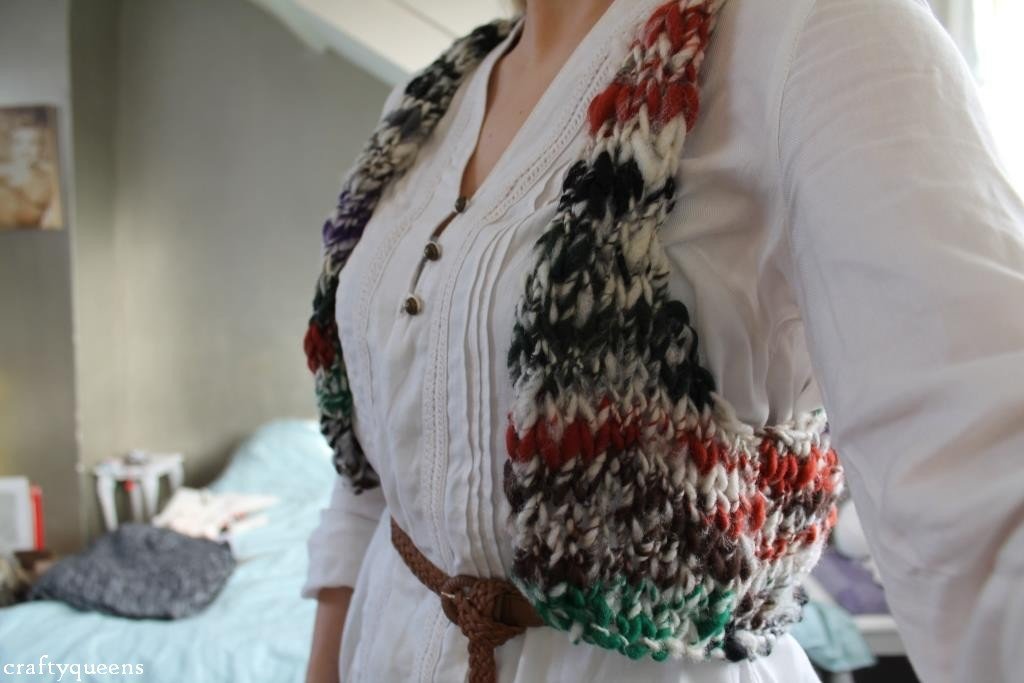
Almost finished now! Decide which side you want up, and sew the parts together using the mattress stitch for an invisible seam. Et voilà, your knitted vest is done! Wear it with a cute dress or a bohemian looking blouse. There wasn’t anybody available to take pics of me wearing it, so please bear with my selfies, haha. Upload your own pics to Ravelry if you’ve made this vest yourself!